
Energy storage is becoming more and more interesting to smart home owners and we recently spotted this write up of a Tesla Powerwall 2 installation on Michael Vorstermans Blog. A great account of the practicalities of installing the domestic battery, how it functions and the finances behind it. Read on for all the details….
Late last year, Elon Musk surprised everyone by announcing a new version of Tesla’s less-than-a-year-old Powerwall home battery system, with double the capacity for the same dough.
 The other players in this industry must have been gnashing their teeth, but bravely soldiered on with the expectation that “it’ll take them forever to deliver”.
Not so – my Powerwall2 was installed yesterday, one of the first in New South Wales, Australia – read on for the blow-by-blow and decide if you also want to be free from power blackouts and 3-figure power bills.
What is a Powerwall Anyway?
If you don’t yet know what a Powerwall2 is, read this section – if you do, skip to the next heading.
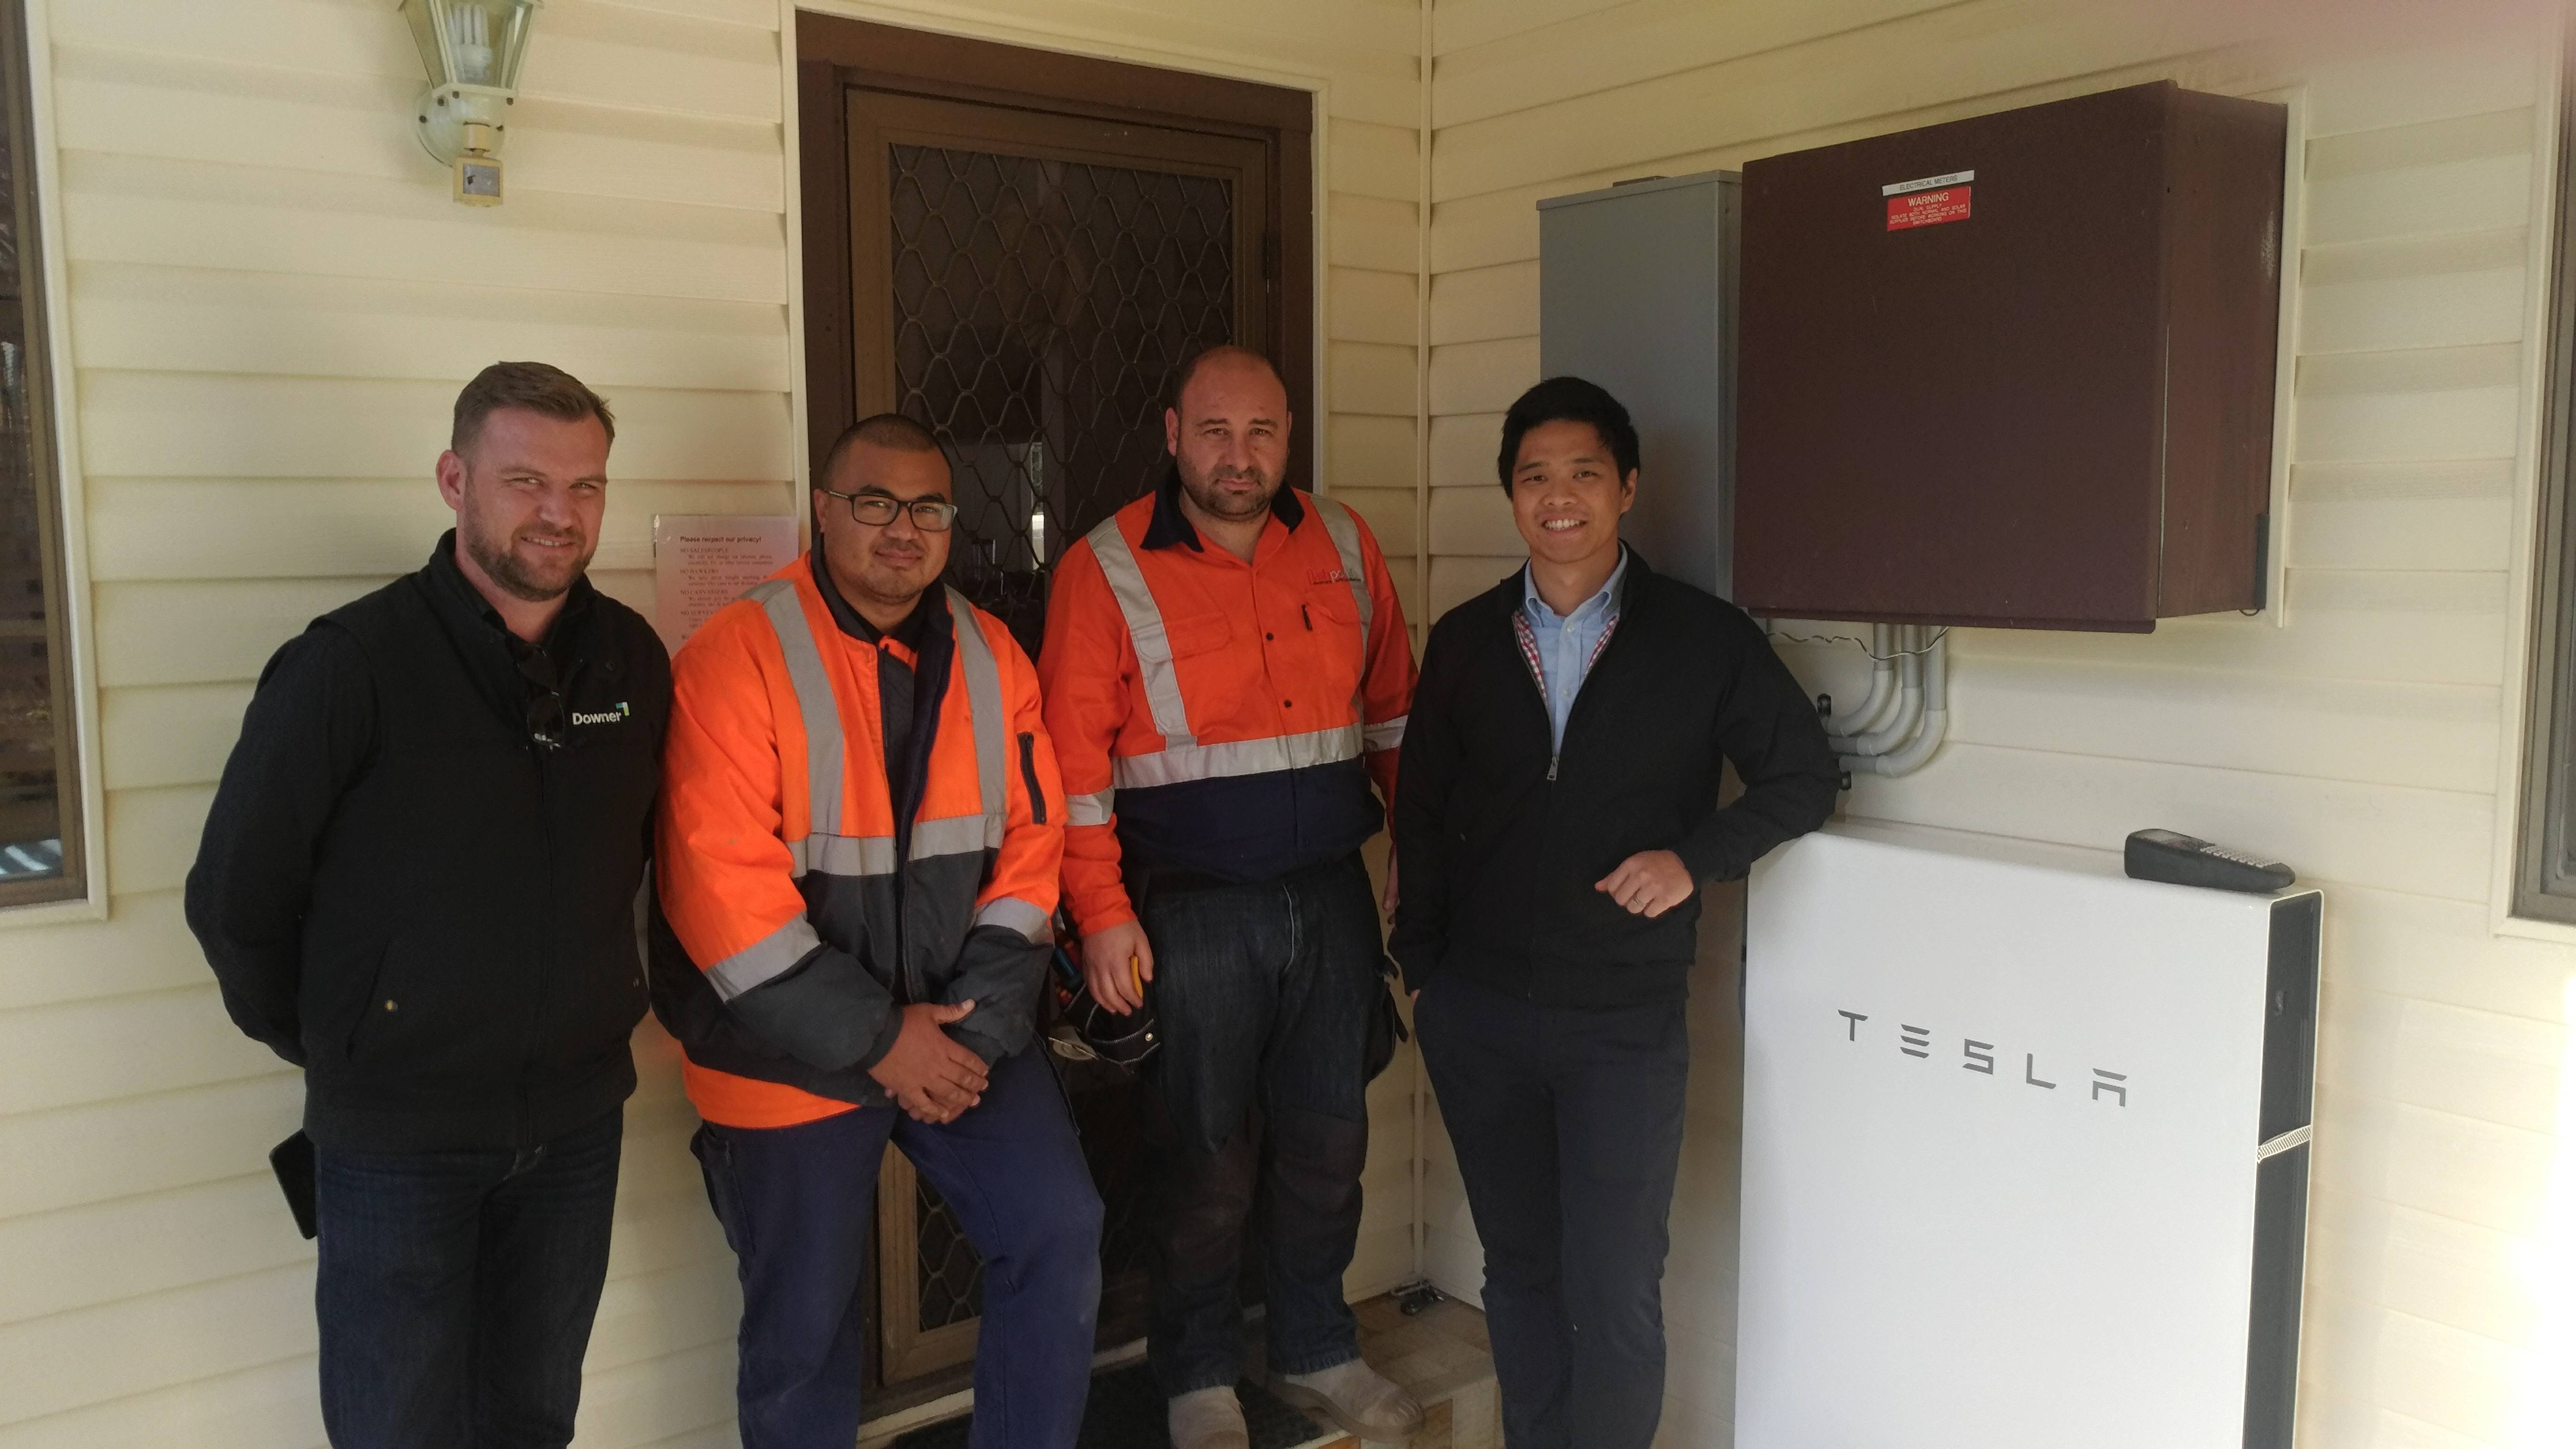
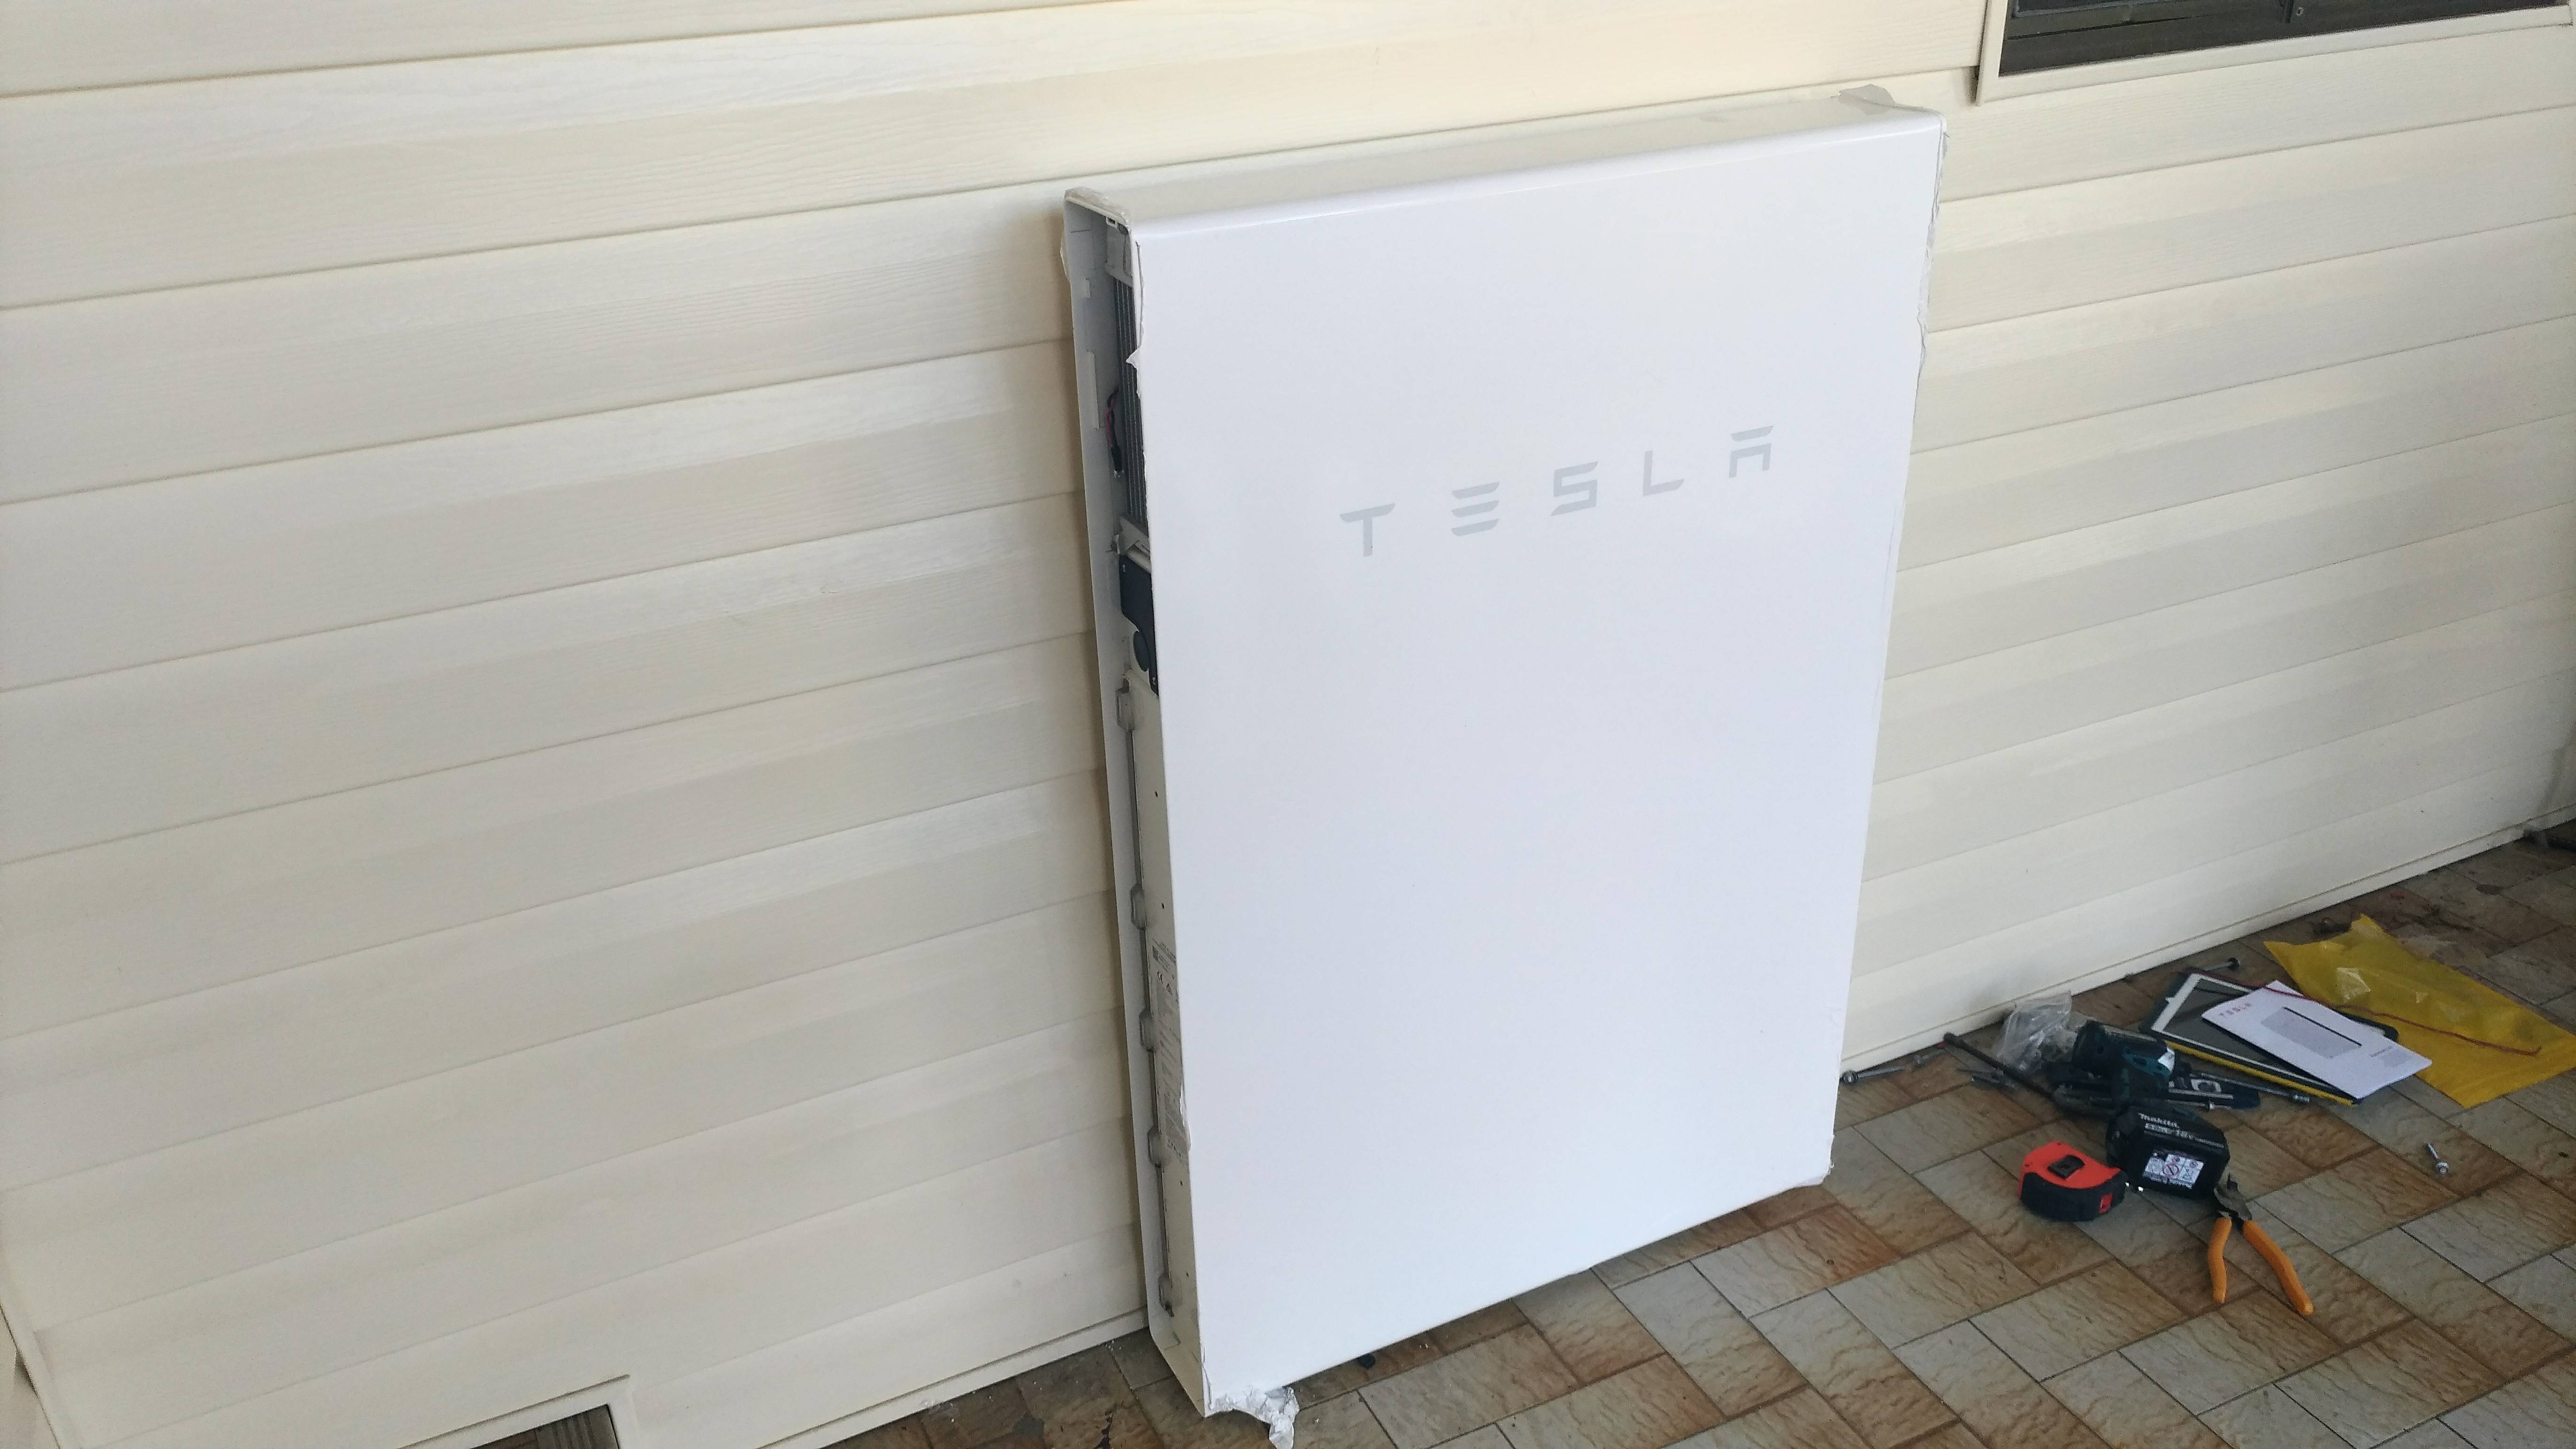
 Simply put, it’s a slim, no-maintenance, weatherproof and near-silent rechargeable Lithium battery system with the front profile of a bar-fridge, located near your power board, paired with a Gateway box that manages power flows from and to your home and the battery system.
Inside it, there’s heaps of cylindrical battery cells, assembled into packs, which will also be used to power the upcoming Model 3 electric car.
They are made in Tesla’s Nevada Gigafactory, and packaged inside a shiny white-painted steel enclosure, along with a charger, inverter, and water-cooling system.
The system has an installed cost of just over $10,700 in Sydney [Ed: currently £5,900 + installation in the UK] and you can get one with around a 2 month lead time today.
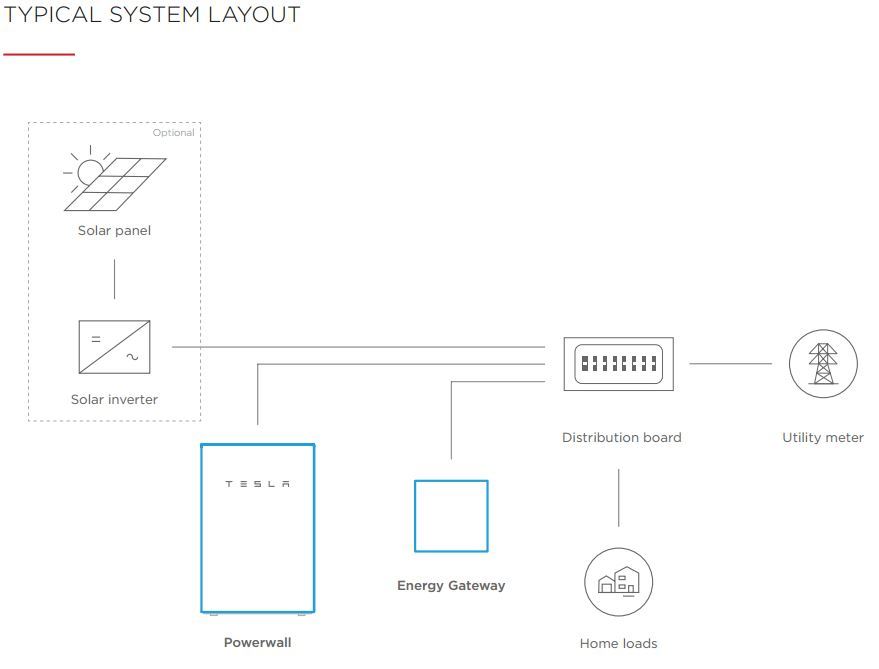
It’s designed to save the output of your solar power system during the day, so when the sun sets (when your solar generation falls away), it will power your entire house until it’s nearly discharged. And, if there’s a power blackout, the PW2 switches to powering your house from the battery instantly, so you still have power for your entire home until power gets restored, or the battery runs down.
It’s capable of supplying 13 kWhr, or so, of stored energy when fully charged, which for most homes will carry them through the night, and therefore saving you the cost of the power you would otherwise have to buy. The power level it can handle is 5kW Steady, 7kW Peak, enough to run most kitchen appliances, a split-system airconditioner, or even charge a short-range electric car (such as a Mitsubishi Outlander PHEV, which only draws 2KW to charge, taking 5 hours).
For me, with 4.8KW of paid-off solar on my roof, a rough calculation says the PW2 could pay for itself in 6 to 9 years, and it’s warranted for 10. If you don’t have solar power, it’s not for you, but given prices for power are only going to rise, you should consider getting solar cells anyway, if you own your home and have roof space available. I’ll go through the financial aspects in detail towards the end.
The Install Process
I reserved a Powerwall2 via Tesla’s site in October last year – it’s a quick and painless process, pricing is entirely available online, it’s transparent and up front, so you have no need to chase around for quotes.
 This is a significant advantage Tesla has, as there’s more than a few cowboys in this industry in Australia. Tesla’s checkout took a $500 deposit by credit card at order time, they followed up with several phone calls over the intervening months, a contractor (Downer EDI) did a site visit a few weeks before install, and then Tesla requested payment by bank transfer for the balance of the $10k this week.
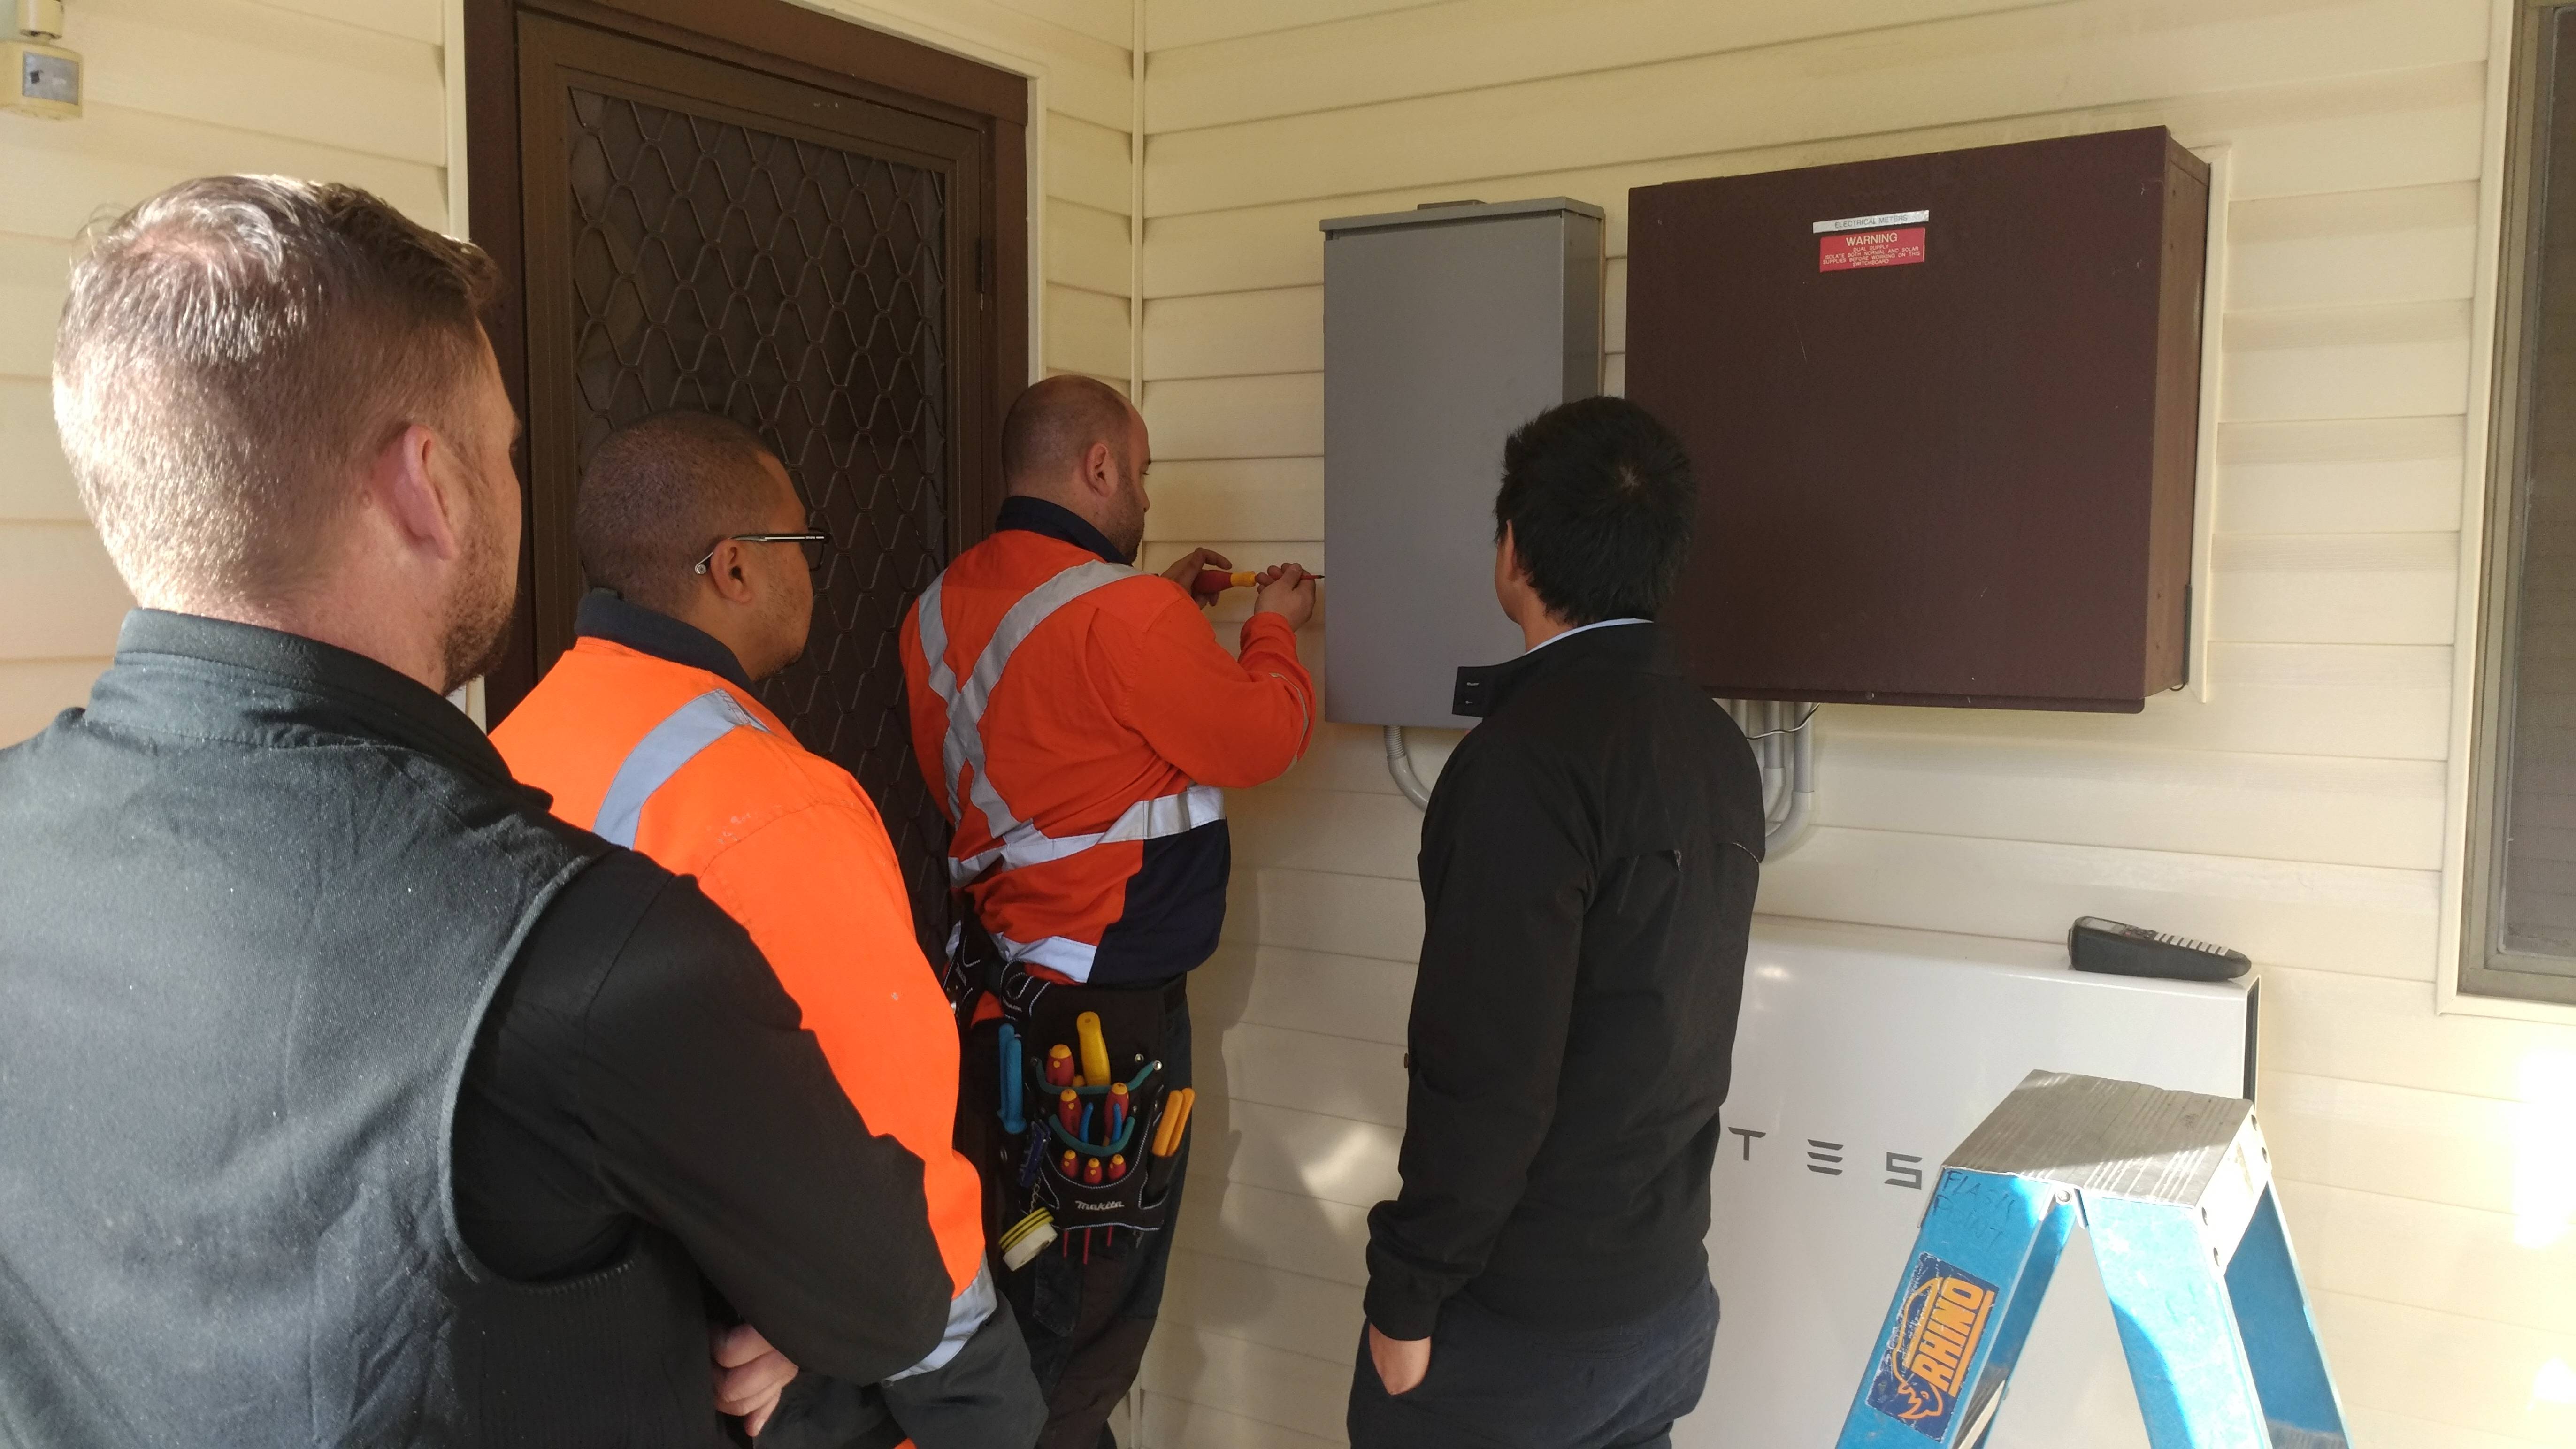
7.00am: Two tradie vans arrived promptly as promised, from a local solar outfit called Flash Point Solar in Punchbowl. Another guy from Downer also arrived to supervise. As it turns out, this was the first install for all of them.
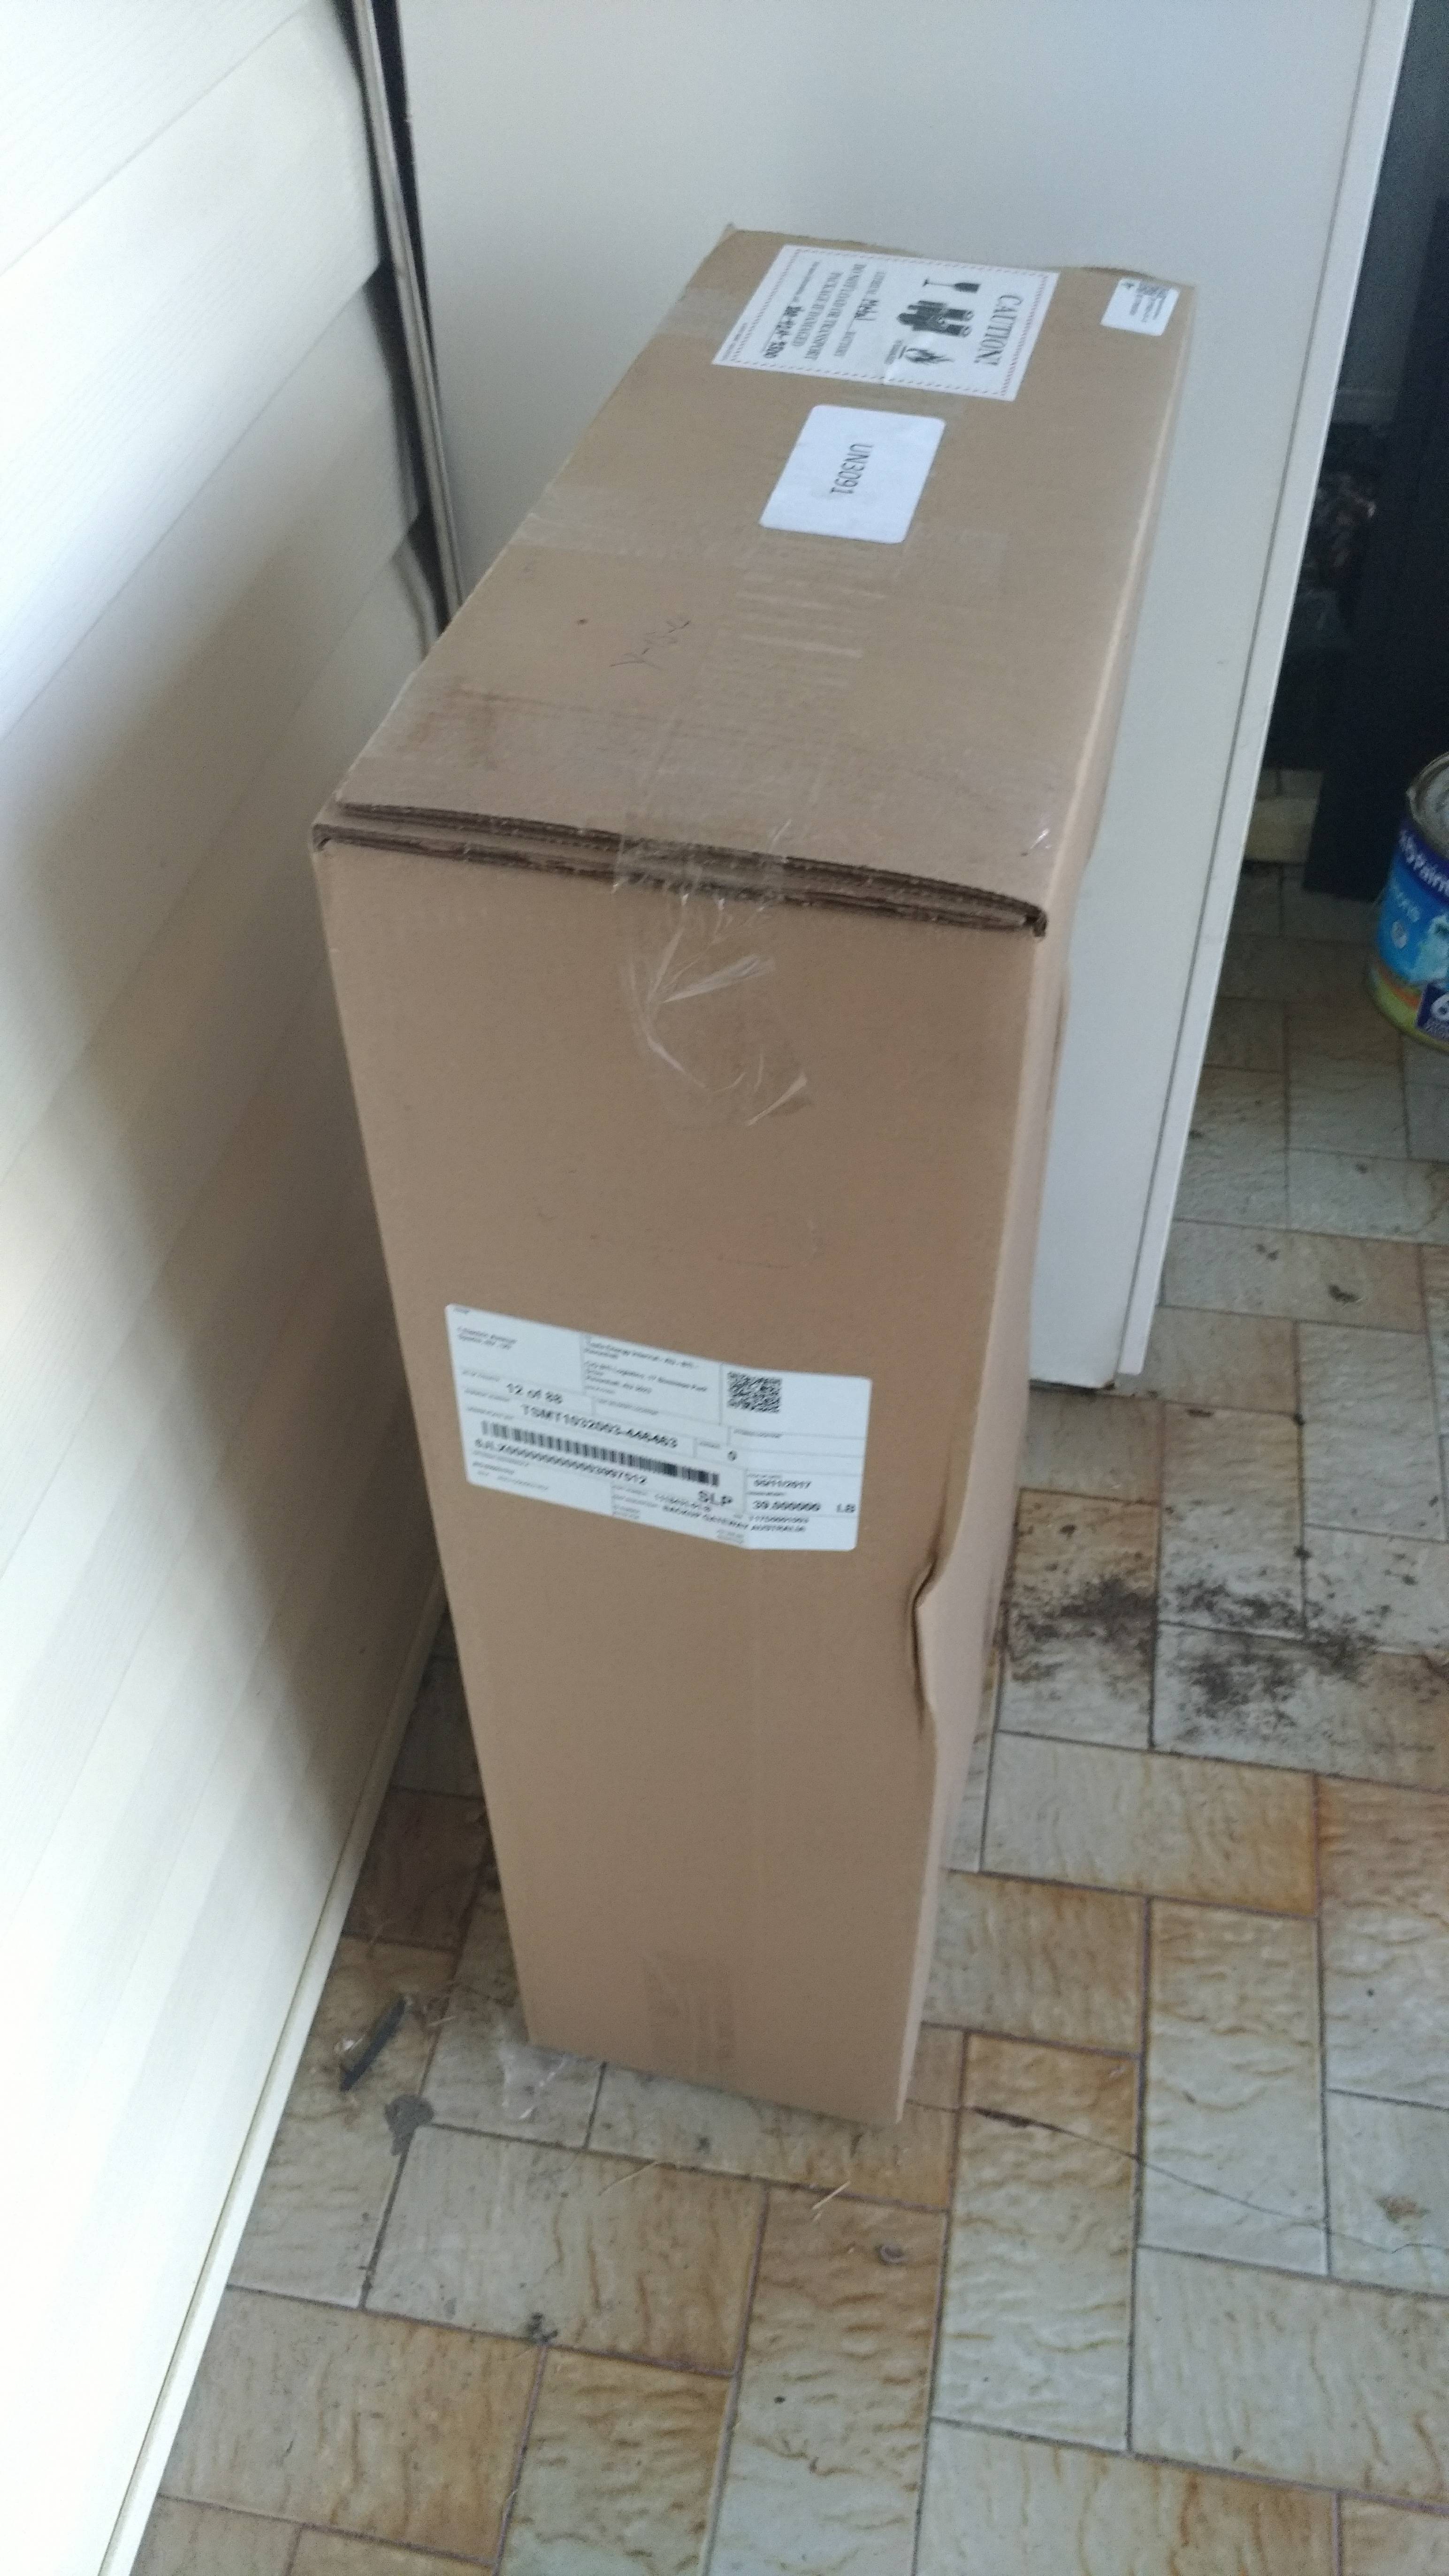
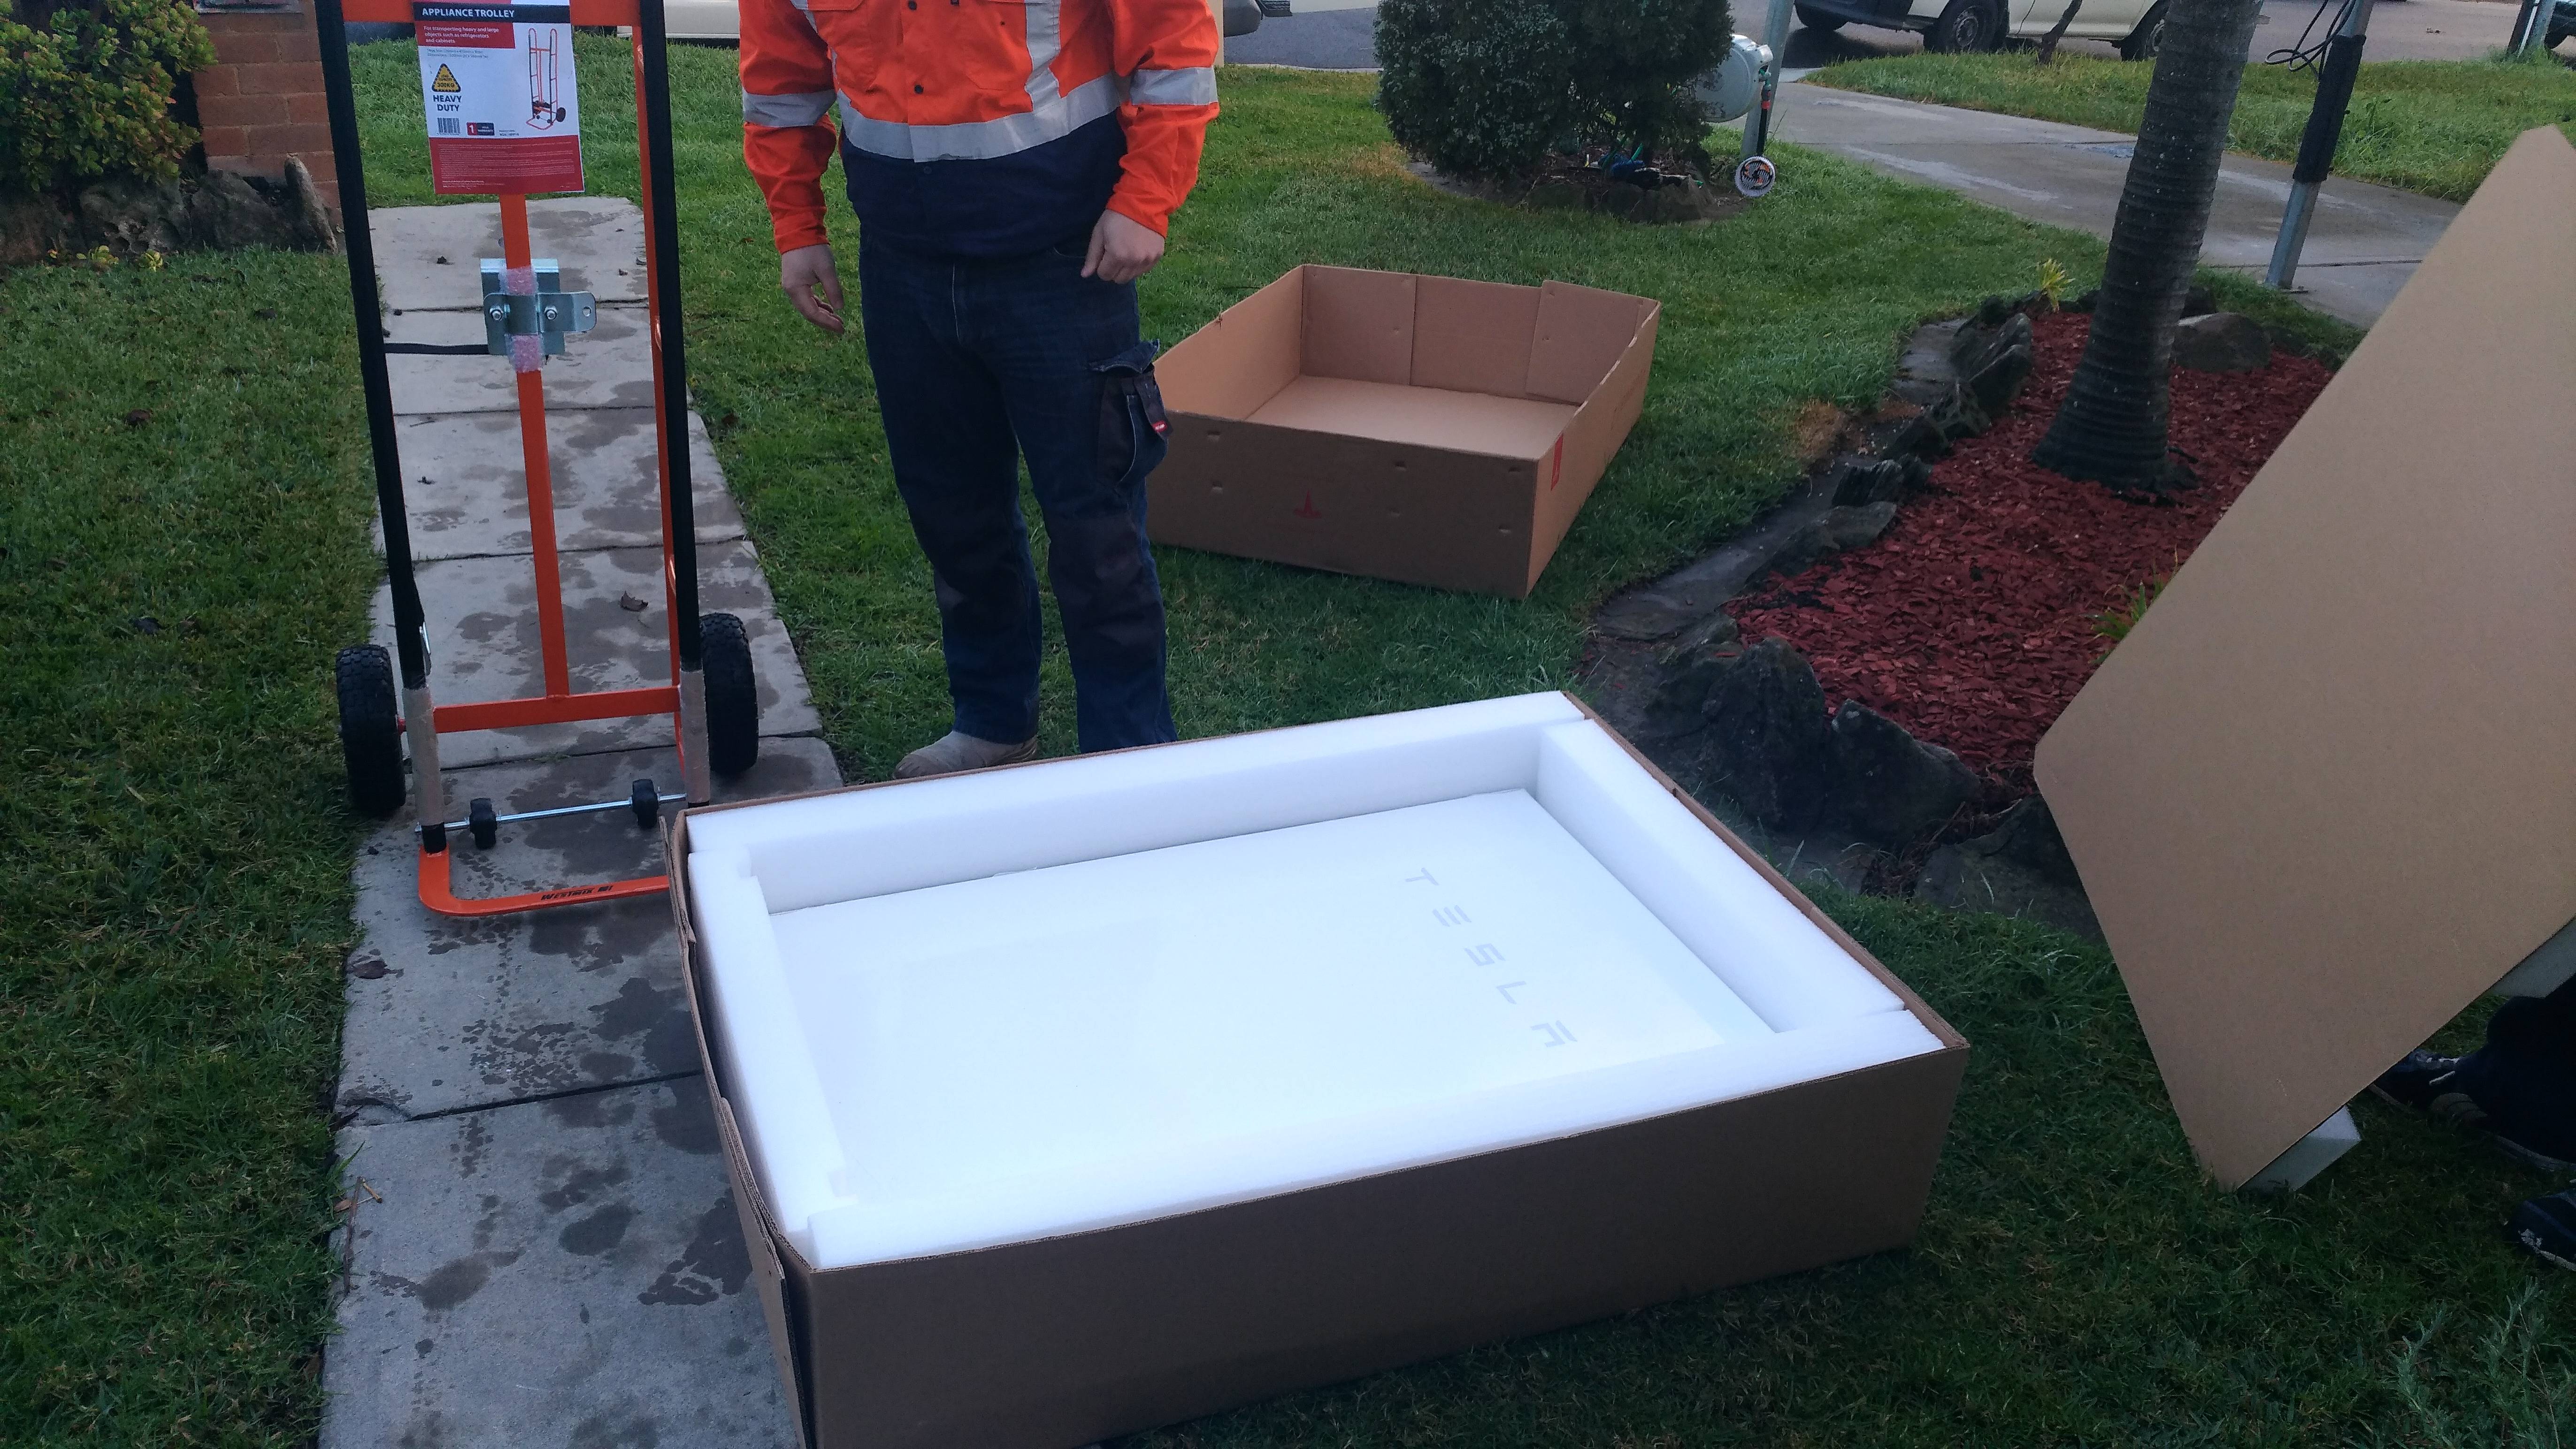
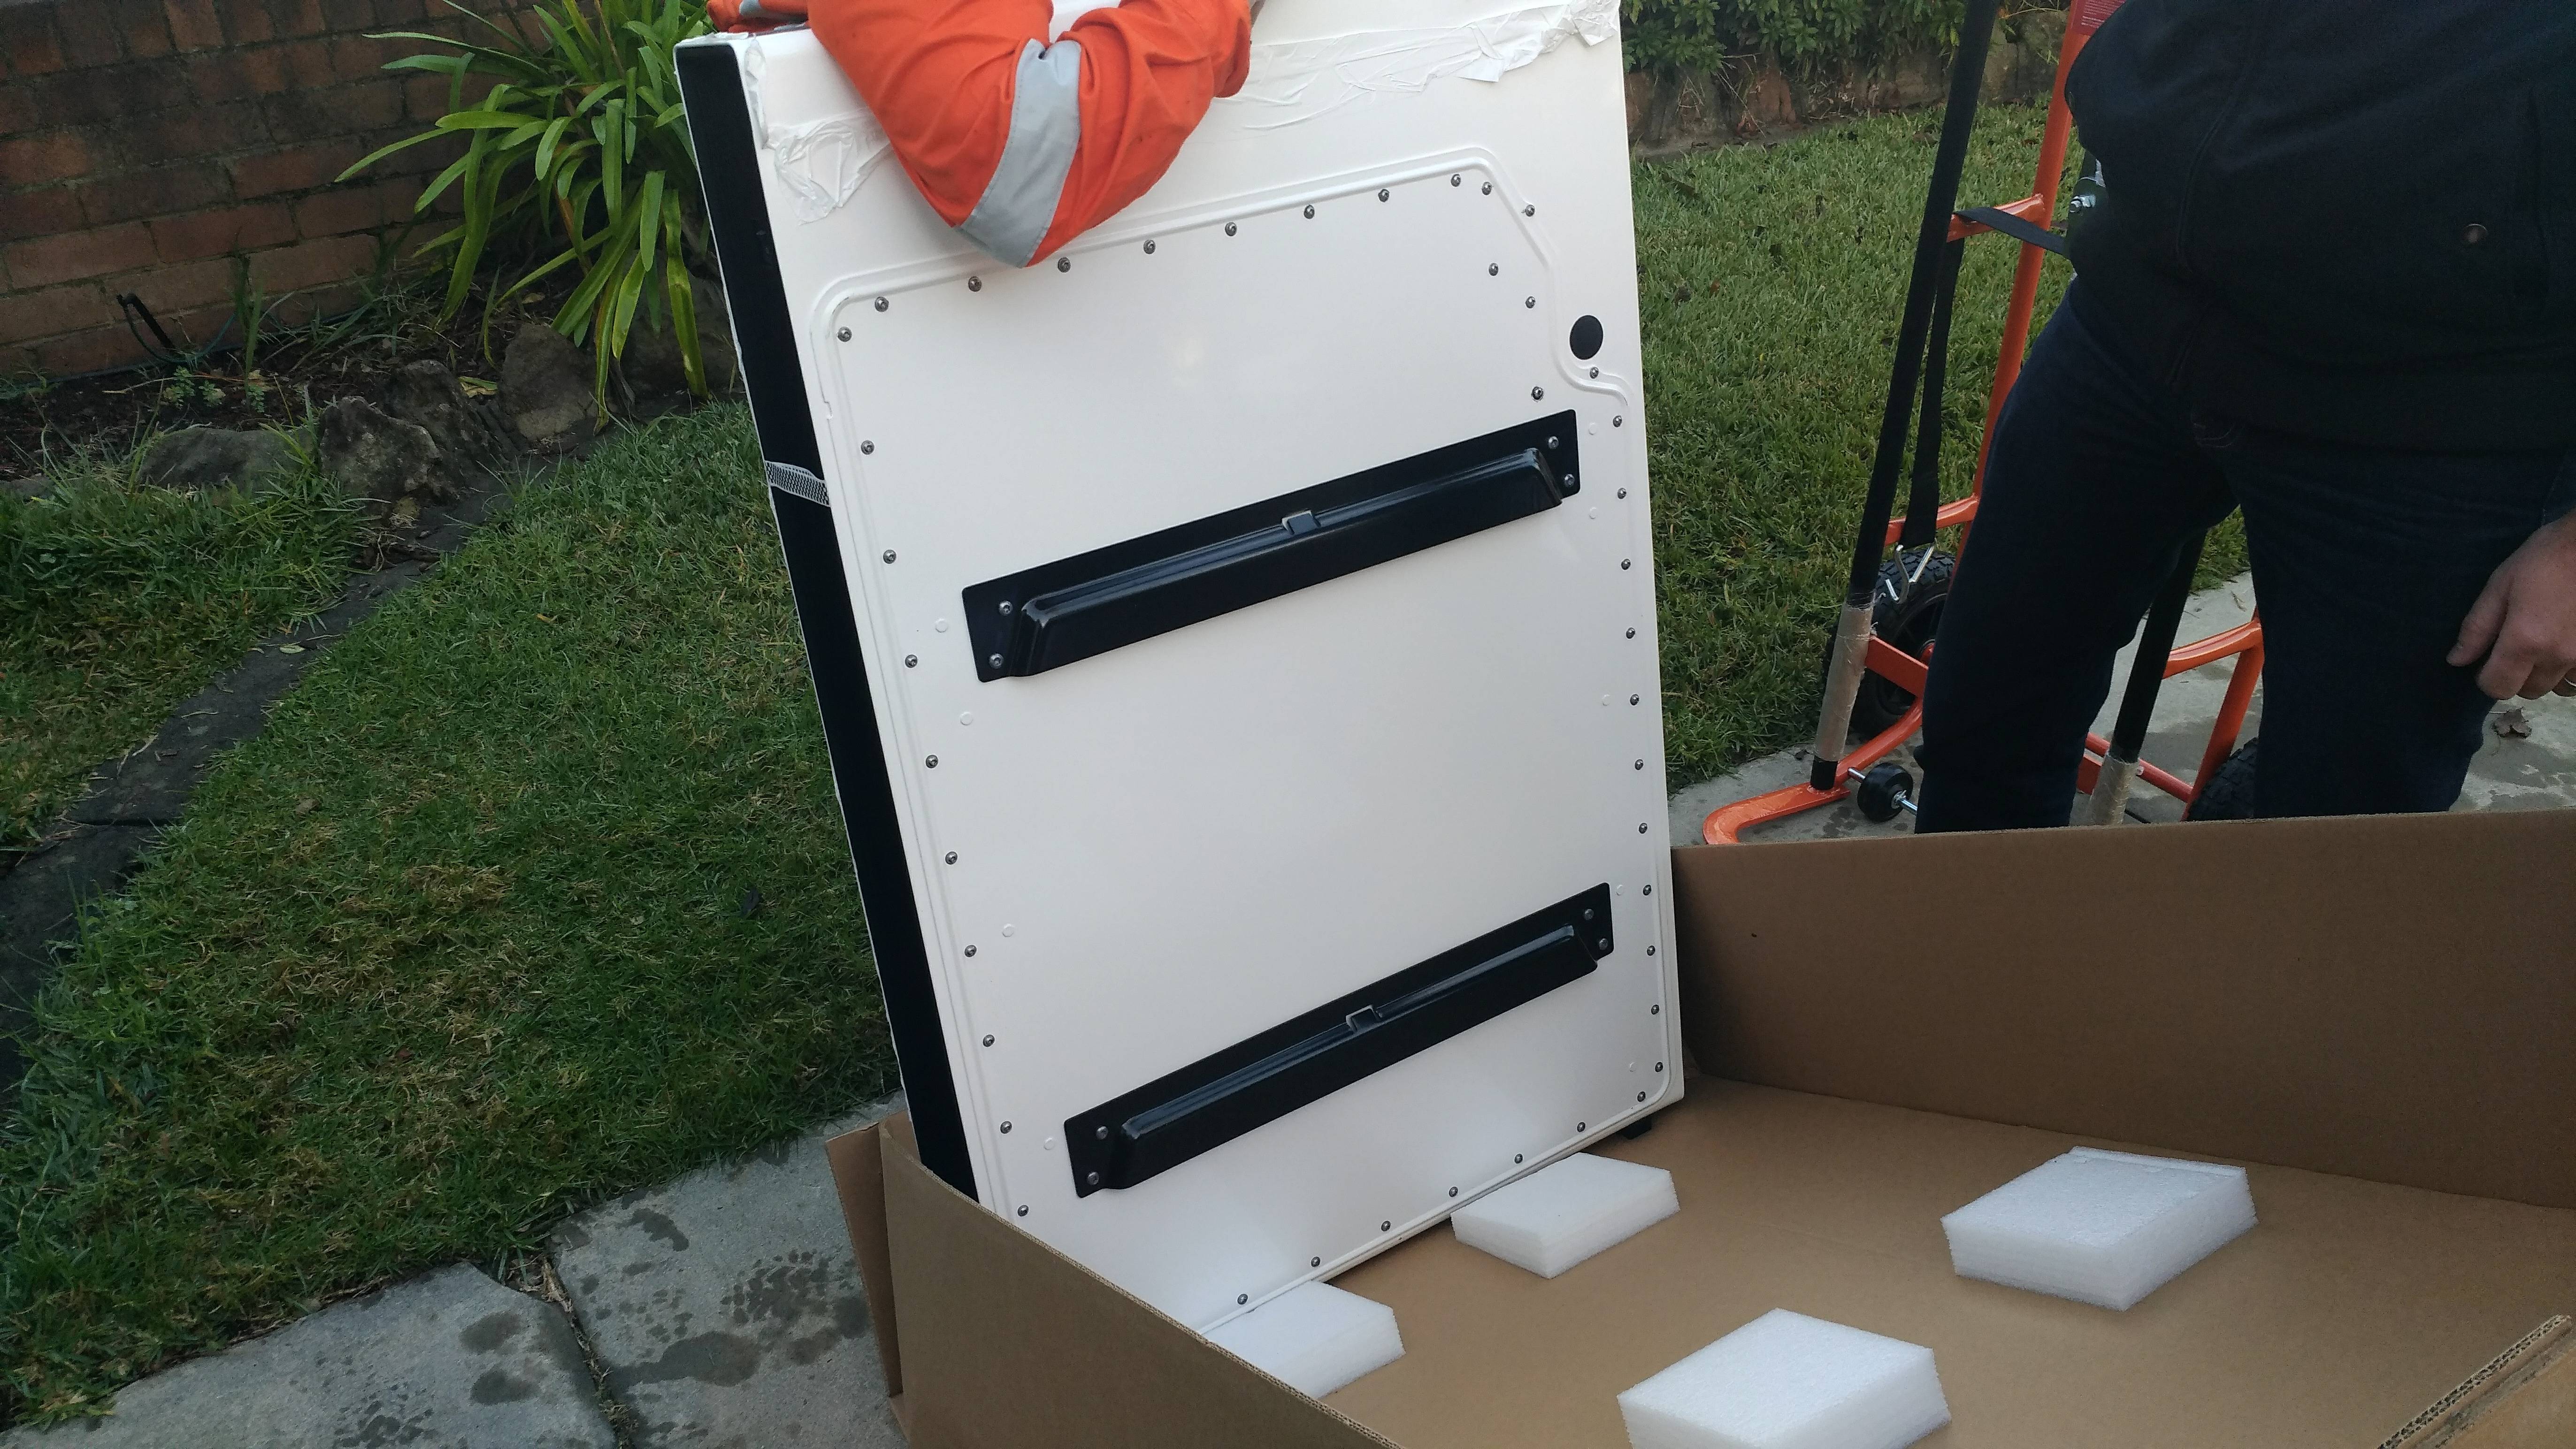
The gear came in two large cardboard boxes – the Gateway, and the Powerwall2 itself. The PW2 weighs over 125kg (290 pounds says the sticker, but another one next to it says 67Kg, so clearly the whole “metric system adoption” in the US still has some bugs in it), with the result that a trolley is needed to shift it around. It is just wide enough to fit through a standard door.
8.00: Hardest part so far is figuring out where the wall studs are for the mounting bracket. My house has plastic cladding, so they can’t easily find the studs. .
The PW2 is expected to rest on the ground on feet, and the bracket is meant to prevent it from tipping over.
8.30: Looks like they are working it out as they go – 5 guys here now – 3 from Downer, of which 2 were here just to learn, and they said they had done some training with a prototype.
9.00: Mounted, and then had to remove it.
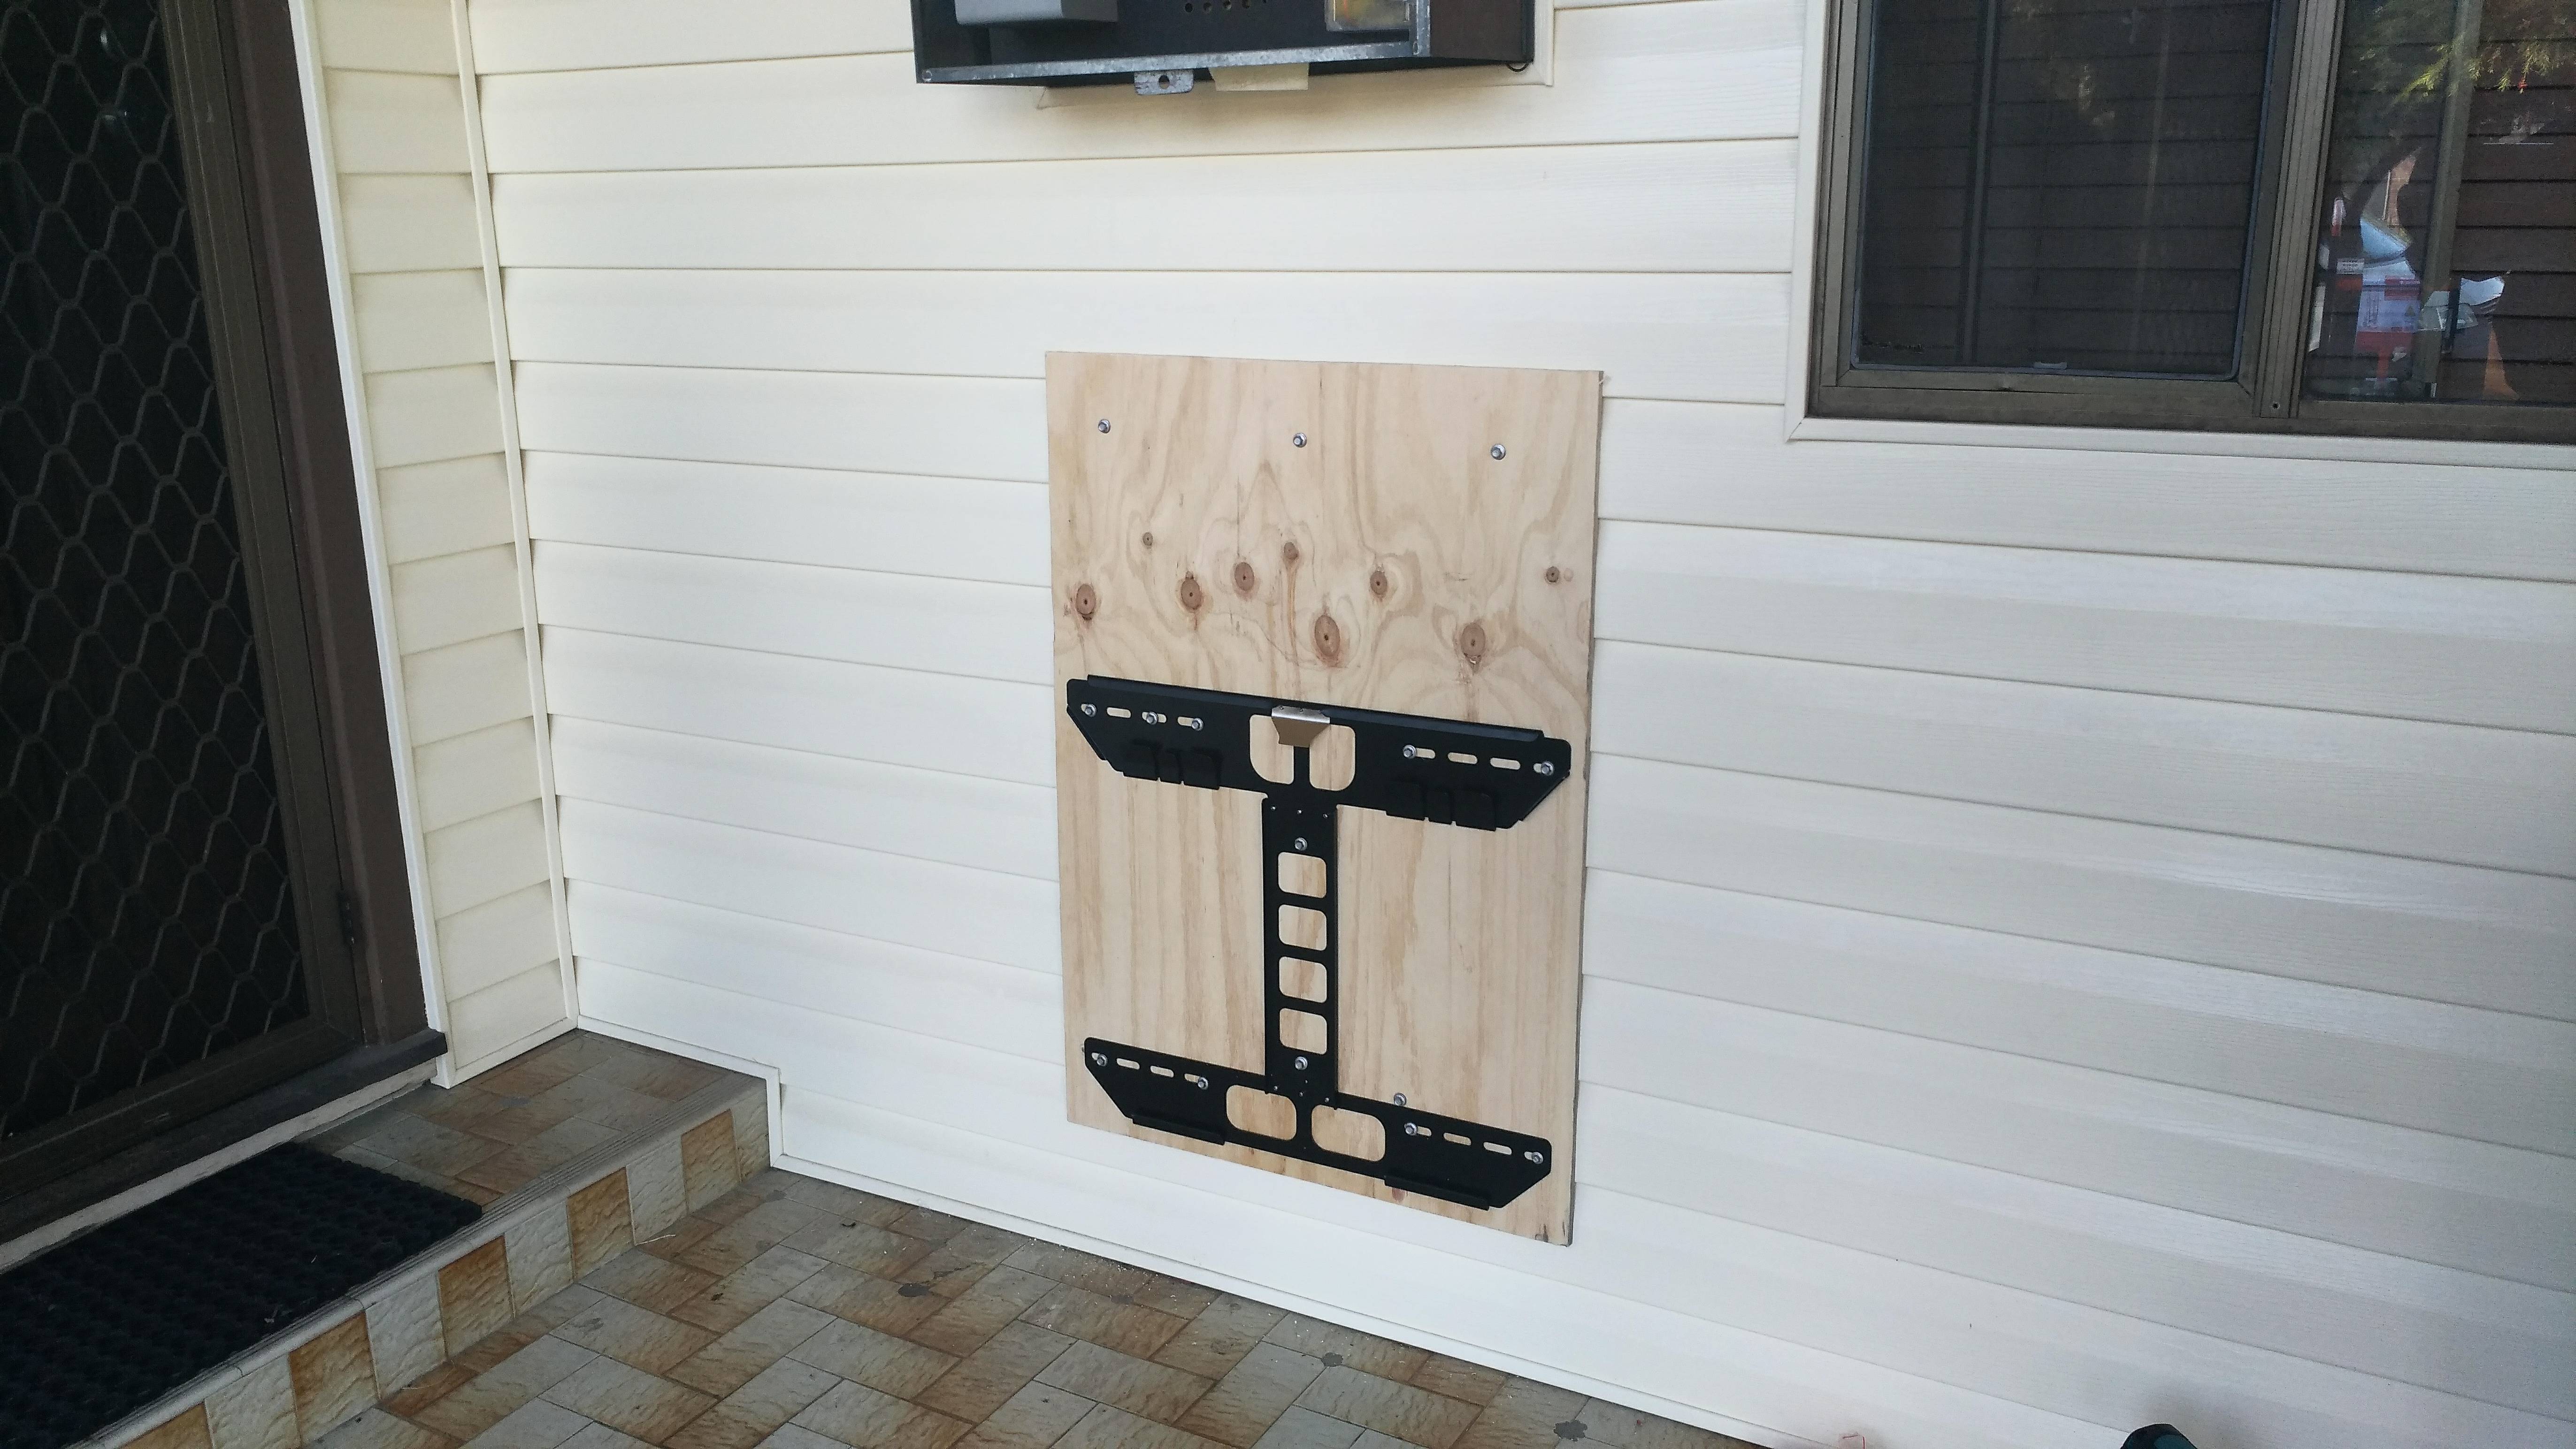
They ended up putting a big piece of ply against the cladding to help spread the load (and give them more opportunities to bolt into the elusive frame studs). Since they didn’t allow for the height of the PW2 bracket placement before bolting the ply to the wall, the ply ended up sticking out beyond the top of the PW2. The mounting bracket has a silver spring clip in the middle of the “T” that locks the frame to the PW2, and the clip can only be accessed with something very long and thin, like a spring-steel ruler. I made them a feeler to dismount it, (Tesla didn’t provide any tools with the PW2), and they pulled it off, and cut the ply down so it wasn’t visible.
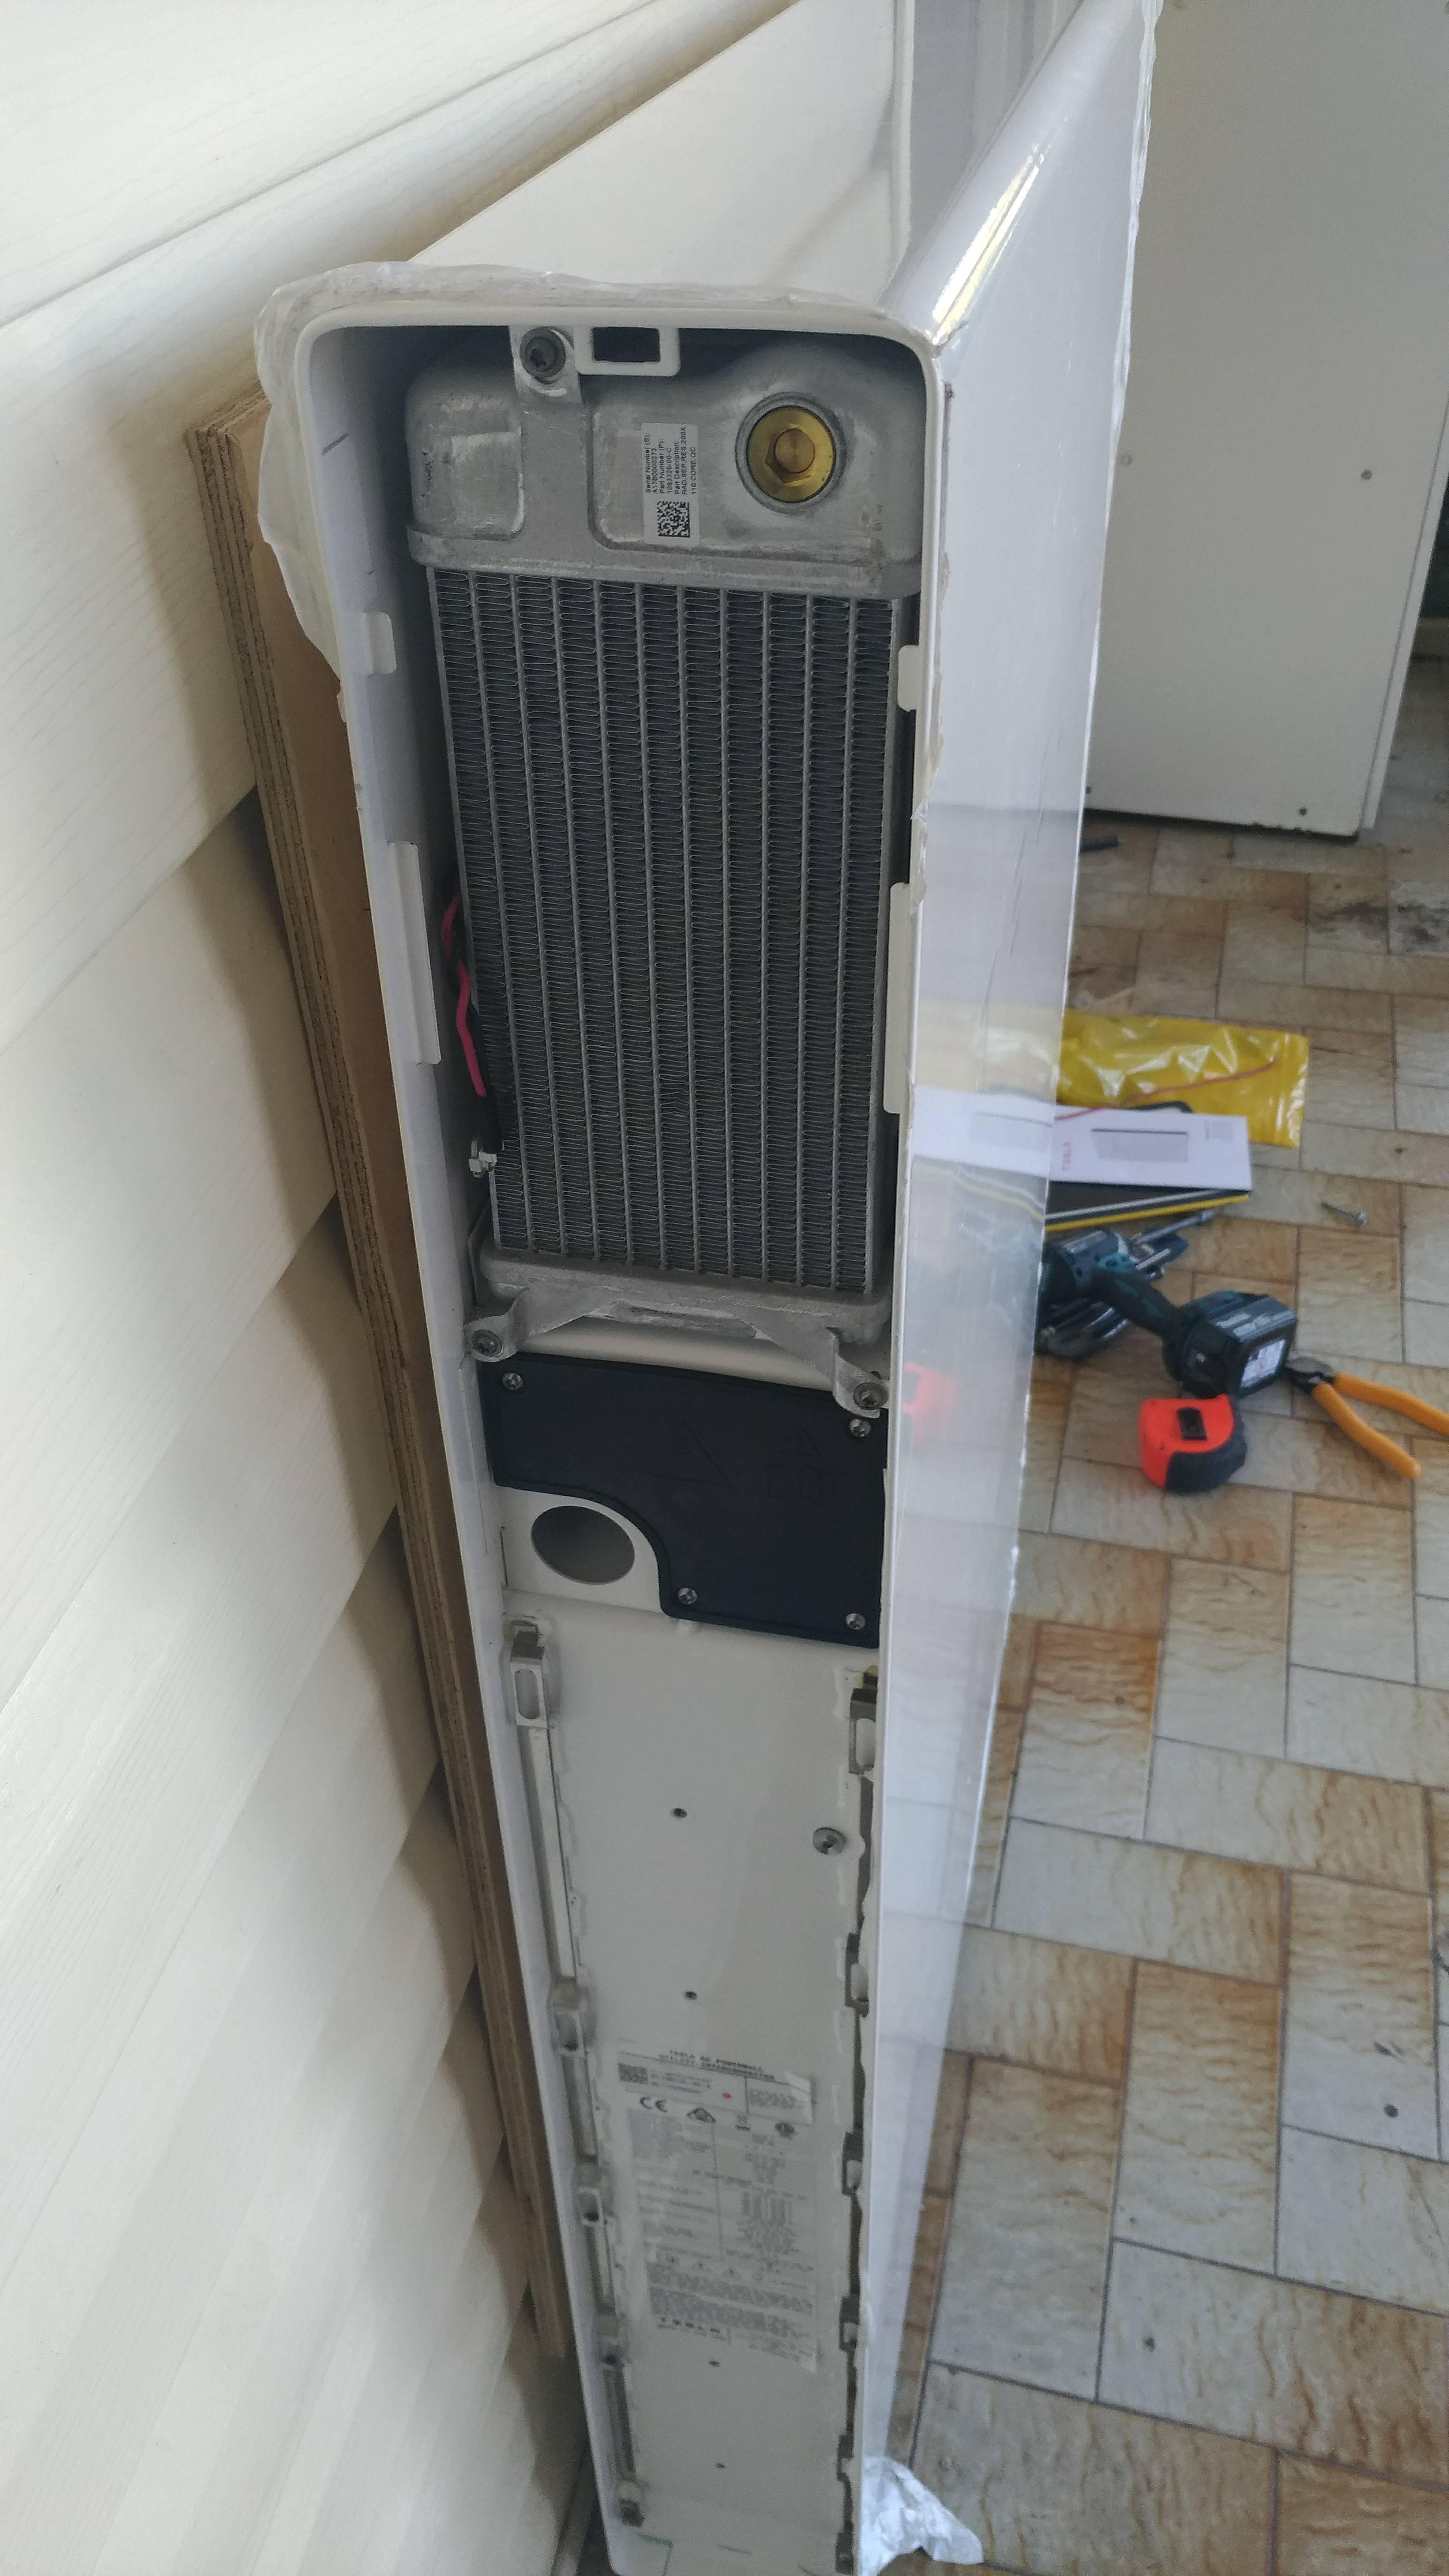
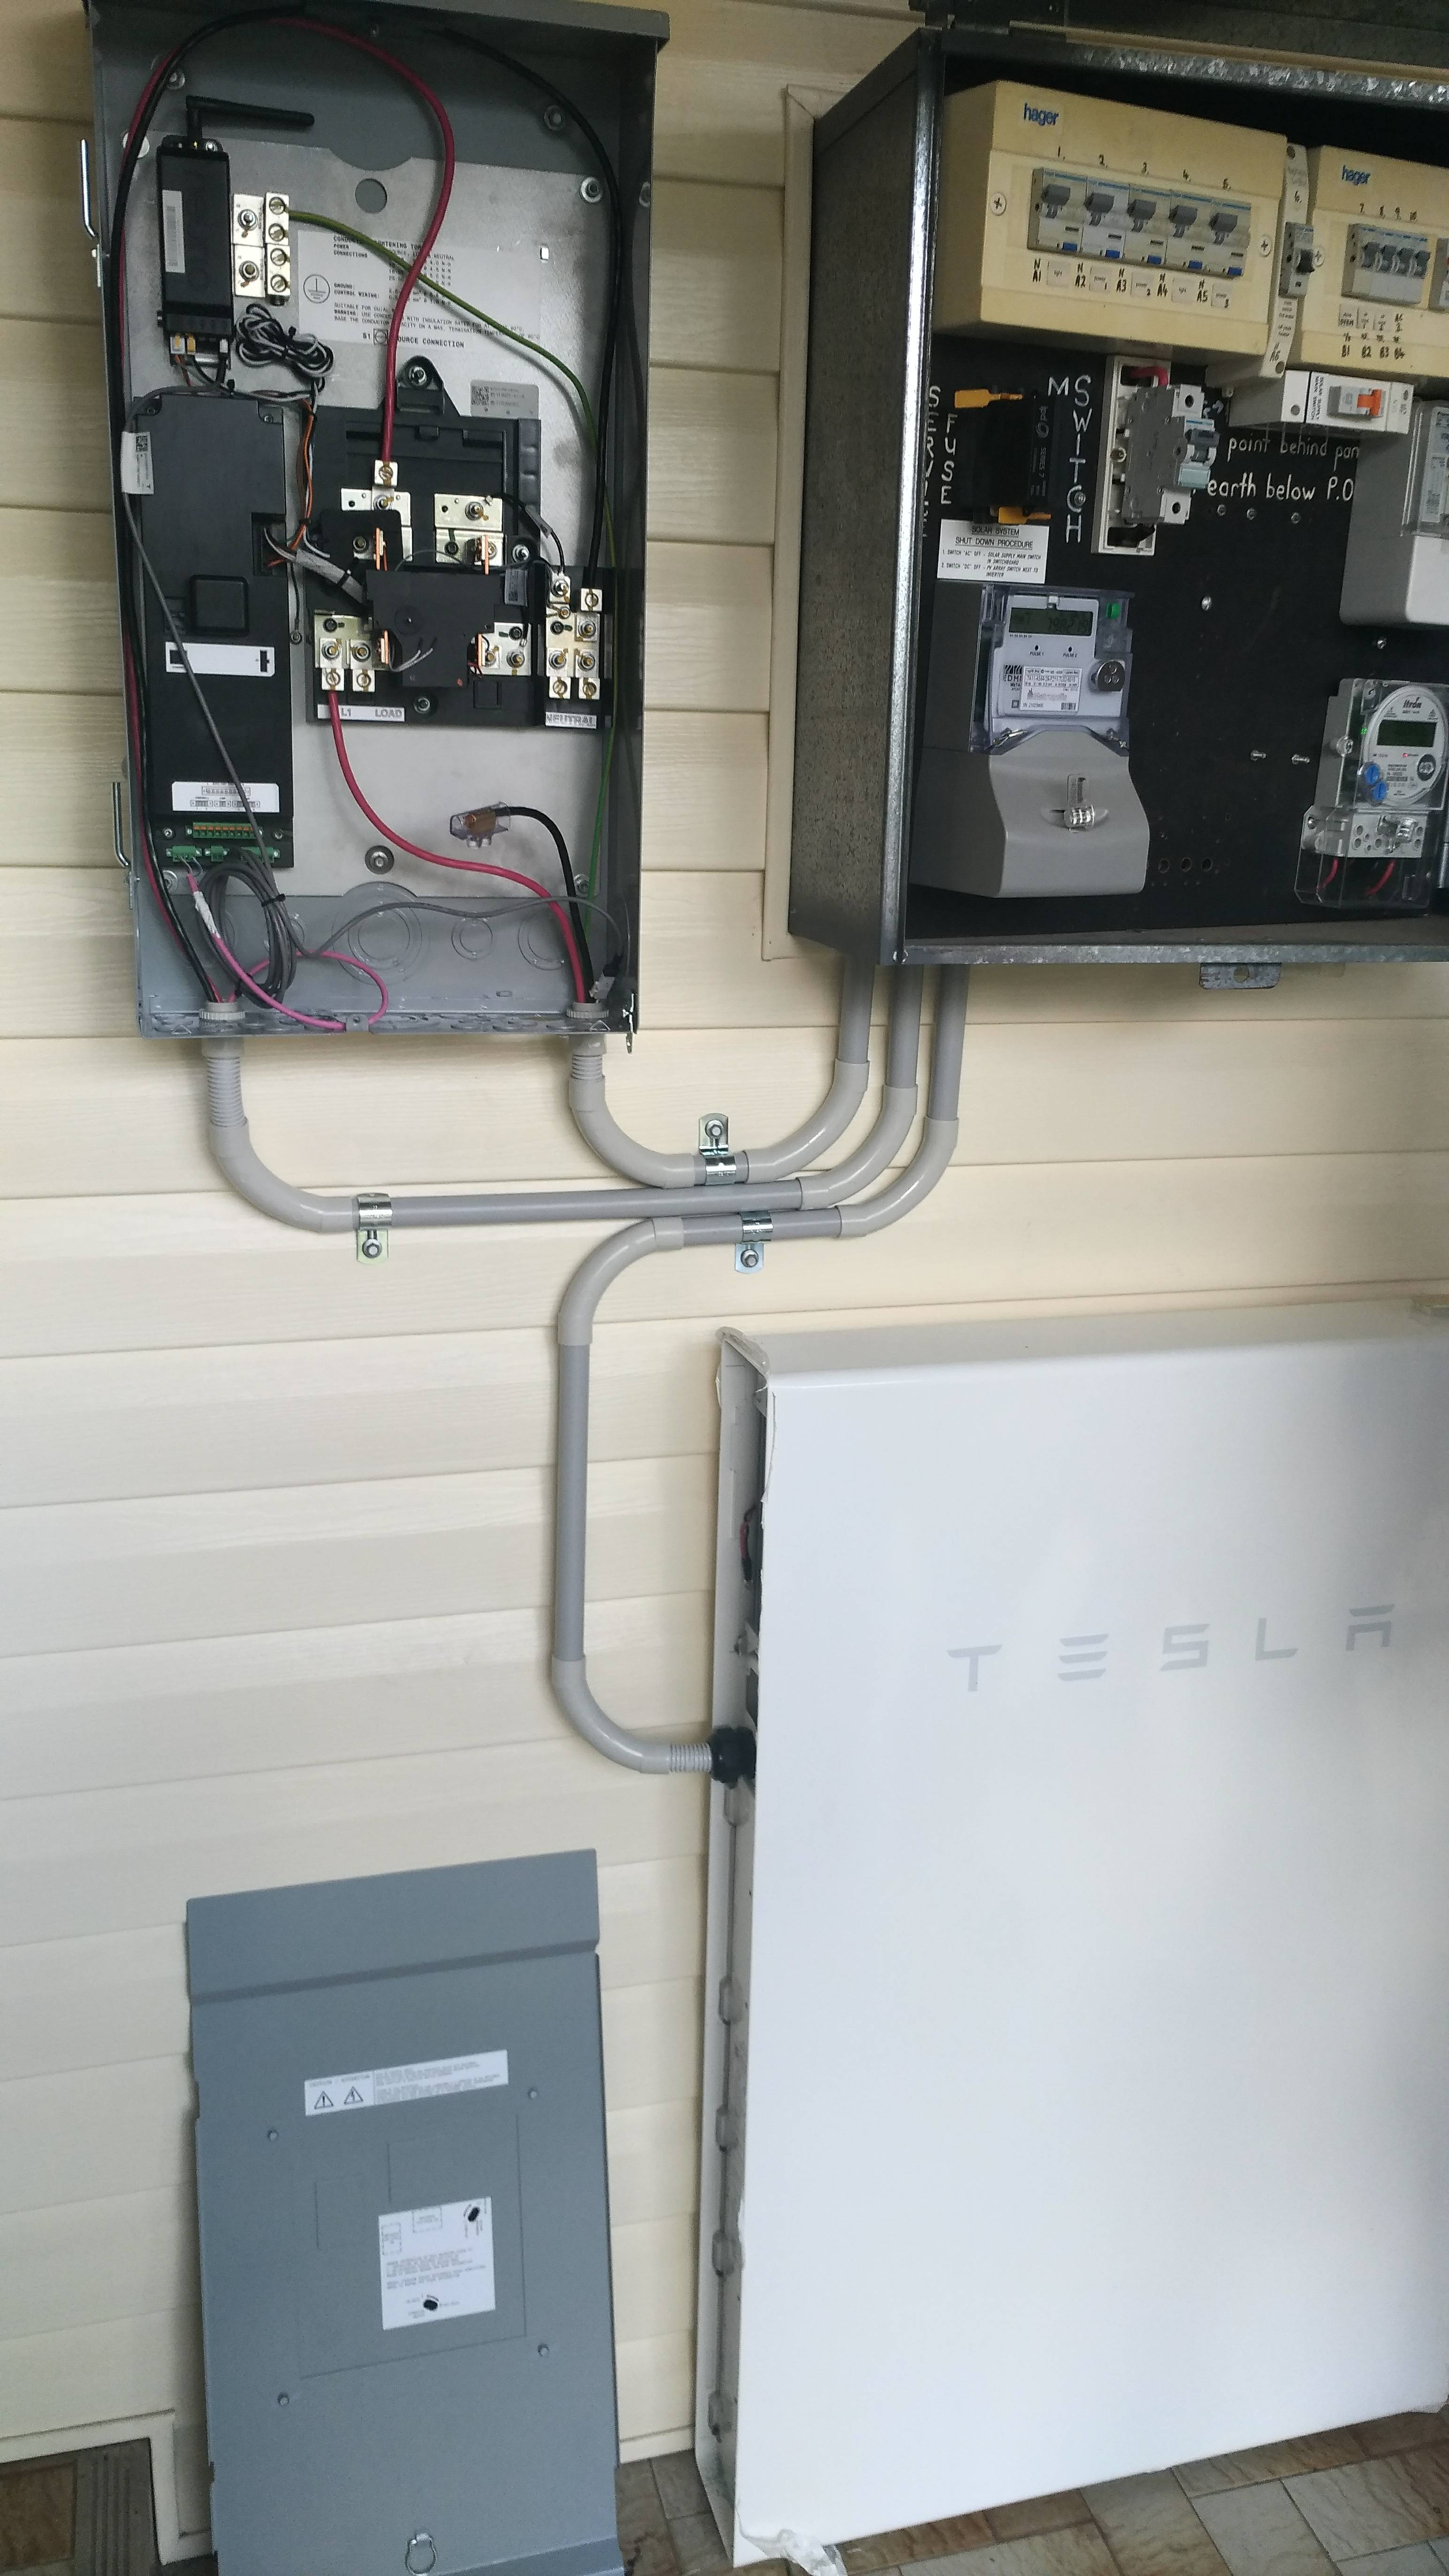
9.15: Apparently all the cables go in the side, to a junction box under the cooling radiator – this is a decent size one, like an inter-cooler from a car. They don’t need access to the back of the unit, although there is a wiring gland just visible there, for use with installations that require the cabling to pass through a wall. The black sides are plastic, and clip into place.
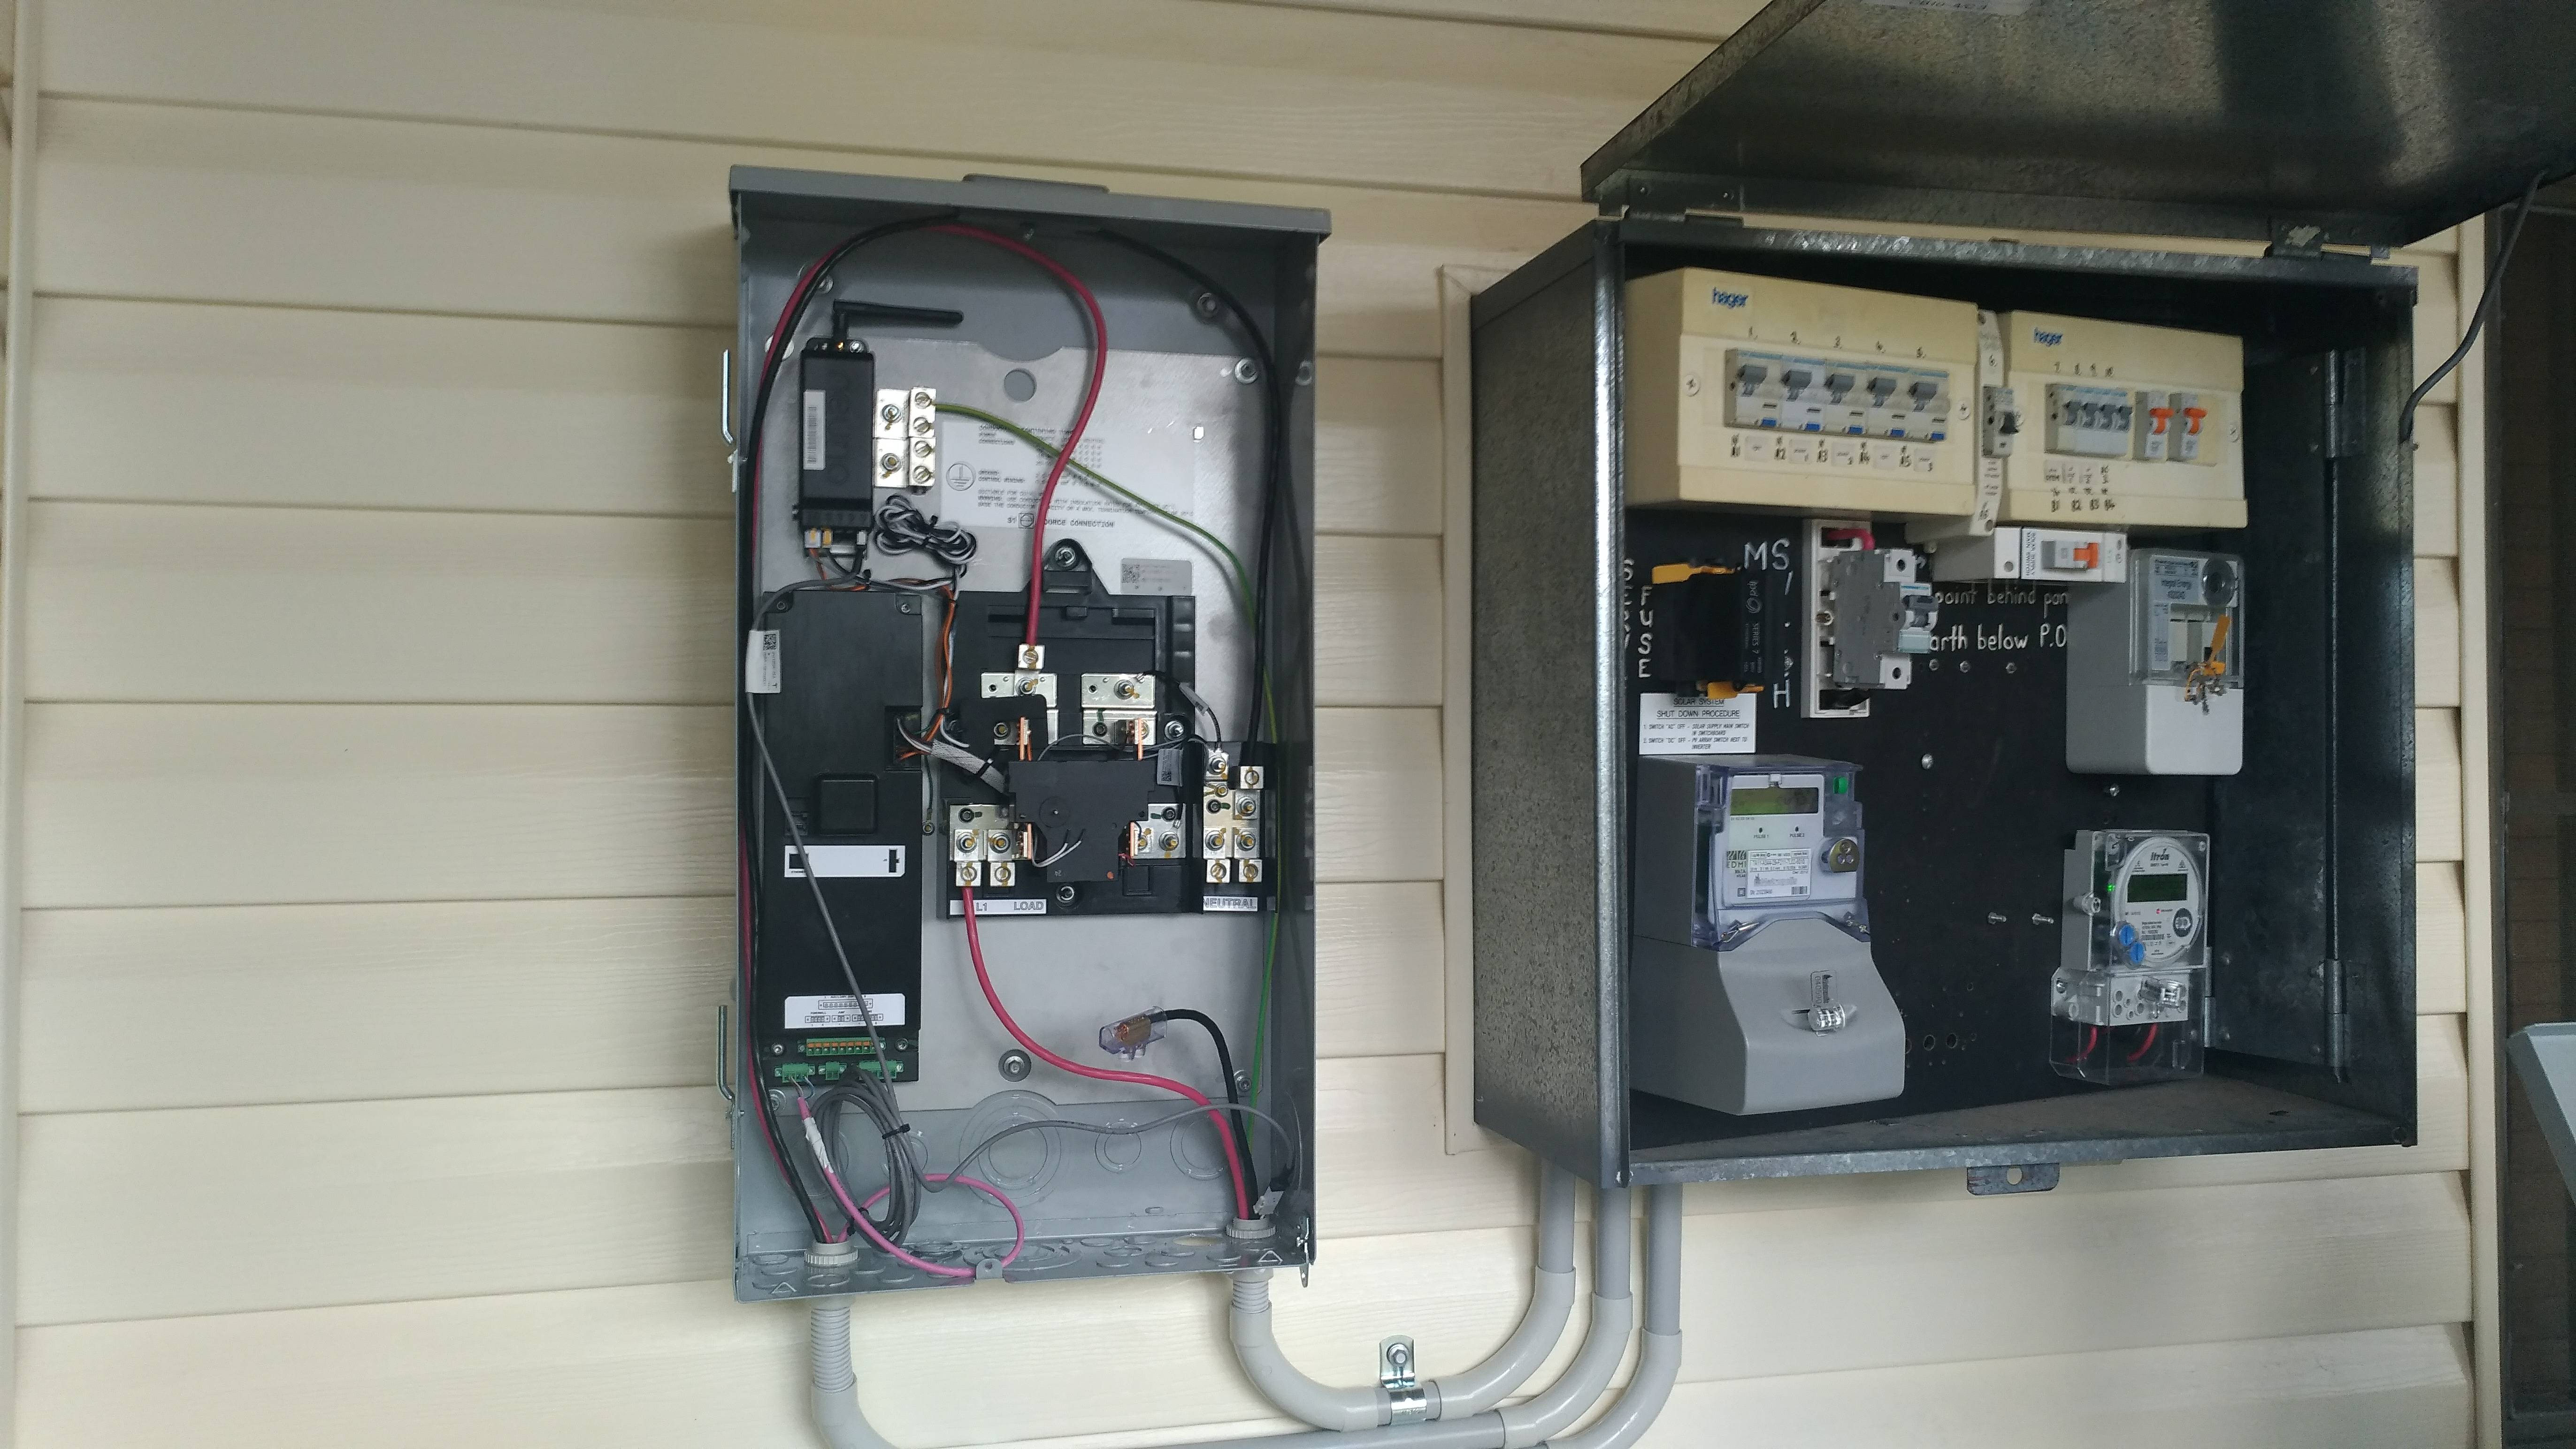
9.30: Gateway mounted, now they are discussing how to wire all the cables between the 3 boxes. There is an installer manual on an iPad, and a set of paper manuals, which are mostly safety advisories.
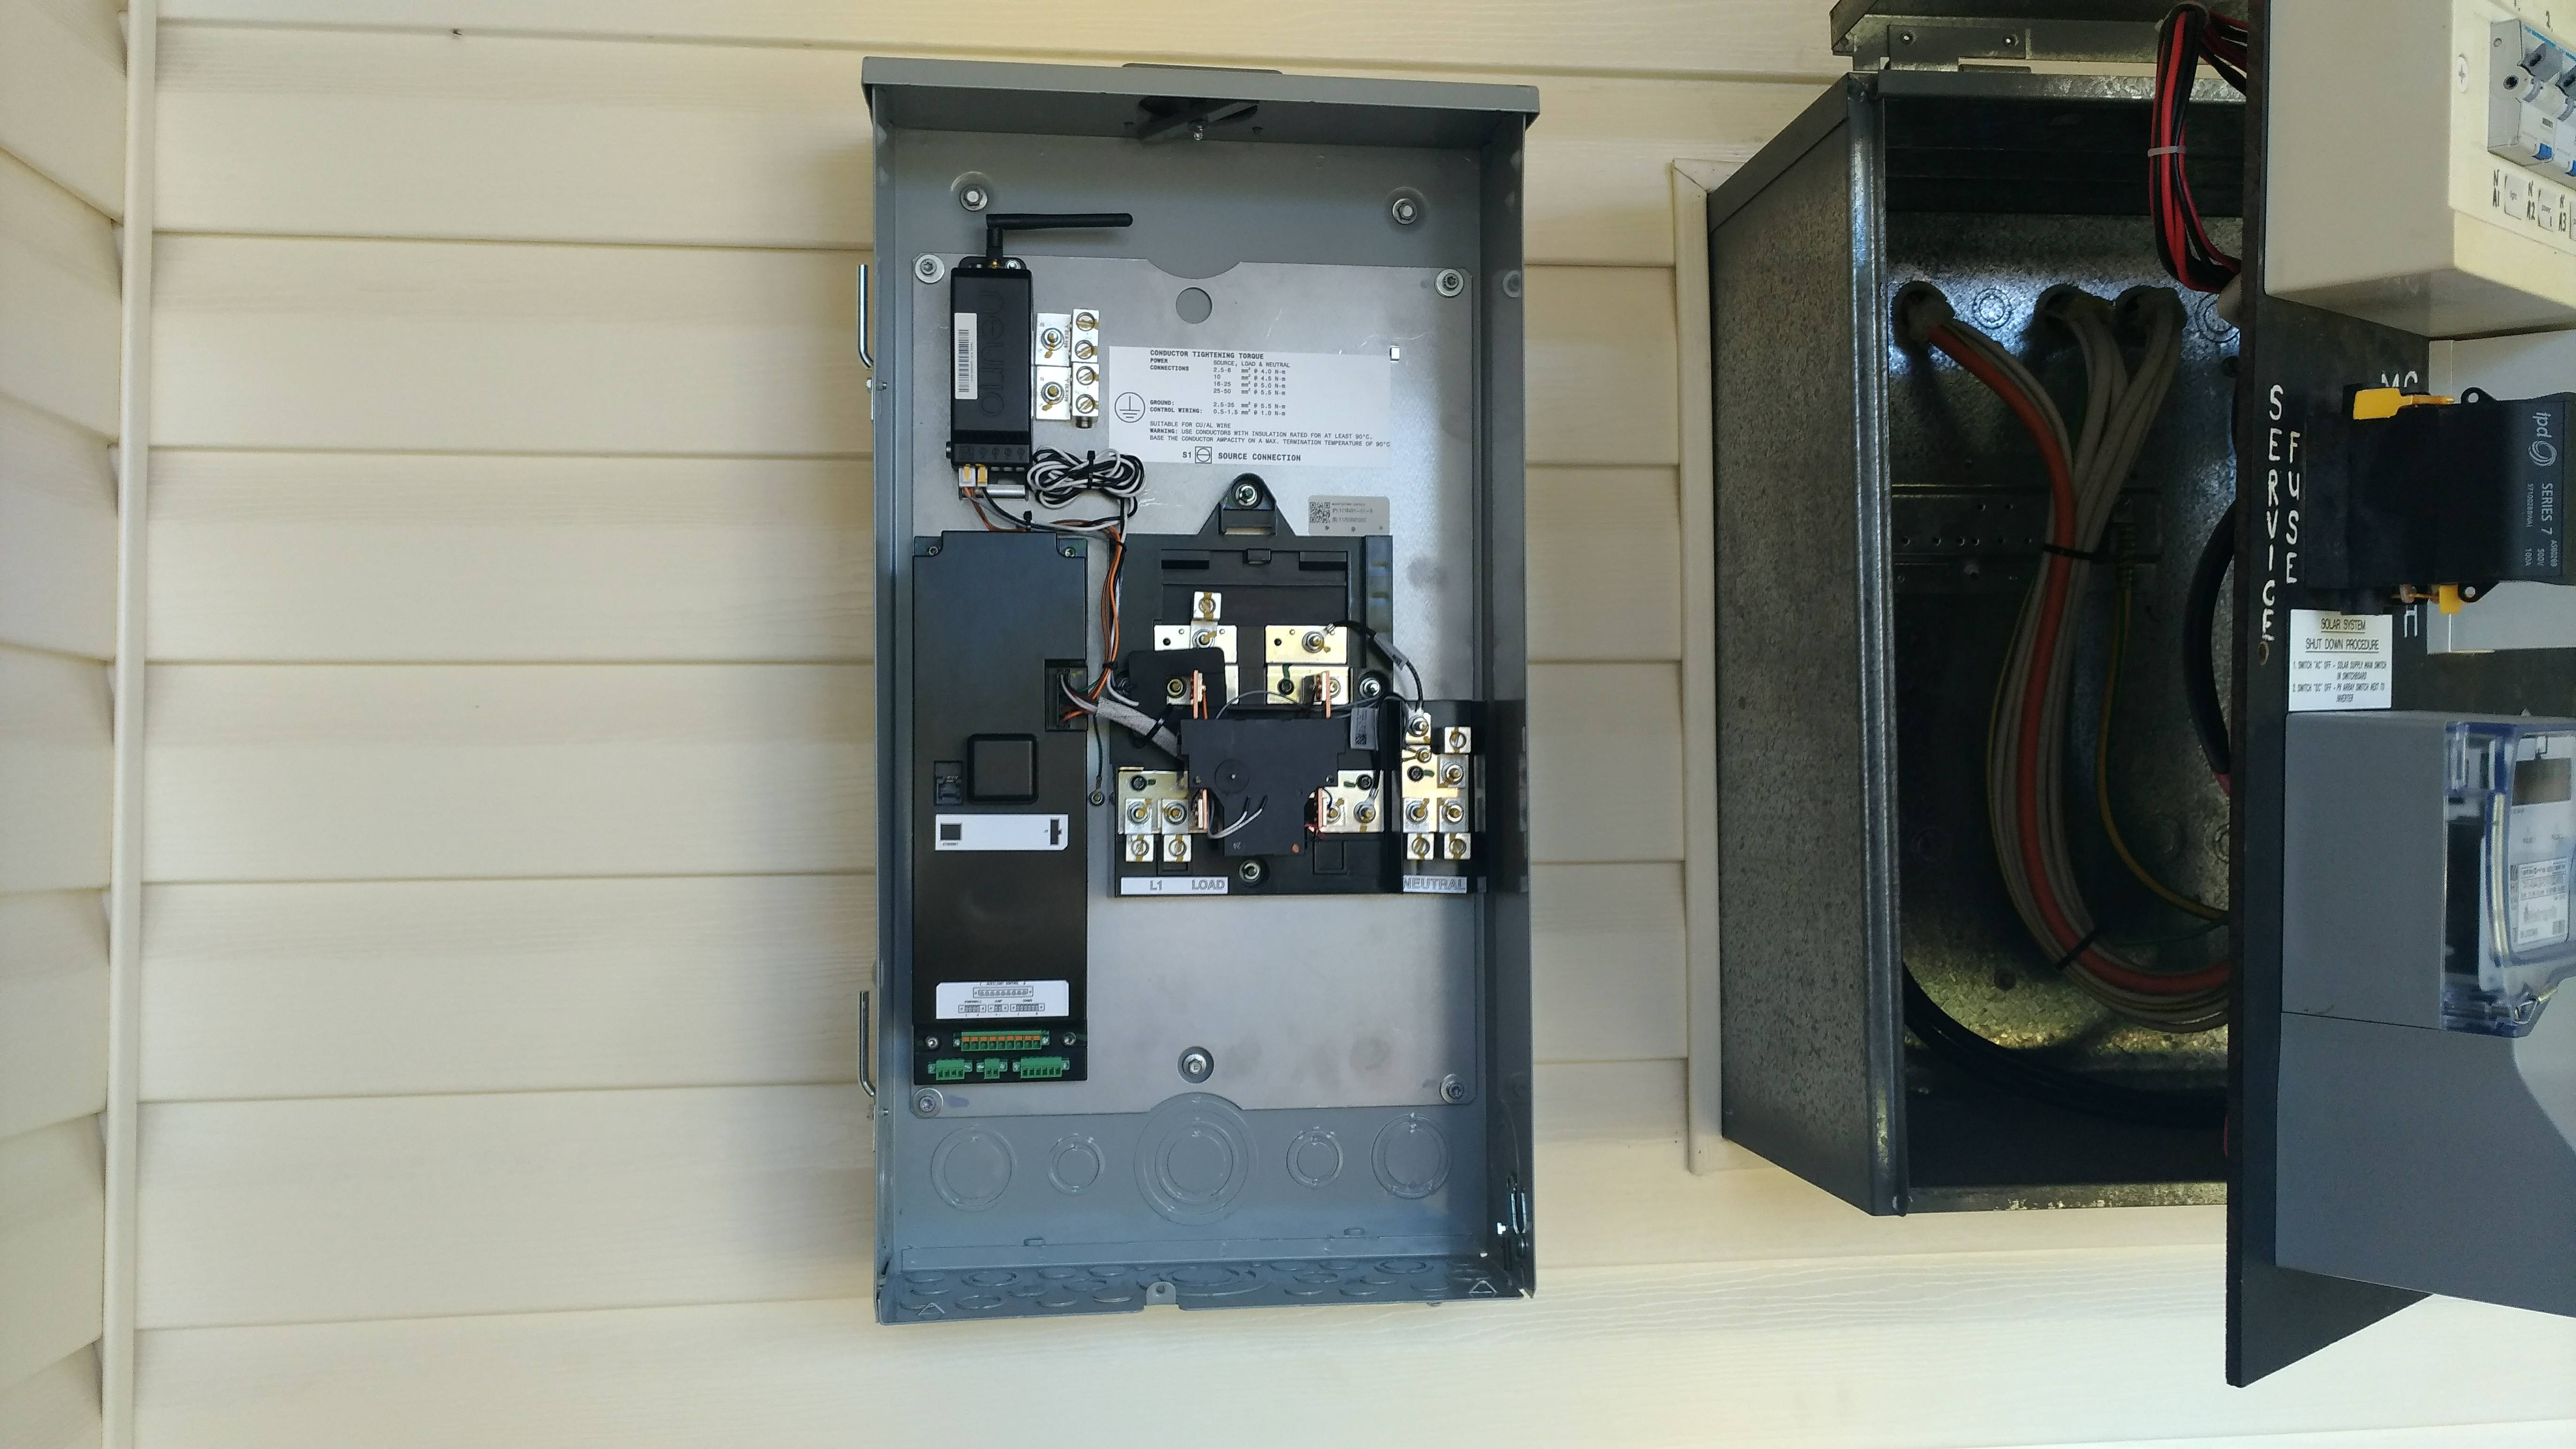
1.30: All cabling done. There is a clamp on the solar active input to measure it’s generation, and the gateway measures the house load from the power cable directly. The PW2 charges only from solar at the moment.
Tim from Tesla arrives to help the installer commission the unit. The Gateway has a built-in Neuros Wifi Access Point (TEGxxxx, username is installer’s email, password is SN#) and a Telstra 3G telco SIM, but the SIM has yet to be activated by Telstra, so Tim connects it to my home Wifi and uses a webpage to update the firmware. He says that the preferred connection method in future is via 3G so they do not need to rely on Wifi availability.
The installer used an iPad to connect to the PW2 Gateway’s AP, and defined the size of the solar inputs, identified my inverter model from a list, selected which measuring inputs in the Gateway are monitoring the load and generation, and entered my Tesla account login (you make this when you order, and there’s no ongoing costs involved).
 At the end of this, the Gateway’s webpage showed the current state of the home current draw, solar generation, and charging status of the PW2. However, the power consumption figure for the home seemed too high for the few lights that were on, and closer examination of the metering setup in my powerboard showed that the solar net meter is summing the solar generation into the input to the home, so they end up running another clamp into the powerboard to measure the consumption load separately.
2.30: Done – I reckon they could shave off a couple of hours, now that they have the install experience, and if they had a brick wall to mount it on, instead of the foam pillows my house has.
To test the system, I turned on a TV that was visible from the powerboard, and then switched off the mains-input circuit breaker to simulate a power blackout – there was a slight clunking of relays in the Gateway, and the TV didn’t even flicker.
Tim said the switch-over takes only 30milliseconds, which should be fine for running PCs, and you do get a notification from the Tesla app on your phone that the house is now running on backup power. Switched on the main circuit breaker again, and with some more clicks, the gateway changed over to the mains about 10 seconds later.
 For solar installs here, local rules require any grid-connected solar system to shut down when the grid-power fails, to protect pole-and-wire workers. I expected this to apply with the PW2 as well, but, it doesn’t, and the solar system stays up when the grid goes down.
Tidbits
Other than the Tesla app, the only visible sign of the PW2’s operation is a LED light strip down the side of the unit that blinks when there’s a problem, is steady when nothing is happening, and pulses slowly when charging or discharging.

Monitoring: I’ve been monitoring the house load and solar generation via PVOutput for the last 6 years – this service provides a free portal to your house power flows via a webpage and phone app, once you install a small monitor in the powerbox.
There is no provision for PVOutput data from the PW2 yet – apparently it generates a huge amount of info, and Tesla are going to expose this at some time in the future, but, Tim said, they are focused on the app experience for now.
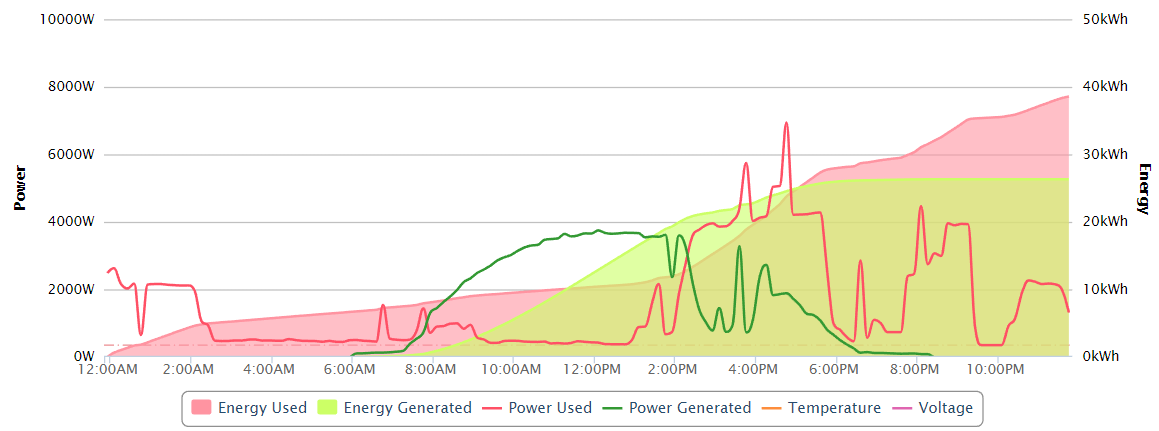
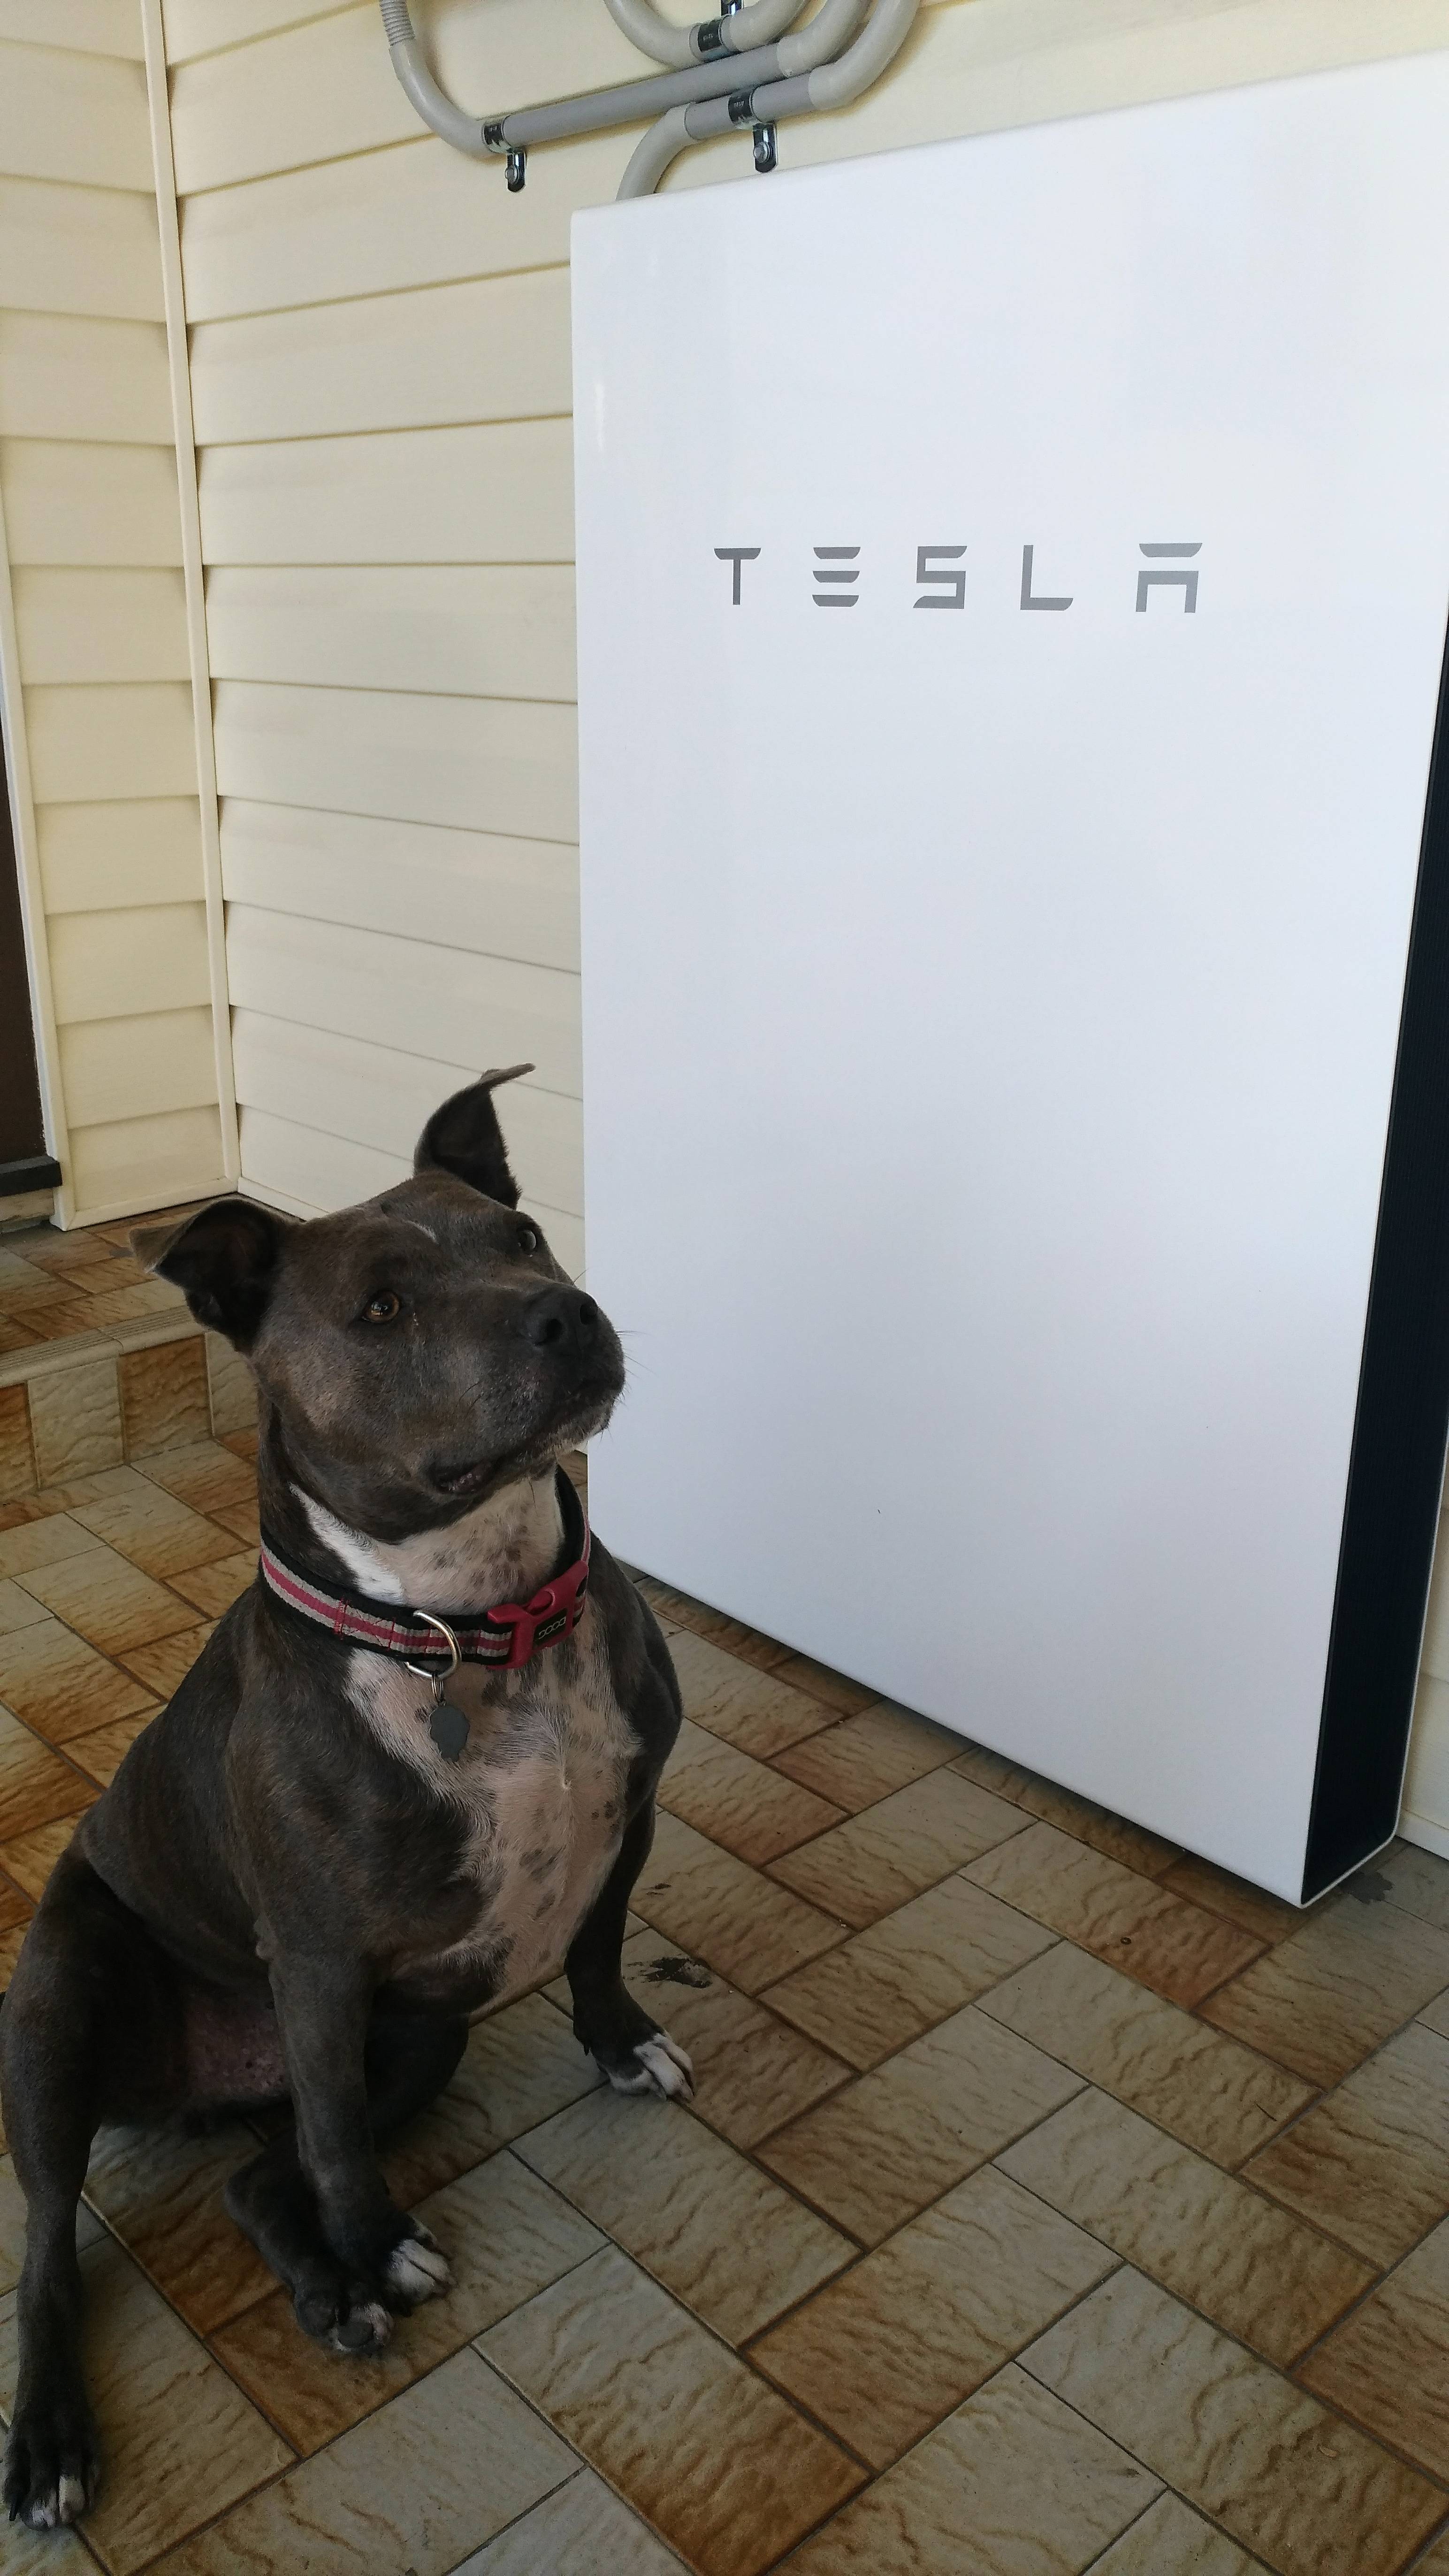
As only my dog is at home during workdays, my home’s generation was mostly exported up to now, and the majority of consumption occurred at night, so my home represents an ideal use case for the PW2. In the graph above, the green line is instant solar output, and the red one is instant consumption, with the shaded areas representing totals for each.
How long before you can get it: Apparently, there are installs booked here in the “thousands” range. Backlog for hardware is 2 months if you order now. Each team of installers could only do 1-2 installs per day, I reckon.
To some extent, the distributor you are chained to controls how soon the install will take place, due to the varying rules and equipment approval timeline processes they have, which are beyond Tesla’s control, so Tesla is prioritising the installs to customers chained to distributors that have the approvals ready now.
As usual, Elon is stepping on toes in this industry, by making it possible for us punters to reduce our dependence on the energy monopolies – they naturally will do whatever they can to limit the uptake of residential battery storage.
AC vs DC: Whilst Tesla initially talked about both DC- and AC-charged Powerwalls being available, they settled on only doing the AC-charged ones – Tim says this eliminated any issues that might arise from varying DC capabilities of the many different solar arrays used worldwide, since the AC output from an existing solar inverter is fairly standard by comparison. Yes, there’s some losses in converting the AC power to DC in the battery, and back again, but it meant a shorter time to market, simplified certification, better control of the charging process, lower prices due to scaling of one type only, and no requirement for the PW2 installers to have to muck around with rewiring existing solar cabling setups.
Commissioning: Enabling it on the day of install depends on the customer’s energy distributor’s regulations. There is a switch on the battery, and another inside the Gateway to bypass the system.
I’m with Endeavour NSW, who are happy to have the sparkys sign off on it, whereas some other distributors insist on L2-certified inspectors, and such to commission it. Apparently, Endeavour are also fine with up to 10KW of solar on a single-phase home.
Overloads: I asked what would happen if the house current draw exceeded the power output of the PW2 – Tim said the output voltage will begin to drop, and then the unit would reset, to shed the loads and give you an opportunity to switch off whatever is drawing too much – this would be the same scenario as when I popped a circuit breaker last week, as there was a car charging+dishwasher+microwave+column heater all on at the same time, and the load went over 8KW.
 Acoustics: it makes the occasional faint “tick”, and a low-pitch whirring sound when the fan runs. You’ll only hear these if you sit right next to it. The fan blows air out the top-right corner, opposite the radiator. It’s quieter than the solar inverter, which always makes a ticking-buzz noise.
Theft: Some people mentioned worrying about the unit being knocked-off, since it’s not behind a locked door. I don’t have any way to put it behind one at my home (no garage), but since it weighs 130Kg, random junkies are not going to be strong enough to lift it, and they would need a tow-truck to yank it off the wall, because of the fiddly clip.
Given Tesla’s no-advertising policy, I imagine the vast majority of people here would have no idea what this mystery white box on my wall does, or what it’s worth. And, I have a backup security system just in case…
The Tesla Phone app
You can download Tesla’s free Android or iPhone app to manage your Tesla cars and Powerwalls. My Tesla app did not have any registered devices in the day after install, and Tim said, at the time, that someone in Tesla USA would need to tick a box. I chased up the Tesla email contact I had for the payment process, and he called back an hour later to say it was done (on a Saturday morning, as well).
Basically, it lets you know if all is well with the system, by monitoring the state of power flows and battery charge state. Herewith some screenshots:
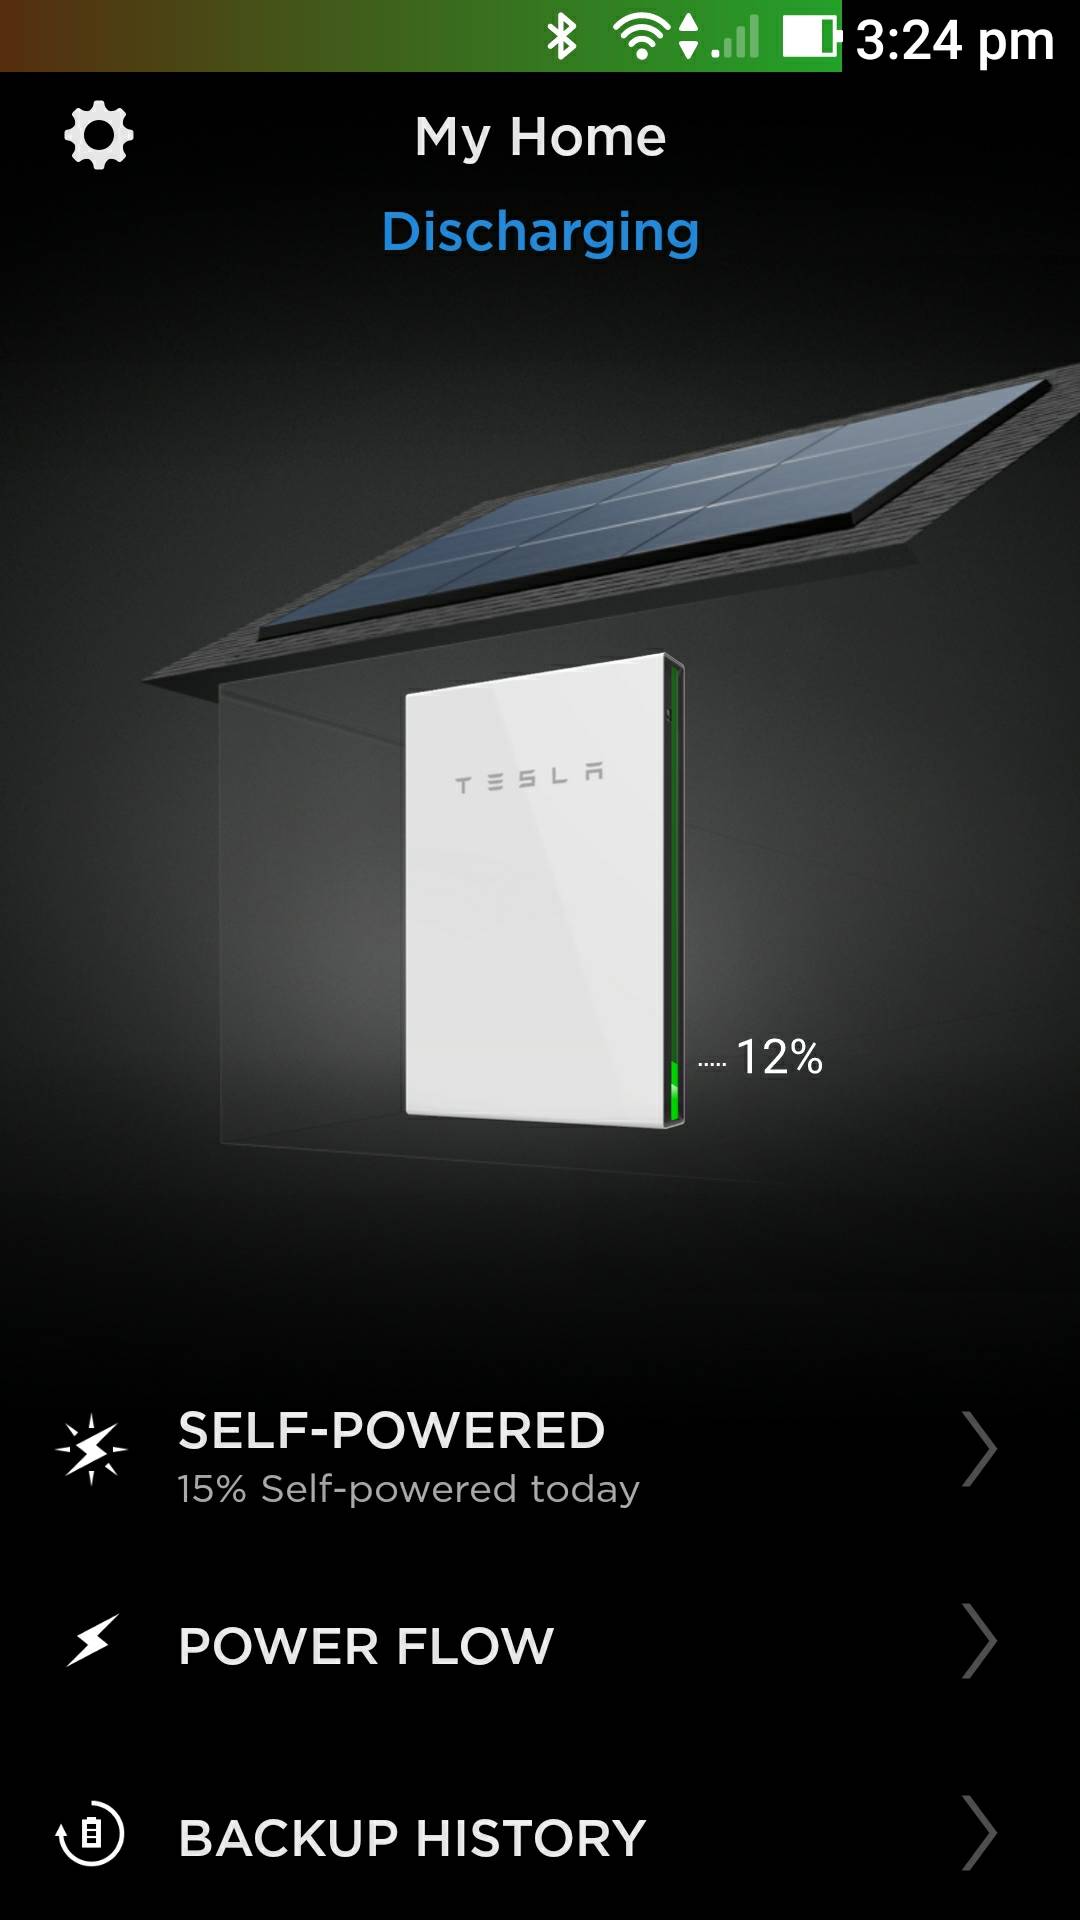
This is the home page you get after signing in. It takes about 5 seconds to fetch the current state when you open the app, and gives a quick glance to see what the battery is doing and how full it is. In this shot, mine is almost discharged, and very little power was used from my solar array today, as it rained most of the day.
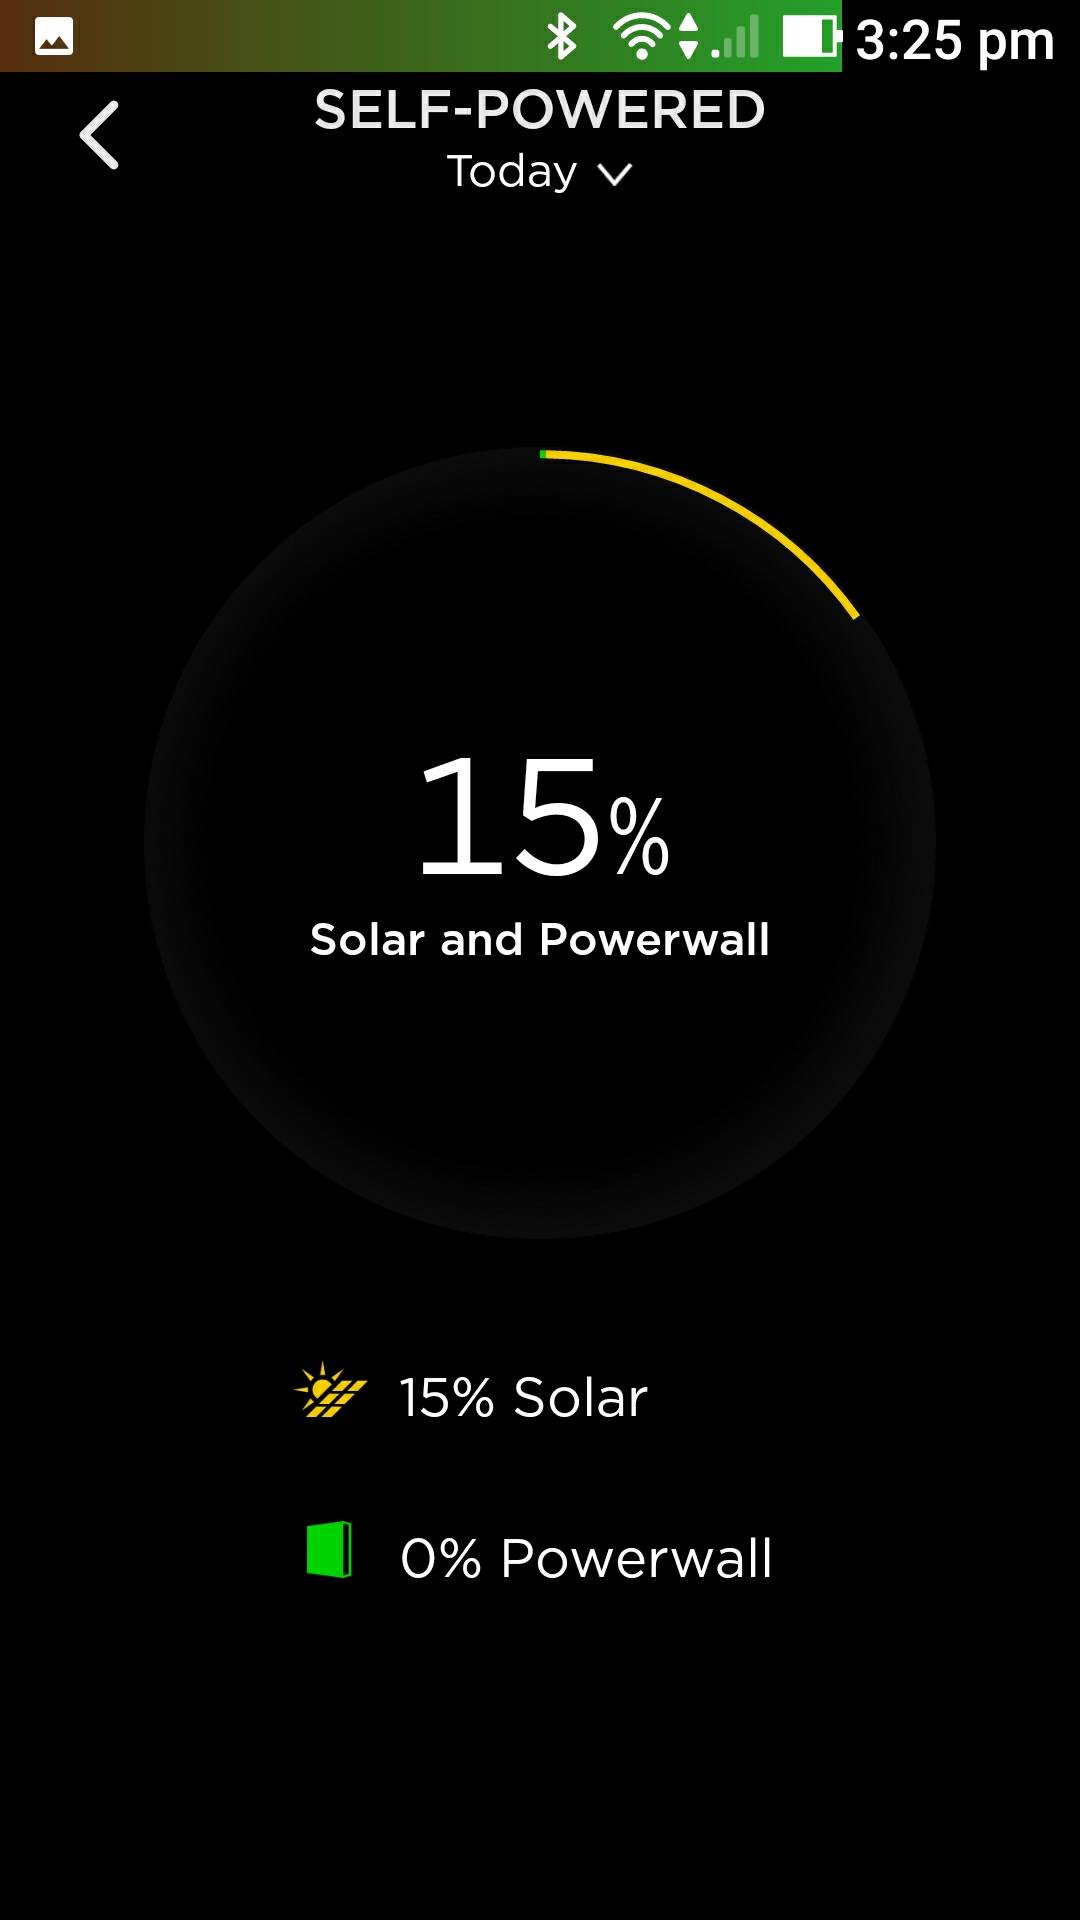
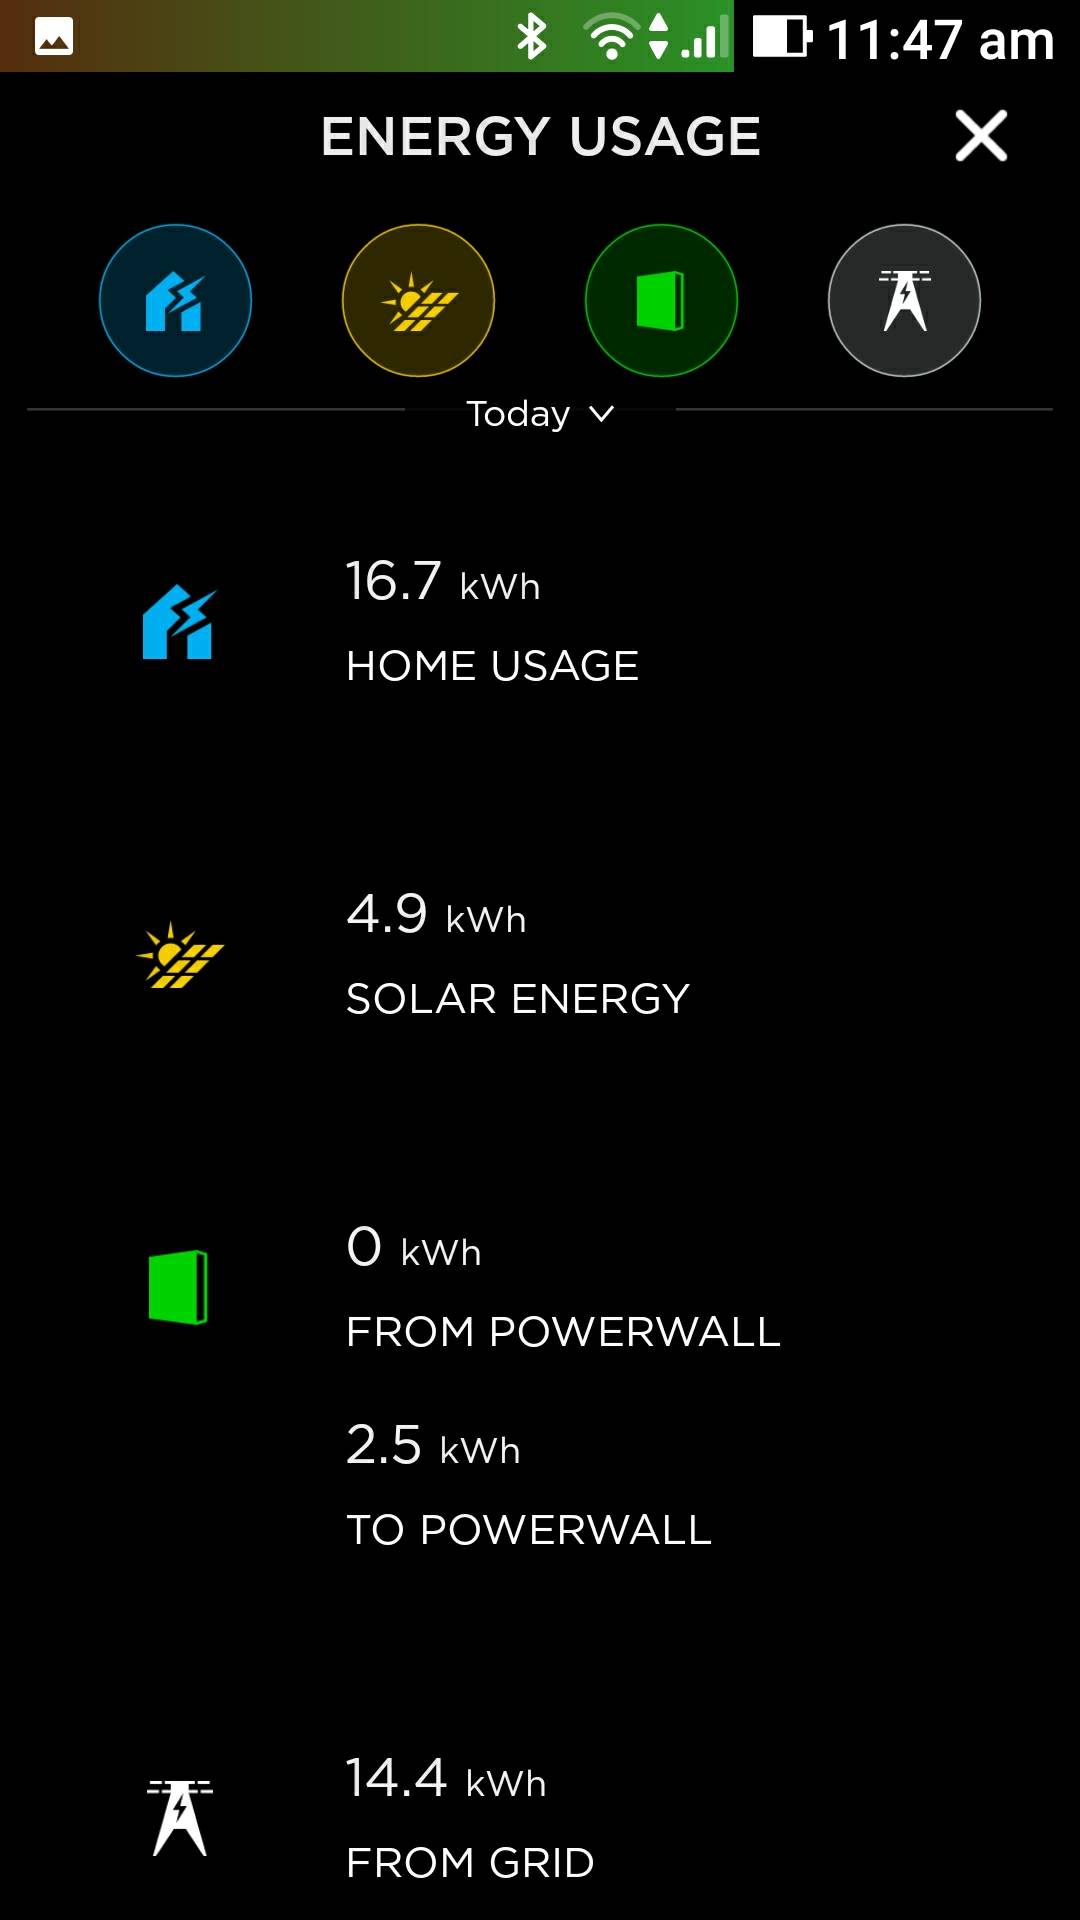
This page, from the first menu on the home page, shows the amount of power that you generated yourself for today. The PW2 didn’t really contribute anything yet, being early afternoon when I took this screenshot, and the overall percentage is low as the solar barely covered the house loads, due to the all-day rain. As the end of the day approaches, the PW2 % will start to go up, as it discharges to cover house loads. You can select today or yesterday from this display.
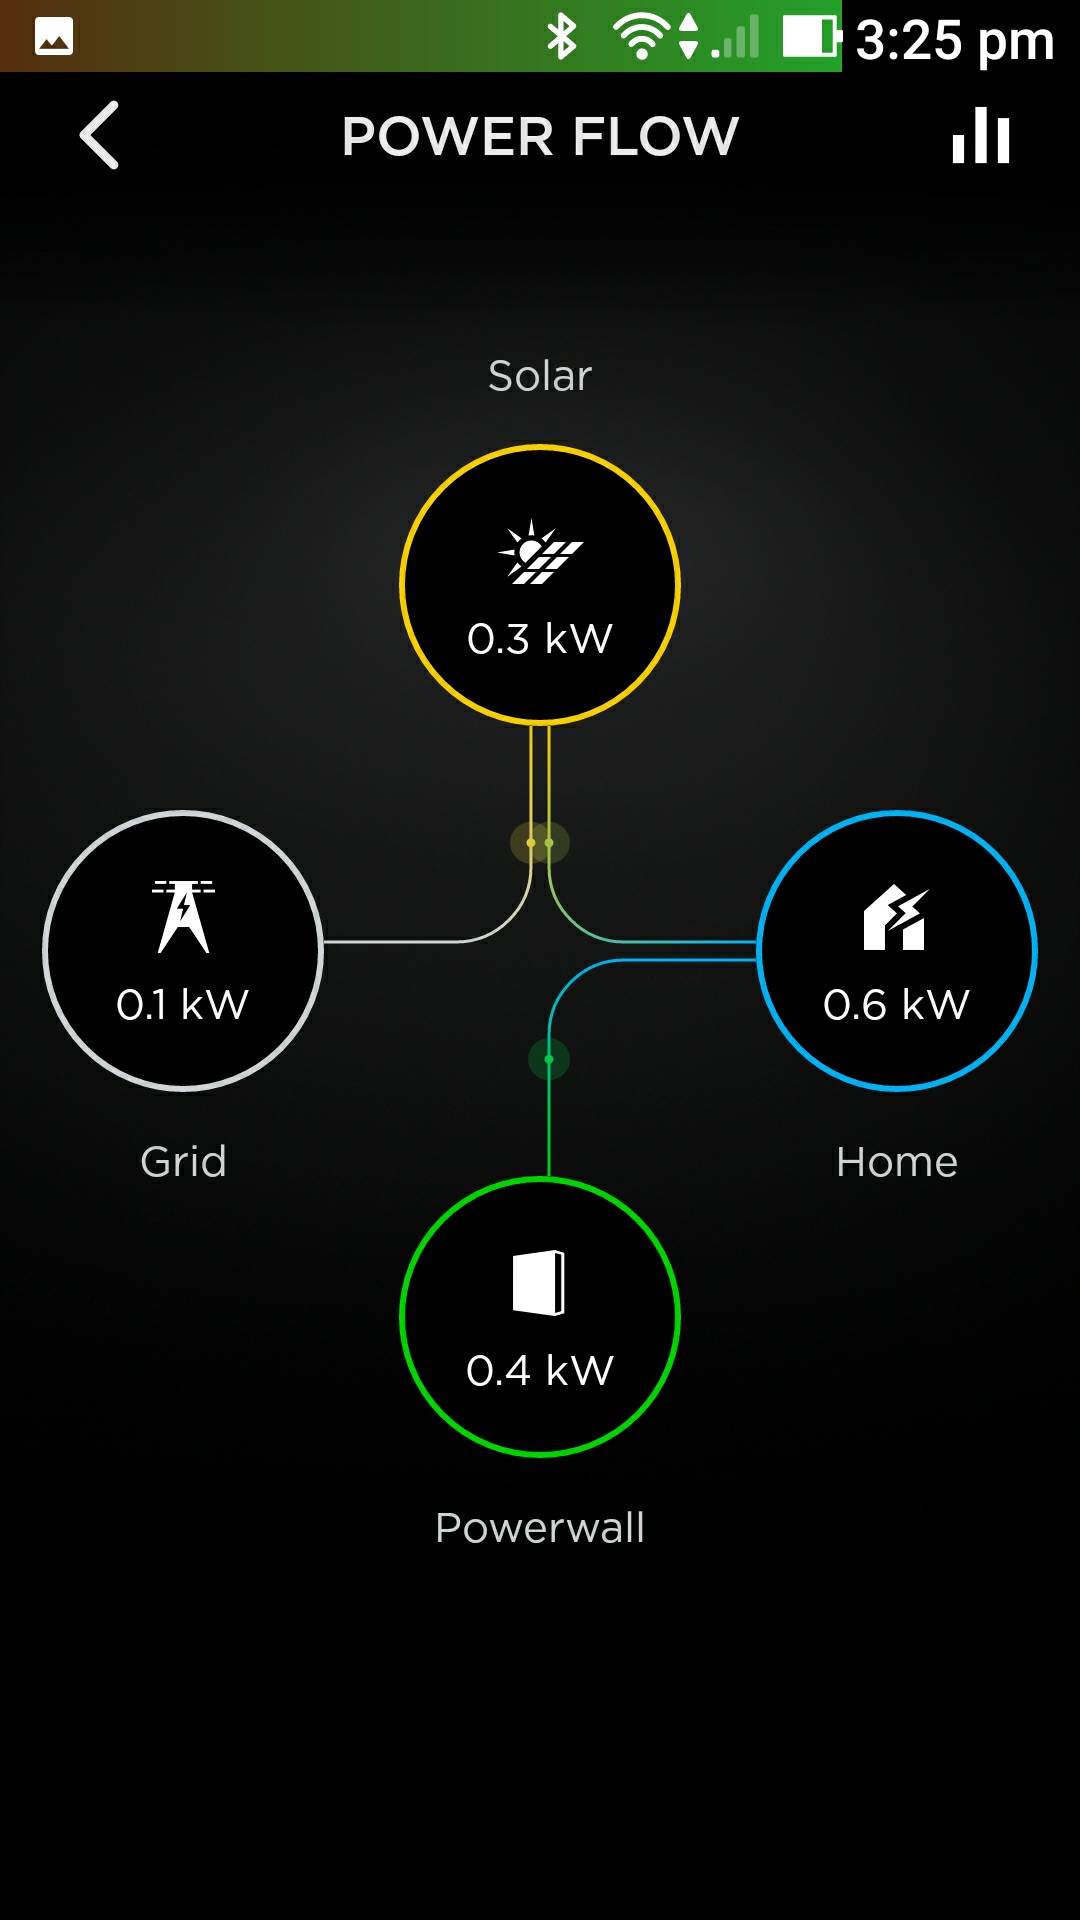
This is the live power distribution / flow for the home, from the second menu on the home page. The lines only appear between specific circles when there is activity between those entities, the inactive ones are greyed-out, they have animated blobs to show the direction power is flowing, and pressing any of the circles or the graph icon takes you to graphs of that source/load for the current day’s history.
The PW2 charger dynamically adjusts to the varying load presented by the home – the lowest PW2 charge rate I’ve seen was 0.3Kw, and highest was 2.3KW, although that’s probably limited by the solar generation rate, which did not exceed 2.7Kw today, plus the home didn’t dip below 0.4Kw. The updates have a lag of around 5 seconds to real time.
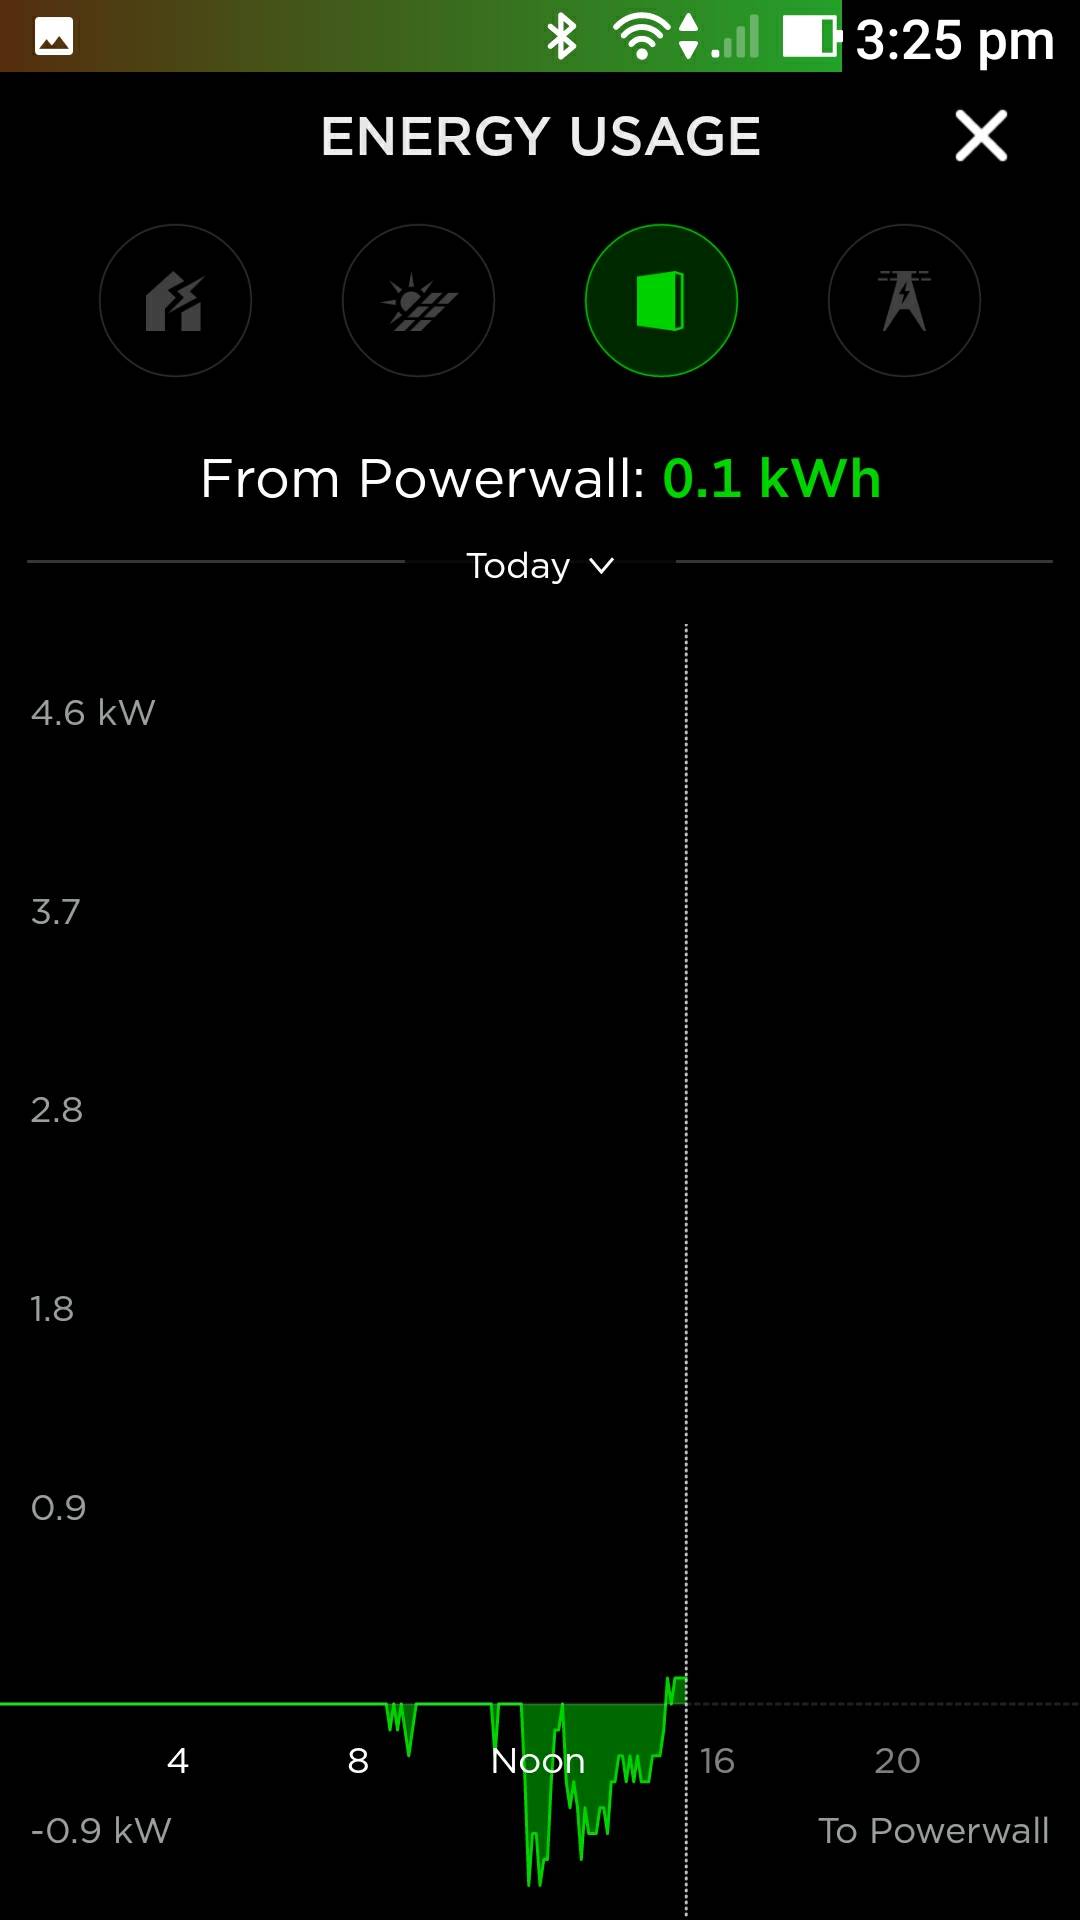
This is the PW2’s graph – you can select today or yesterday. Same applies for each of the other home/grid/solar sources below, and you can multi-select them to overlay all of the on the page at once.
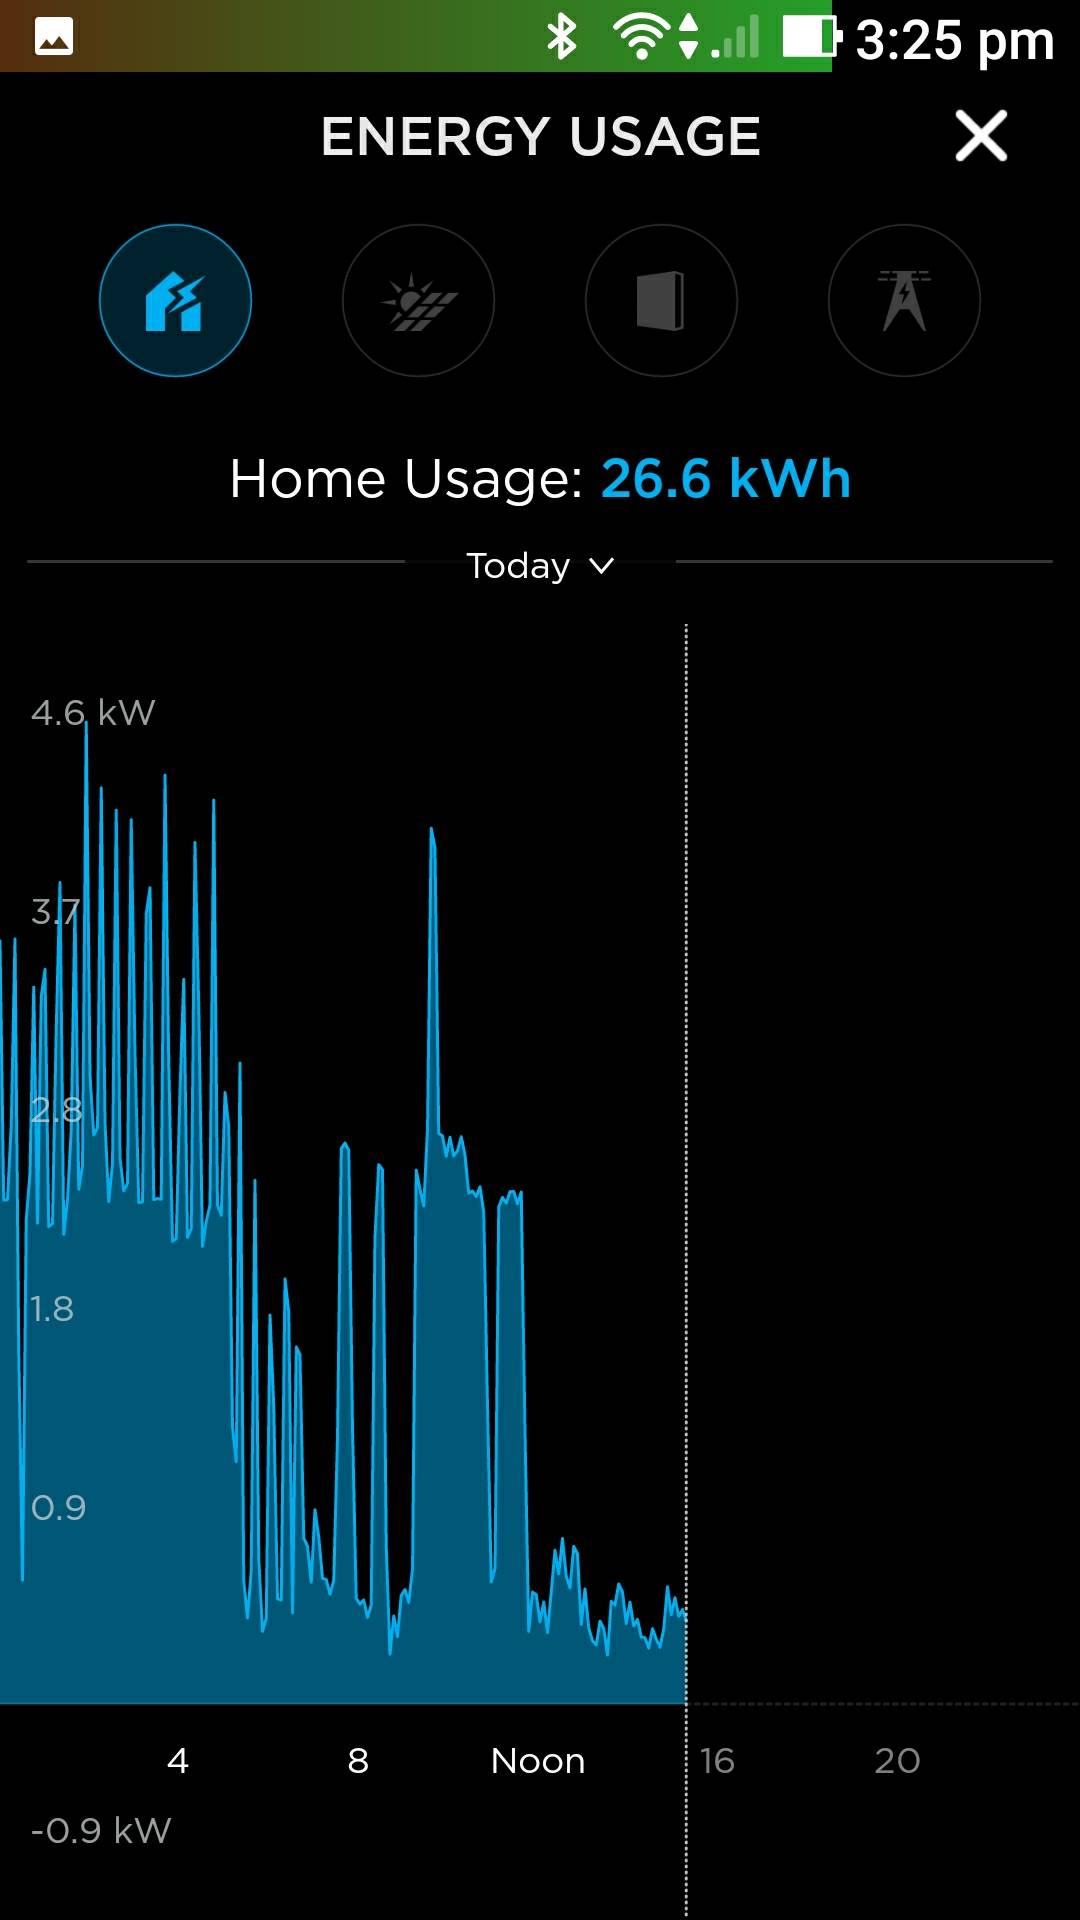

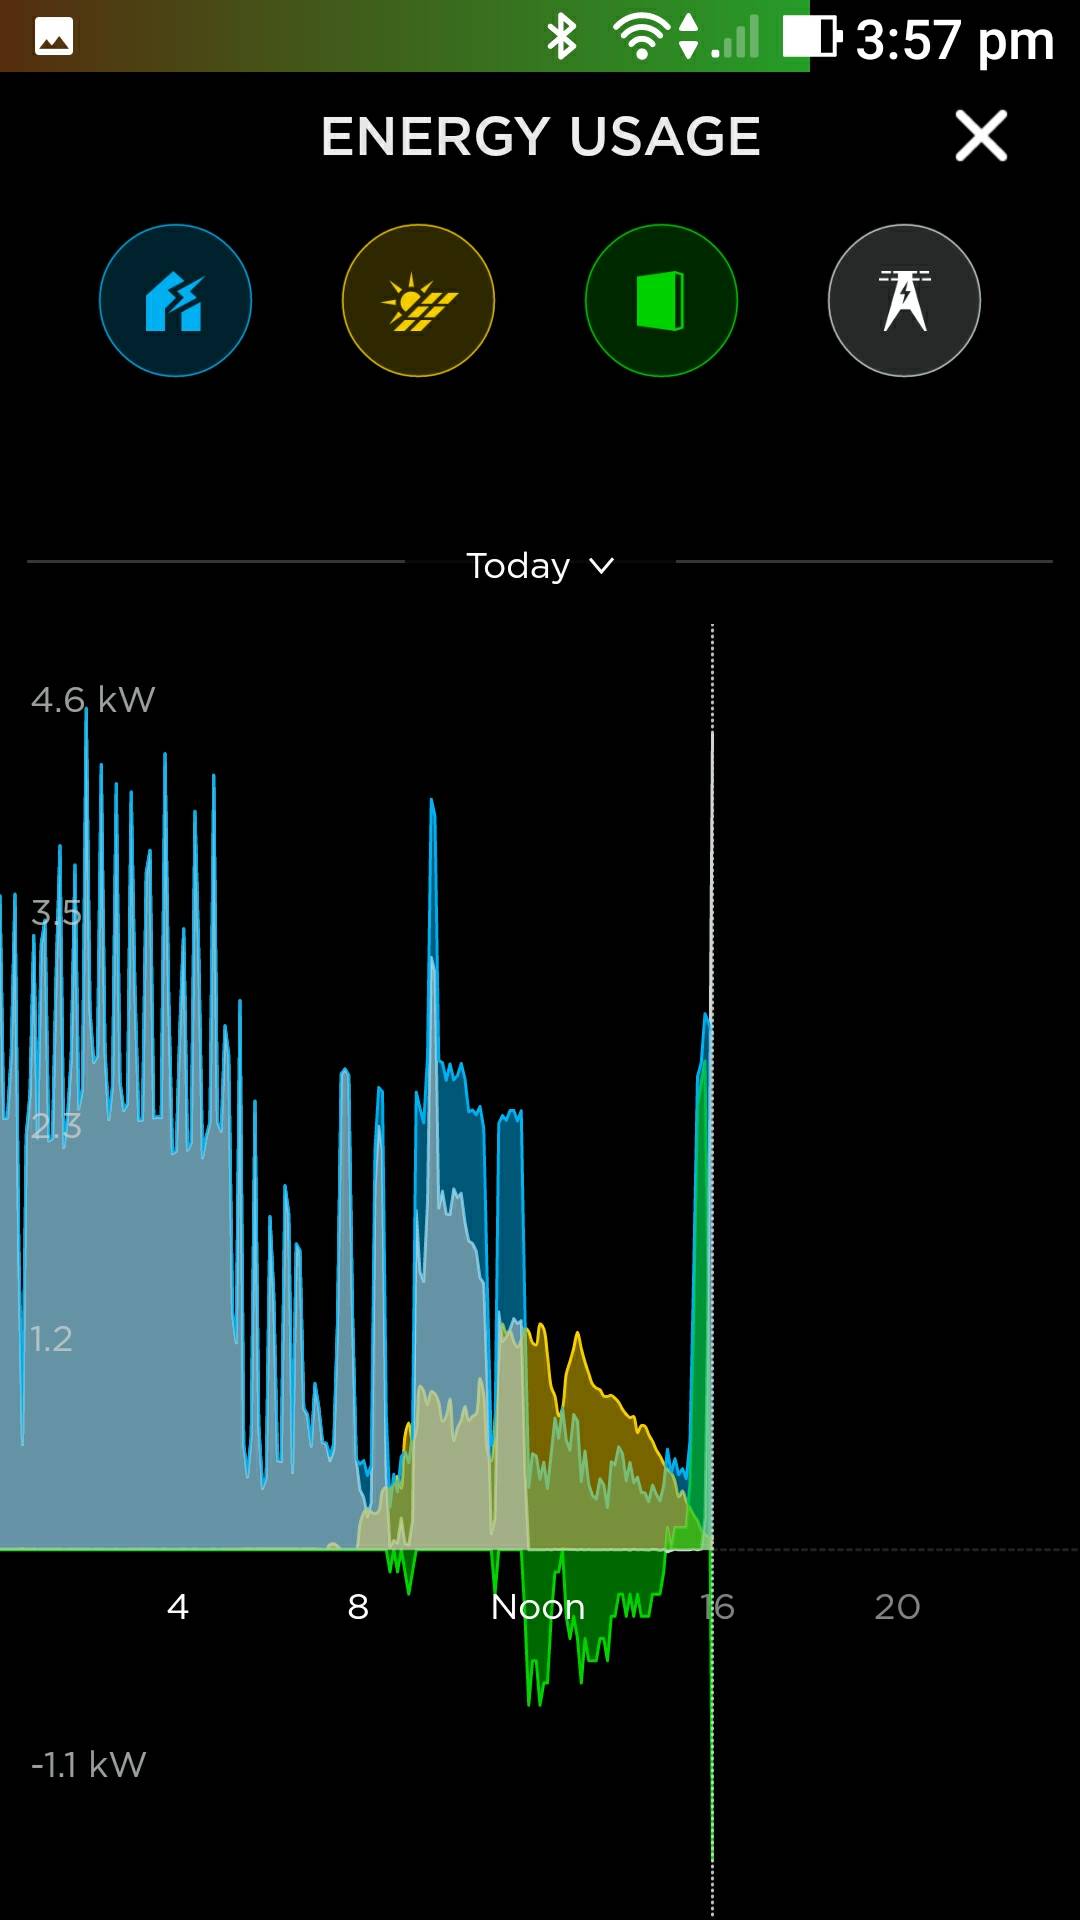
The next shot was taken towards the end of the first non-rainy day. The blue spikes are bar heaters running at night, the yellow hump is the solar output, shading to lime-green where it covers the home load. The green area below the line is the PW2 charging from solar, and the green spikes to the right are the PW2’s discharging contributions.
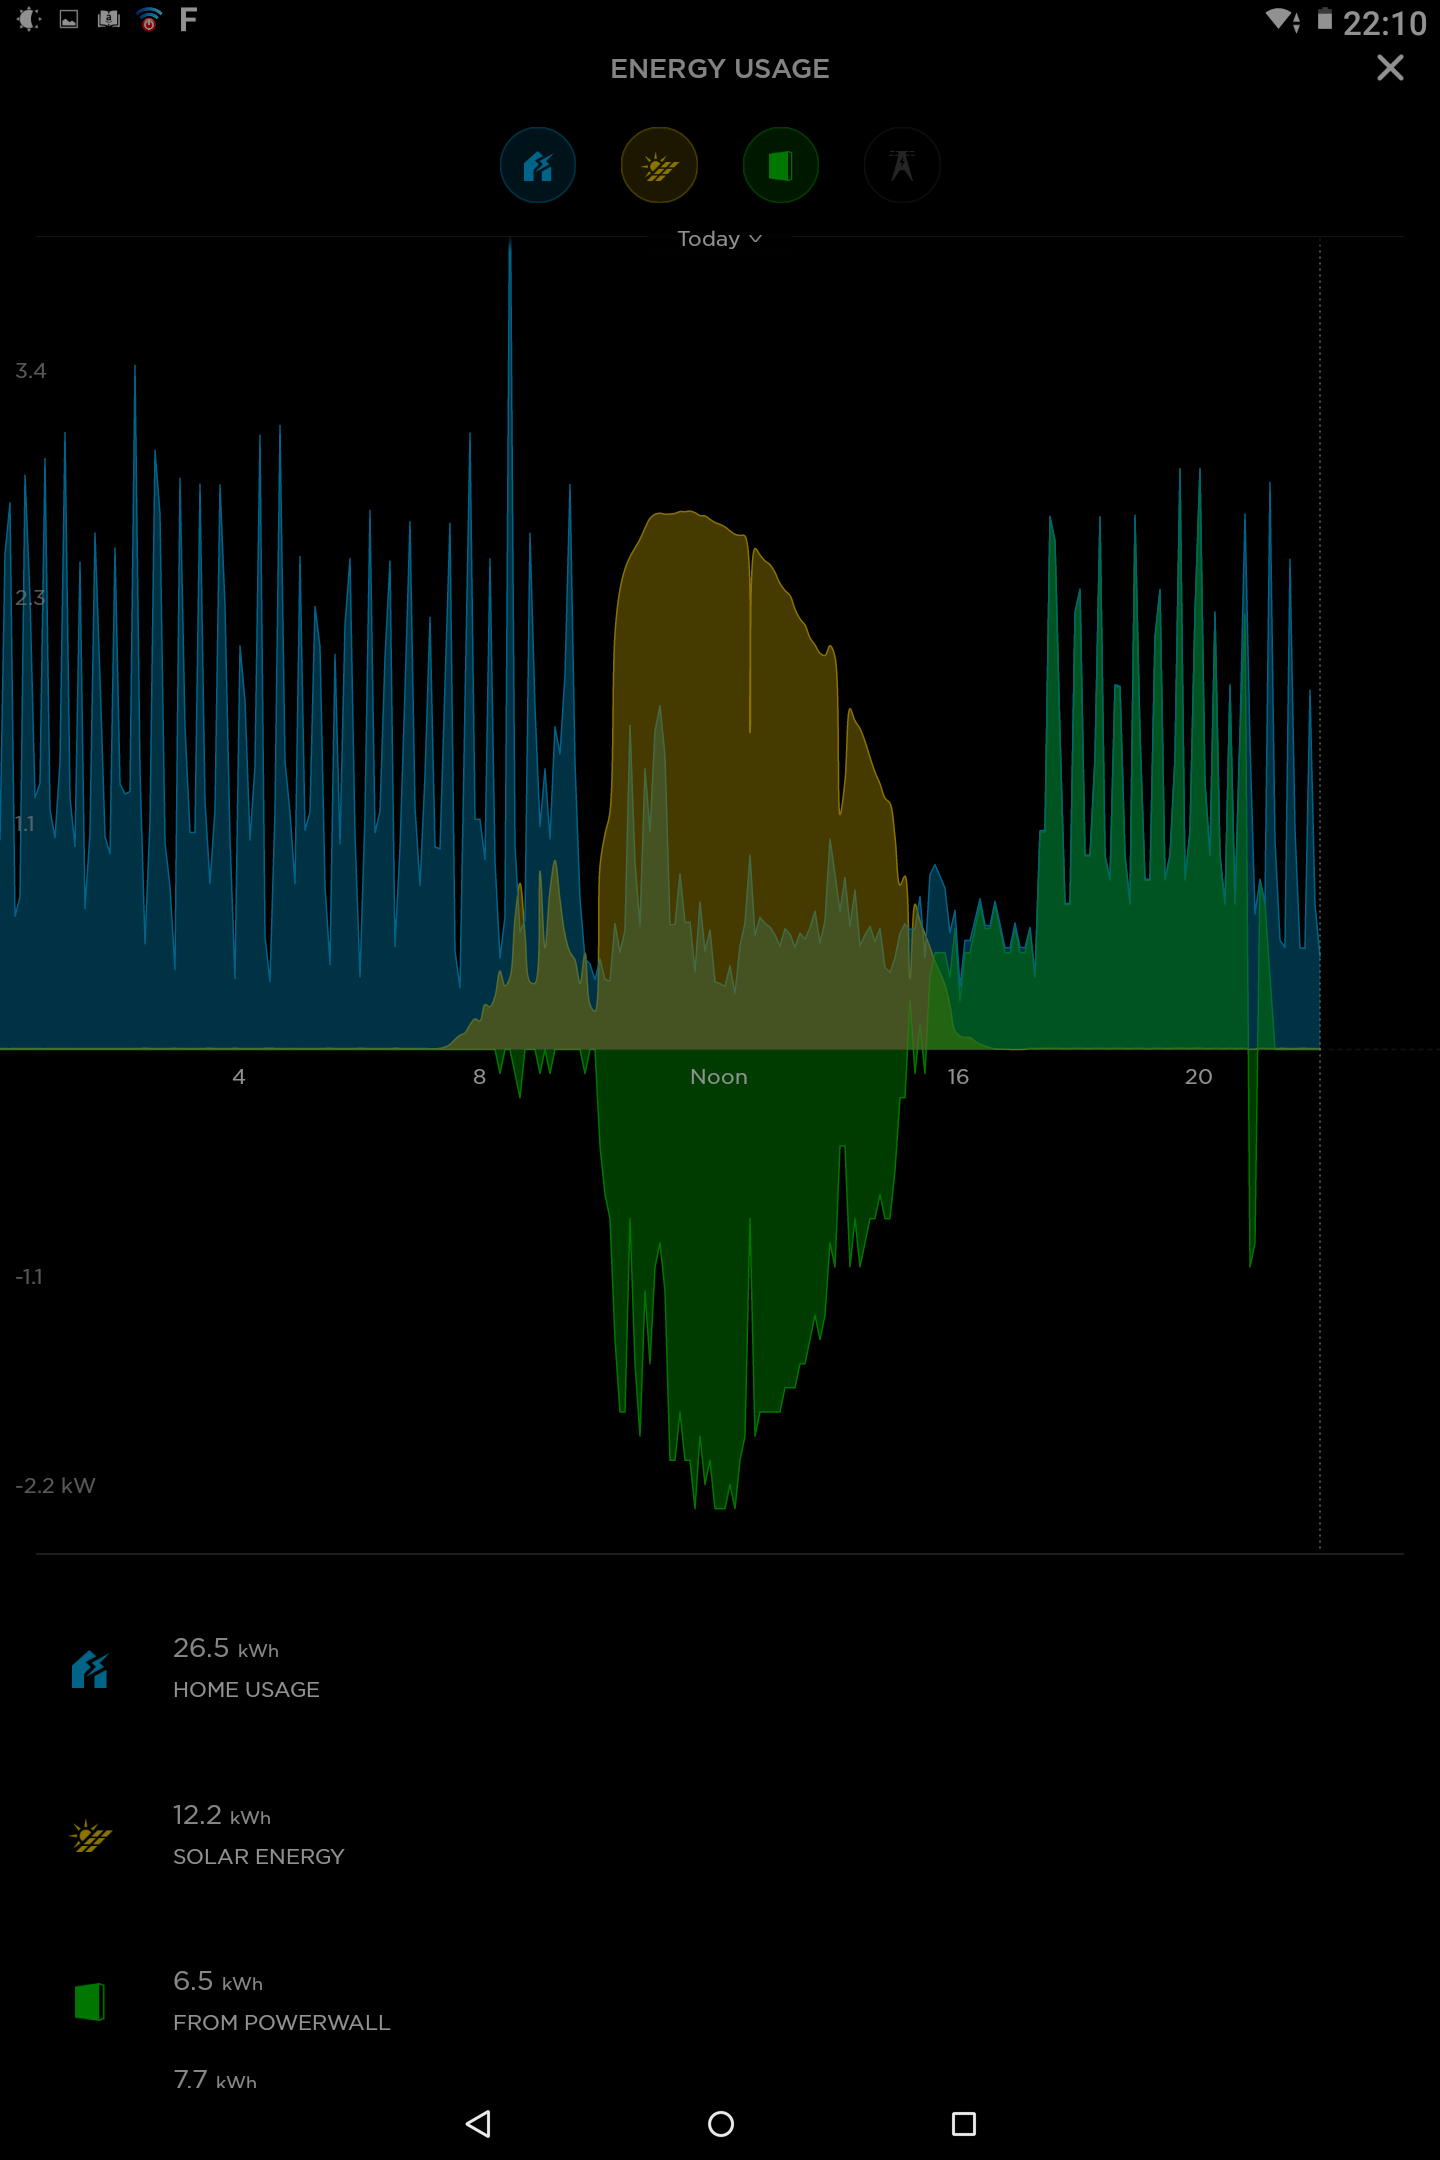
If you scroll down the graph pages, they also show you the running totals for each source/load that’s been selected at the top.
The Backup History is the last of the three homepage options, and shows when the home has been disconnected from the grid, and is running on battery alone.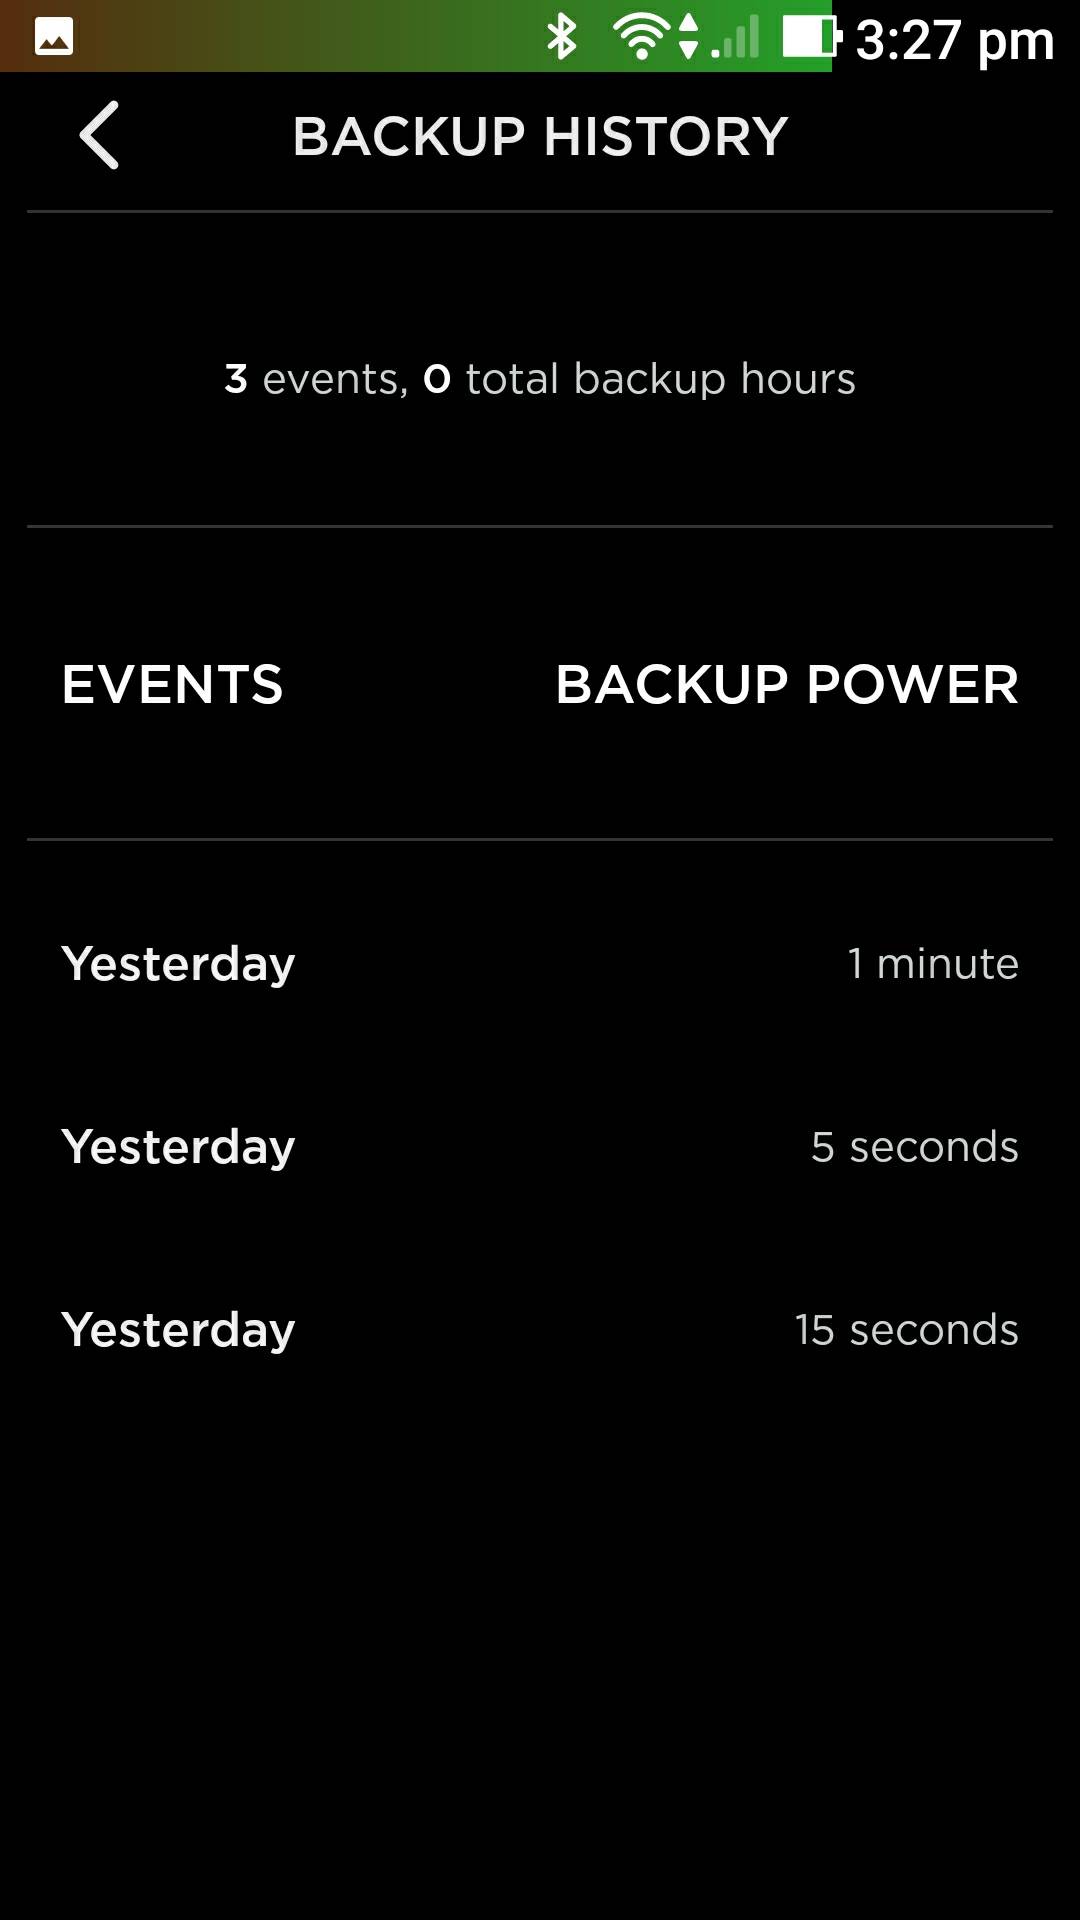
There’s one settings “gear” in the home page, which gives the app version number and enables fingerprint authentication. It’s early days yet, so I suspect they will enable more controls over time, just as they do with the Tesla cars.
Your account at the Tesla website has no usage information about the Powerwall as yet, so the app is the only way to monitor it currently. If you want extensive history for your power generation and use, I recommend using the Efergy clamps to monitor and upload to PVOutput.
No More Blackouts
Now that the PW2 is installed, I probably won’t notice a blackout has occurred, unless the neighbours knock on my front door to ask why my home has lights on when theirs don’t work. I’ll point to the Powerwall, and invite them in to watch Game of Thrones until the power comes back on at their place….
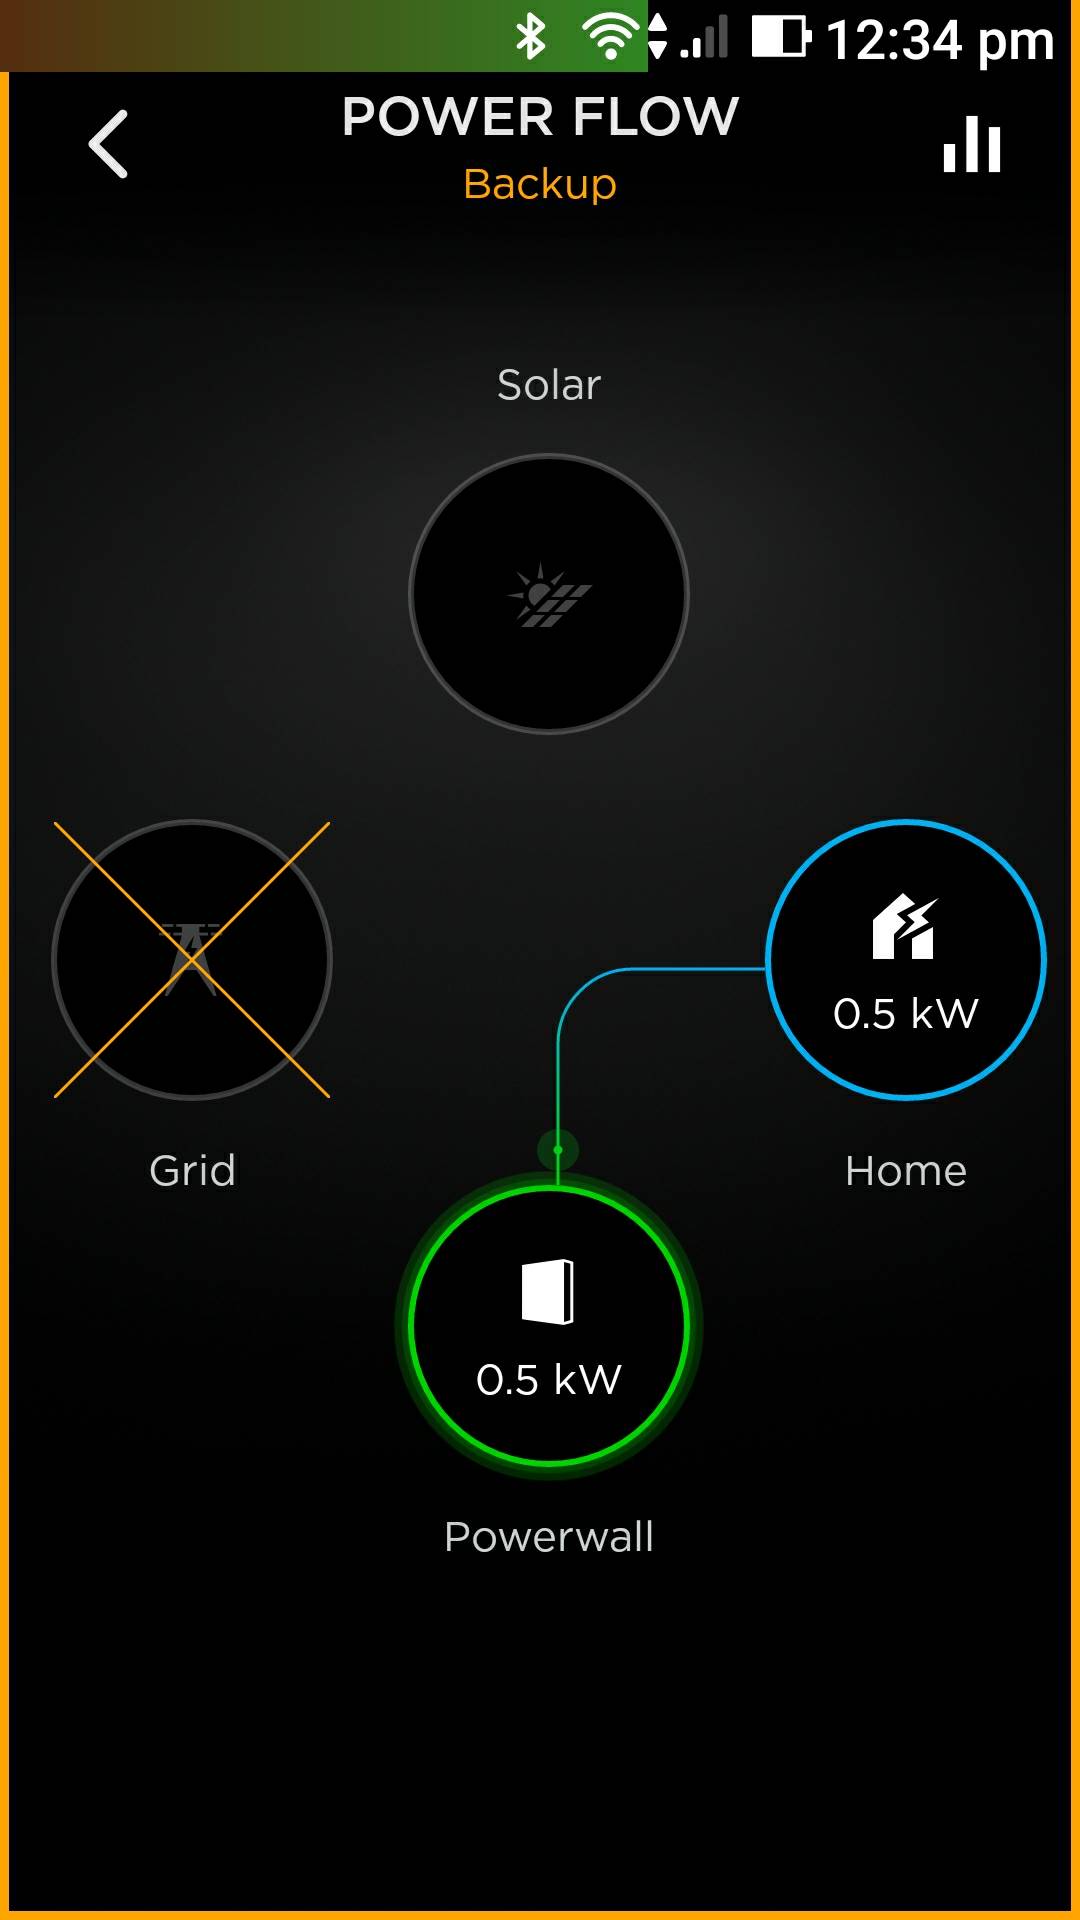
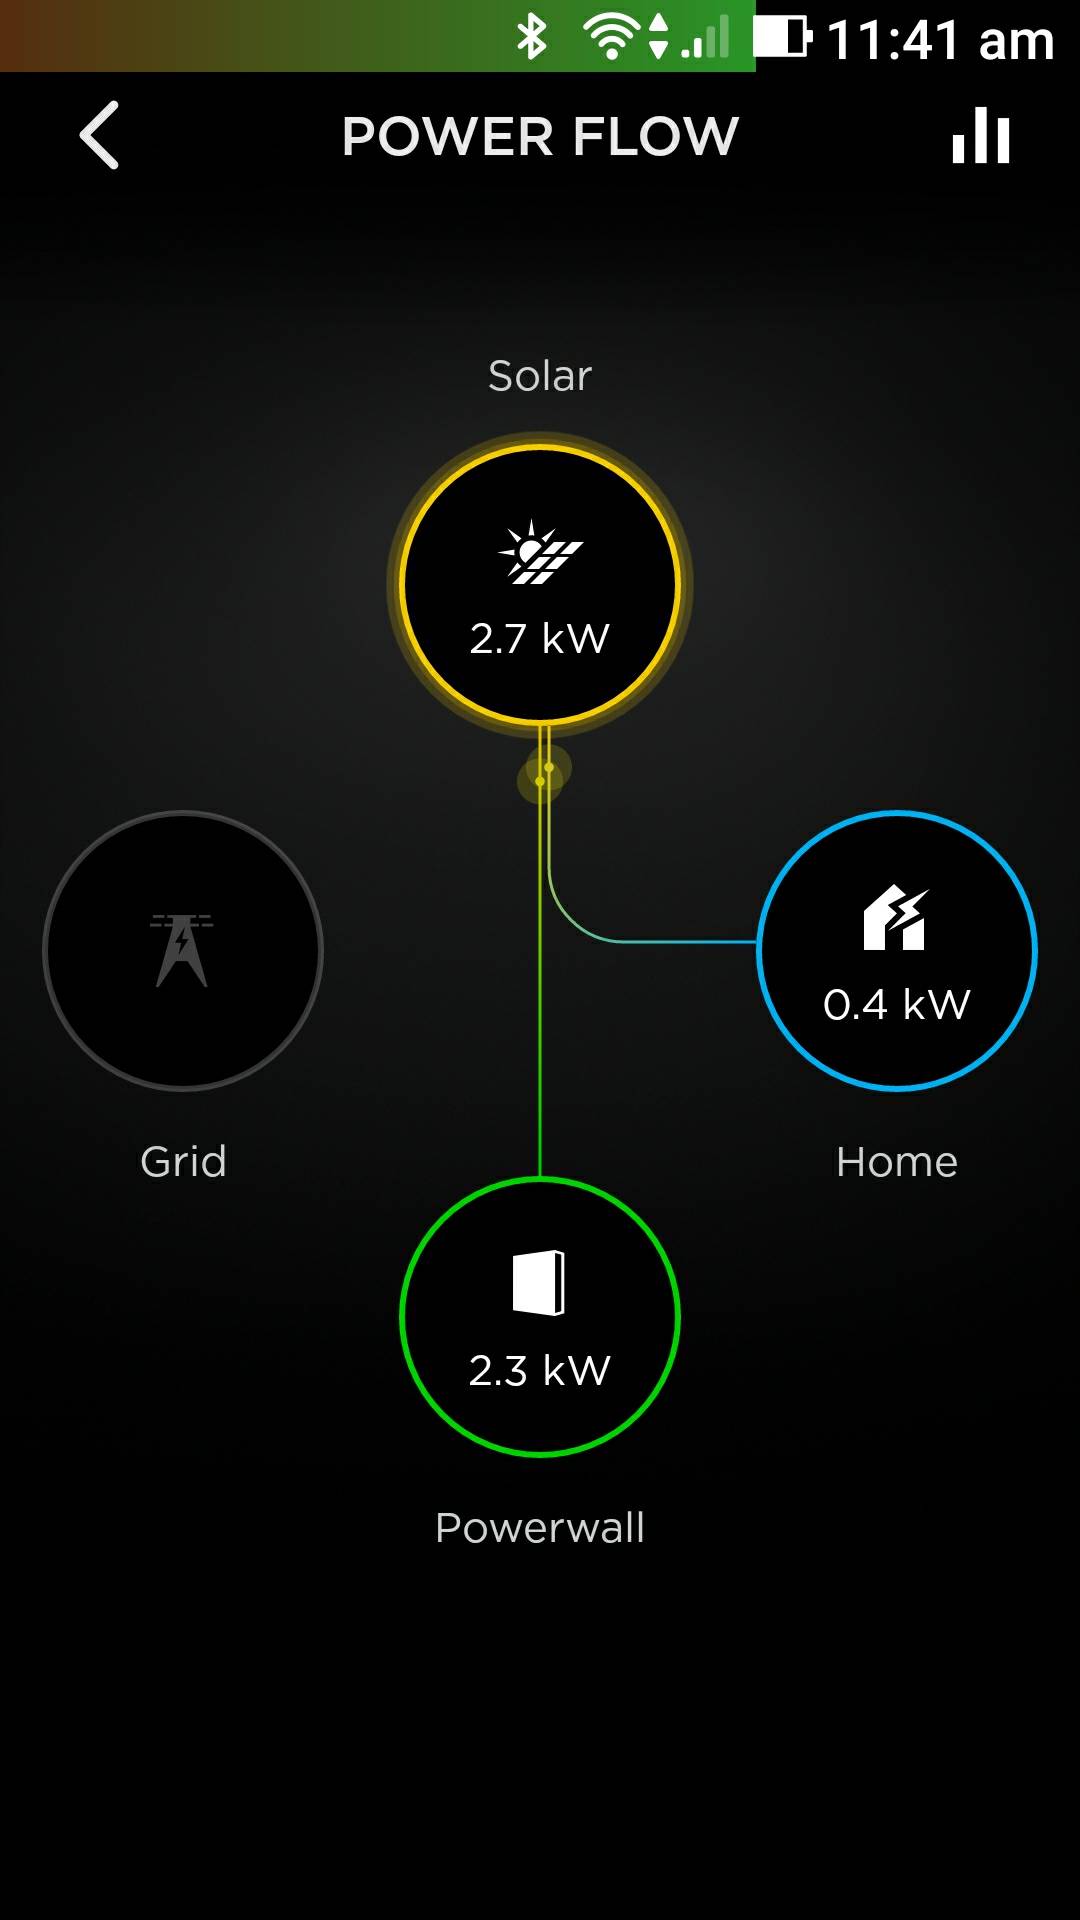
This is what the app looks like when the grid goes down. It had also been showing solar generation with power flows to the home and battery, but that disappeared right as I took this screenshot. The app has a lag of 5 seconds to real-time, and it did show the PW2 both charging and discharging, as well as the solar array still generating.
I was asked in several forums to find out what happens to the solar array during a blackout. The solar array was producing 2.7Kw (500w to home, 2.2Kw to charge the PW2) at the time I shut off the grid, and the inverter didn’t seem to notice the grid disconnect, as it kept on producing power. Prior to the PW2 install, it would always shut off on grid failure, so no power would be available in the home, even when the sun was shining. Now, if the power fails during the day, the solar system still keeps everything running, as far as I can tell.
The installer can define the level of battery power capacity to keep in reserve in case of blackouts, so the battery is never allowed to discharge to a nearly-empty state – I left it at 5%, as we don’t tend to get many blackouts in the winter. The PW2’s setup site (accessed through the Wifi AP directly) allows the installer to specify this, so when you have a higher chance of a blackout (in the middle of summer, a hot day with lots of aircons on at night in my street will overload the substation and melt it’s breakers), you can bump up the “saved” percentage to a higher amount, and the PW2 will discharge down to this level only, and then switch back to mains, saving the stated percentage of power to use only if there is a blackout. I’ve yet to play with the AP directly, which you can, so will update when I have.
Financial Sense?
There’s lots of online debate over whether it’s worthwhile to buy PW2. I judged the PW1 would not earn it’s keep during it’s warranted lifetime, with only 6.4KWhr of storage, but at 13.5KWhr available, the PW2 makes financial sense, in addition to “Greenie” feel-good things like helping offset CO2 and coal pollution.
One way to estimate this is the “cost per KWhr for the warranted lifetime output”. Assuming 13.5KWhr/day x 365 days x 10 years = 49,275KWhr @ $10,700 cost, giving a best-case net cost to me of $0.21 per KWhr used. In my area, AGL charges $0.27 / KWhr for dirty-coal-fired power, or $0.32 /KWhr for “green-ish” power, so it looks like I’m well ahead.
Yes, some of the power that I used to export, (and would otherwise be paid $0.06 / KWhr for), now goes into charging the PW2 every day – this reduces the saving somewhat, to what appears to be break-even. However, keep in mind that the total cost for the PW2’s warranted lifetime output is a fixed figure of $10.7k, whereas AGL had an 8% power price rise in the last year, and they just announced that they’ll be demanding 16% more for NSW, and 18% more for SA customers from next month.
I judged that this trend in power price rises is unlikely to go away soon, as the power distributors are incentivised by the government to spend up big on their networks, because they are guaranteed to recoup those costs, plus a healthy markup, from us punters, by law. As such, this rise in prices will more than outweigh the “cost of finance”, and not fully utilising the 13.5KWh available from the PW2 on cloudy days.
Plus, it’s not like the PW2 will just give up the ghost in exactly 10 years – it’ll probably gently decline in output a little over time, just like the owners of Tesla cars report. In that case, the lifetime net cost of the power drops by nearly 2 cents per year in the first years after 10 years has passed, making the value even better over time. The battery cost for new PW2 units will probably go down a little each year too, but I doubt that it will be more than 10% per annum, given historic increases in battery density are 7% p.a.
Another way to value the PW2’s contribution is to see how many years of it’s power output will take to pay off it’s purchase price – or how many year’s-worth of electricity $10,700 will buy you vs the 10-year warranty term. The problem with this approach is that you can’t reliably guess how much the power price will be in the future, and assuming today’s electricity price will hold for the 10 year warranty term is under-valuing it substantially. Today’s “green-ish” power cost here is $0.32 / KWhr, but we had a 8% price rise last year, and expect 16% for the coming year.
So, assuming we stick with last year’s “just 8%” increase p.a. over the next 10 years, the median power cost for 10 years will be around $0.50 / KWhr. If you cycle 13.5KWhr per day x $0.50, you “earn” $6.75 / day, or $2,460 / year. Divide that into the cost price, and the minimum payback period for the purchase cost of the PW2 is less than 4.5 years.
You could dig further into this, and deduct cost of finance, (mortgage rate – 3.5% p.a.), which results in a $0.41 / KWhr 10-year median price ~ $2,020 / year, and it’s paid for itself in just over 5 years.
If you wanted to include the opportunity cost of the power used to charge the PW2 ($0.06 export tariff x 13.5 KWhr x 365 days), this would reduce the annual “earn” by around $300, bringing the payback-time to just over 6 years. If you expected to get less than the full storage out of it, say 10KW/hr on average (7KWhr in winter, 13.5KWhr in summer), it bumps up the payback time to 8 years. It’s warranted for 10 years, so I justify the purchase price as buying me 8 years of power in advance, with 2 or more years free power and backup protection thrown in.
The worst case scenario for this calculation method is that it would take as long as the warranty lasts to pay it off. Working that calculation above backwards, assuming a 10-year cost-of-finance-included median price of $0.41 / KWhr, you would have to use only 7KWhr from it per day (half it’s usable capacity), to pay it off over 10 years. So, any day you use more than 7KWhr from the PW2, you are in front.
The guys next door to me have $1200 / quarter power bills, for the same number of people, and a smaller home, than mine. I decided a while ago that the only way to win was to make your own power, and the PW2 helps to make use of as much of it as possible.
Is PW2 Right For You?
Do you own a solar array 3KW or greater in size that’s not getting a big feed-in tariff? Do you consume more than 15KWhr daily, and use most of your power in the evening? If so, PW2 has been designed just for you. If you live in South Australia, where our coal-fondling politicians, foreign-owned tax-dodging power monopolies, and inclement weather have all combined to conspire against you, it’s a no-brainer to get a PW2.
If you have paid-off a solar array on your home already, the PW2 is the best way to maximise the value the array still has, now that feed-in tariffs are mostly a pittance in NSW. If you have yet to install solar, the rising prices for coal-fired and gas-fired power that are the result of our crappy political situation will make it more and more attractive in the future, to be sure.
With 13.5KWhr storage capacity, the Powerwall2 can store around £2 of electricity, so running it from full to completely dead overnight will save you £2.
Whilst the poster lives in Australia and can build his business case based on filling his battery 365 days per year, that really isn’t the case in the UK, having a spare 13.5KW is only likely to happen on the very best of days, so it feels like the economics still aren’t there for us yet.
Had a Tesla Powerwall 2 installed recently. Unfortunately the Tesla installer caused a voltage fluctuation which fried the motherboard of my wife’s tablet. Tesla won’t cough up the $350 for the fix!